Wednesday, December 30, 2015

OAM Application Domain and Policy Objects

Below is a big picture that explains Oracle Access Manager OAM's Application Domain and Conceptual relationships for Policy Objects.


Application Domain:
An application domain consists of four big buckets:
Resources that need to be protected for access,
Authentication Policies that check users for valid authentication,
Authorization Policies that determine the access to those resources, and
Token Issuance Policy that defines the rules under which a token can be issued for a resource (Relying Party Partner) based on the client's identity, with the client either being a Requester Partner or an end user.

The resources you specify in Authentication, Authorization, and Token policies must be one of the resources defined under the resource bucket within the application domain.

You can have N number of resources, authentication, authorization and Token Policies specified in an application domain.


Conceptual Relationships for Policy Objects
All 1:M relationships are Optional:Required, respectively (required toward the crow's foot end), except the relationship between the Authentication module and identity store, which is optional at both ends (because the identity store association is only in the case of the Authentication modules requiring LDAP).

Identity Store and Authentication module are part of System Configuration even though they are shown here for completeness of relationships.

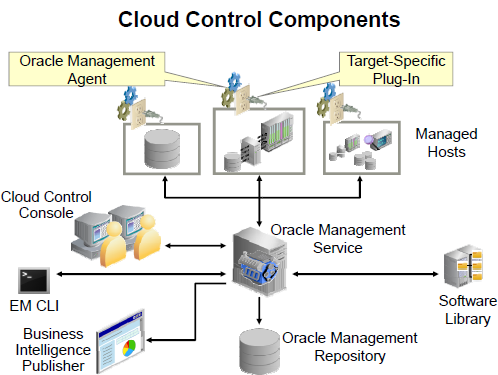
The top-level construct of the Oracle Access Manager 11g Policy model is the OAM application domain. Each application domain provides a logical container for resources (or sets of resources), and the associated authentication and authorization policies that dictate who can access specific resources.

The size and number of application domains is up to the administrator. The decision can be based on individual application resources or any other logical grouping as needed. An application doamin is automatically created during agent registration. Also, administrators can protect multiple application domains by using the same agent by manually creating the application domain and adding the resources and policies.

After a policy has been evaluated, tow standard actions are performed:
  • The result is returned.
  • The user is shown something based on that result: either the requested URL requested (on SUCCESS, allow) or the URL of a generic error page (on FAILURE, deny)
Either or both results can be overridden on a policy-by-policy basis.

Policy Responses for SSO 
Administrator-defined policy responses declare optional actions to be taken in addition to the above. Policy responses provide the ability to insert information into a session and pull it back out at any later point.
An authorization rule and conditions grant or deny access to a particular resource based on the context of the request for that resource. Authorization rules define the obligations (requirements) that must be fulfilled before responding to a client's request. Evaluation of rules determines whether the authorization policy applies to the incoming request. The appropriate obligations that effect after successful authentication.
Evaluation of the authorization policy results in one of two outcomes: SUCCESS (allow) or FAILURE (deny). If the data is insufficient to evaluate the policy, the outcome is always FAILURE. For example, if the value of a user attribute is evaluated by a rule, but the attribute is not set for that user, the outcome is FAILURE.

OAM Console URL: http://servername:7021/oamconsole


For any further queries to use Oracle Access Manager OAM to enable Single Sign On SSO for E-Business Suite application, please don't hesitate to contact me on samiappsdba@gmail.com

Tuesday, November 17, 2015

1-System Upgrade EM 12c Cloud Control 12.1.0.3 to 12.1.0.4

Before starting an upgrade to Enterprise Manager Cloud Control 12c from an earlier version of Grid Control or Cloud Control consider your starting point because this will determine which upgrade path you select.

The below picture illustrates the upgrade path from a Grid control to 12c Cloud control or from an earlier version of 12c CC to latest 12c CC.


12c to 12c Upgrade Utilities are
• Oracle Universal Installer (OUI)
– Upgrades the OMS and OMR to the latest 12c version
– Graphical or silent mode

• Could Control 12c built-in Agent Upgrade Console page
– Upgrade the agents
– Delete the old agents
– Perform other agent post-upgrade tasks

A Choice of Two Upgrade Processes are
• 1-System upgrade
– An upgrade of the current 10g or 11g Grid Control OMR and agents to Cloud Control 12c
– An upgrade of the current Cloud Control 12c OMR and agents to the latest version of 12c
• 2-System upgrade
– A migration of OMR and agents from the current 10g or 11g Grid Control to Cloud Control 12c
• Agent/OMS Oracle Management Service compatibility across versions:
– 10g and 11g agents cannot communicate with 12c OMS.
– 12c agents cannot communicate with 10g and 11g OMS.
– Both upgrade processes handle this in different ways.
– 12c agents can communicate with all 12c OMS versions.

In this article we will be focusing on the "1-system updgrade enterprise manager 12c cloud control from 12.1.0.3 to 12.1.0.4".

Steps for Cloud Control 12c 1-System Upgrade Process are
1. Ensure that the current 12c system is up to date.
• Minimum version 12.1.0.2
• Database patches
• Latest Cloud Control PSU
• DST Patches for database, OMS and Agents
2. Back up the OMR.
3. Copy emkey to the OMR.
4. Shut down the current OMS.
5. Run OUI in 1-System upgrade mode.
6. Upgrade agents using the Agent Upgrade Console.
• Central Agent first
• Other agents in your system
7. Clean up the old agents.

Below are steps to upgrade EM 12c from Release3 to Release4:

  • Check that the EM Release3 OMR Oracle Management Repository Database and it's Listener should be up and running.
  • Check that the EM Release3 OMS Oracle Management Server should be up and running.
# emctl start oms
# emctl status agent 
Oracle Enterprise Manager Cloud Control 12c Release 3
Copyright (c) 1996, 2013 Oracle Corporation. All rights
reserved.
WebTier is Up
Oracle Management Server is Up

  • Check that the Central Agent installed with the OMS should be up and running.
# /u01/app/oracle/product/agent12c/agent_inst/bin/emctl start agent
# /u01/app/oracle/product/agent12c/agent_inst/bin/emctl status agent
Oracle Enterprise Manager Cloud Control 12c Release 3
Copyright (c) 1996, 2013 Oracle Corporation. All rights
reserved.
---------------------------------------------------------------
Agent Version : 12.1.0.3.0
OMS Version : 12.1.0.3.0
Protocol Version : 12.1.0.1.0
Agent Home : /u01/app/oracle/product/agent12c/agent_inst
Agent Binaries :
/u01/app/oracle/product/agent12c/core/12.1.0.3.0
Agent Process ID : 3020
Parent Process ID : 2970
Agent URL : https://em12c.example.com:3872/emd/main/
Repository URL : https://em12c.example.com:4904/empbs/upload
Started at : 2014-04-04 10:49:35
Started by user : oracle
Last Reload : (none)
Last successful upload : 2014-04-04
11:34:39
Last attempted upload : 2014-04-04
11:34:39
Total Megabytes of XML files uploaded so far : 0.06
Number of XML files pending upload : 0
Size of XML files pending upload(MB) : 0
Available disk space on upload filesystem : 30.54%
Collection Status : Collections
enabled
Heartbeat Status : Ok
Last attempted heartbeat to OMS : 2014-04-04
11:37:31
Last successful heartbeat to OMS : 2014-04-04
11:37:31
Next scheduled heartbeat to OMS : 2014-04-04
11:38:31
---------------------------------------------------------------
Agent is Running and Ready

  • At this point, in a production system, you must back up your existing system, using your predefined backup strategy.
  • Next, apply all required patches for the database home in your environment, if your DB Software is 11.2.0.3 version of the database/OMR. Then, install the latest version of Patch
    6880880: OPatch 11.2.0.3.6 for the OMR home.
  •  Apply the generic database patch 11061801. This is a required database patch for
    database 11.2.0.3, the OMR version. While applying the database patch, Confirm the version of Perl installed and configured for the ORACLE_HOME. The version of Perl must be 5.00503 or higher, you can check the perl version using command 'perl -v'. While applying this database patch shutdown the database and OMS services and then apply using 'opatch apply' command.
  • After the database patch is applied, then start the database.
  • As a prerequisite for this upgrade, the Management Repository tables must not have
    any snapshots created. To check, log in as the sysman user and run the following
    query. It should return no rows.
# sqlplus sysman/Oracle123
SQL> select master , log_table from all_mview_logs where log_owner='SYSMAN'; 
no rows selected.

  • Now Apply the Oracle Enterprise Manager 12c Release 3 Patch Set Update 1 (12.1.0.3.2) for
    Oracle Management Service on EMRelese3
    • Save the old OPatch and apply the latest required OPatch for your OMS home
      environment (p6880880_111000_Linux-x86-64.zip). 
    • The WebLogic Administration server and the database must be up in order to apply
      this patch. Check all components’ status. Your OMS should already be down.
# emctl status oms 
Oracle Enterprise Manager Cloud Control 12c Release 3
Copyright (c) 1996, 2013 Oracle Corporation. All rights
reserved.
WebTier is Down
Oracle Management Server is Down


If the OMS shows up then stop it using 'emctl stop oms' command.
    •  Check that the WebLogic Administration server is running at this stage before applying the patch.
# ps –ef | grep ADMINSERVER
oracle 2092 2045 0 Oct26 2015 10:11:15
/u01/app/oracle/product/middleware/jdk16/jdk/bin/java -server -Xms256m -Xmx512m -XX:MaxPermSize=512m -Dweblogic.Name=EMGC_ADMINSERVER

    •  Ensure that you have the correct OMS version for this patch, it should be 12.1.0.3.0
# emctl getversion oms 


Oracle Enterprise Manager Cloud Control 12c Release 3
Copyright (c) 1996, 2013 Oracle Corporation. All rights reserved.
Enterprise Manager 12c OMS Version 12.1.0.3.0


    • Analyze your system configuration and make sure that you meet all the prerequisites for applying this Patch Set update PSU.
[p17513525]# opatchauto apply -analyze
OPatch Automation Tool
Copyright (c) 2013, Oracle Corporation. All rights reserved.
OPatchauto version : 11.1.0.10.3
OUI version : 11.1.0.11.0
Running from : /u01/app/oracle/product/middleware/oms
Log file location :
/u01/app/oracle/product/middleware/oms/cfgtoollogs/opatch/opatch2015-10-26_15-20-56PM_1.log
opatchauto log file:
/u01/app/oracle/product/middleware/oms/cfgtoollogs/opatchauto/17513525/opatch_oms_2014-05-12_15-21-01PM_analyze.log
Please enter OMS weblogic admin server
URL(t3s://em12c.example.com:7103):> <Enter>
Please enter OMS weblogic admin server username:> weblogic
Please enter OMS weblogic admin server password:> Oracle123
Configuration Validation: Success
[…]
opatchauto succeeded.

    • Apply the patch 17513525,
[p17513525]# opatchauto apply OPatch Automation Tool
Copyright (c) 2013, Oracle Corporation. All rights reserved.
OPatchauto version : 11.1.0.10.3
OUI version : 11.1.0.11.0
Running from : /u01/app/oracle/product/middleware/oms
Log file location :/u01/app/oracle/product/middleware/oms/cfgtoollogs/opatch/opatch2015-10-26_15-30-13PM_1.log
opatchauto log file:
/u01/app/oracle/product/middleware/oms/cfgtoollogs/opatchauto/17
513525/opatch_oms_2015-10-26_15-30-13PM_1_deploy.log
Please enter OMS weblogic admin server
URL(t3s://em12c.example.com:7103):> <Enter>
Please enter OMS weblogic admin server username:> weblogic
Please enter OMS weblogic admin server password:> Oracle123
Configuration Validation: Success
Running apply prerequisite checks for patch(es) "17513525" and Oracle Home
"/u01/app/oracle/product/middleware/oms"...
Please monitor OPatch log file:
/u01/app/oracle/product/middleware/oms/cfgtoollogs/opatch/17513525_Oct_26_2015
_11_01_13/ApplyPrereq2015-10-26_15-30-13PM_9.log
Patches "17513525" are successfully analyzed for Oracle Home
"/u01/app/oracle/product/middleware/oms"
To continue, OPatch will do the following:
[Patch and deploy patch(es) binaries] : Apply patch(es) [ 17513525 ] to
Oracle Home "/u01/app/oracle/product/middleware/oms";
Apply RCU artifact with patch
"/u01/app/oracle/product/middleware/oms/.patch_storage/17513525_Jan_13_2014_07
_45_01/original_patch";
Register MRS artifact "swlib";
Register MRS artifact "procedures"
Do you want to proceed? [y|n] y
User Responded with: Y
y
Applying patch "17513525" to Oracle Home
"/u01/app/oracle/product/middleware/oms"...
Please monitor OPatch log file:
/u01/app/oracle/product/middleware/oms/cfgtoollogs/opatch/17513525_Oct_26_2015
_11_01_13/apply2015-10-26_15-30-13PM_11.log


  • Start the OMS to ensure that the patch was applied successfully. You may log in and confirm that your system is working as expected.
# emctl start oms
  • Copy the emkey from the existing OMS to the existing Management Repository
 # emctl config emkey -copy_to_repos -sysman_pwd Oracle123
Oracle Enterprise Manager Cloud Control 12c Release 3
Copyright (c) 1996, 2013 Oracle Corporation. All rights reserved.
The EMKey has been copied to the Management Repository. This operation will cause the EMKey to become unsecure.
After the required operation has been completed, secure the EMKey by running "emctl config emkey -remove_from_repos".


  • Check the emkey's status 
 #emctl status emkey -sysman_pwd Oracle123
Oracle Enterprise Manager Cloud Control 12c Release 3
Copyright (c) 1996, 2013 Oracle Corporation. All rights reserved.
Enter Enterprise Manager Root (SYSMAN) Password :
The EMKey is configured properly, but is not secure. Secure the EMKey by running "emctl config emkey -remove_from_repos".

  • Now stop the OMS that you are about to upgrade to Enterprise Manager Cloud Control 12c R4,
    your primary and only OMS
# emctl stop oms –all
Note that if you are running a JVMD or ADP engine you must stop them explicitly. For example:
# emctl extended oms jvmd stop -all
# emctl extended oms adp stop –all

  • Shut down the central Management Agent. Even though this agent is not yet being upgraded, it must be stopped because it monitors the management repository that is being upgraded.
# /u01/app/oracle/product/agent12c/agent_inst/bin/emctl stop agent

  • In a production environment, prior to upgrading you should back up the OMS (the middleware home and the inventory), the Management Repository, and the Software Library so that you can always restore your system to a known state. You can upgrade the OMS and the Management Repository in graphical or silent mode. You can also choose to install the software binaries at one point and upgrade them later in graphical or silent mode. Here we will perform an upgrade in graphical mode.
    • If you have additional non-default plug-ins that you want to upgrade during this
      upgrade process, download them from http://www.oracle.com/technetwork/oem/grid-control/downloads/oemupgrade-console-502238.html and place them in a known location. Then run the installer as: runInstaller -pluginLocation <absolute_path_to_plugin_software_location>
    • Launch the Oracle Universal Installer
# /stage/emcc12104/runInstaller & 


    •  The Enterprise manager console URL remains the same after an upgrade.
      − Connect to https://em12c.example.com:7803/em
    • − Accept the security certificate exception.
      − Log in as sysman/Oracle123.
      − Review the default Accessibility Preferences.
      − Click Save and Continue.
      Note the status of all targets. Remember that the central agent or other agents have yet to be upgraded; therefore, most targets will be in status “unknown.” 
  • Upgrade the management agents
    • First, you must upgrade the central agent installed with the old OMS. The agents to be
      upgraded must be up and running and secure. You stopped the central agent for the
      repository upgrade, and you must now restart it
# /u01/app/oracle/product/agent12c/agent_inst/bin/emctl start agent 
# /u01/app/oracle/product/agent12c/agent_inst/bin/emctl status agent
 Oracle Enterprise Manager Cloud Control 12c Release 3
Copyright (c) 1996, 2013 Oracle Corporation. All rights
reserved.
---------------------------------------------------------------
Agent Version : 12.1.0.3.0
OMS Version : 12.1.0.4.0
Protocol Version : 12.1.0.1.0
Agent Home : /u01/app/oracle/product/agent12c/agent_inst

Agent Binaries :
/u01/app/oracle/product/agent12c/core/12.1.0.3.0
Agent Process ID : 20594
Parent Process ID : 20546
Agent URL : https://em12c.example.com:3872/emd/main/
Repository URL : https://em12c.example.com:4904/empbs/upload
Started at : 2014-04-08 20:21:18
Started by user : oracle
Last Reload : (none)
Last successful upload : (none)
Last attempted upload : 2014-04-08
20:21:48
Total Megabytes of XML files uploaded so far : 0
Number of XML files pending upload : 18
Size of XML files pending upload(MB) : 0.02
Available disk space on upload filesystem : 23.04%
Collection Status : Collections
enabled
Heartbeat Status : Ok
Last attempted heartbeat to OMS : 2014-04-08
20:21:38
Last successful heartbeat to OMS : 2014-04-08
20:21:38
Next scheduled heartbeat to OMS : 2014-04-08
20:22:48
---------------------------------------------------------------
Agent is Running and Ready

Note the Agent URL points to https, indicating that the agent is secure
    •  In the EM Console, navigate to Setup > Manage Cloud Control > Upgrade Agents. This leads you to the Agent Upgrade Console (AUG).
    • Under Job Name, maintain the default name. Click Add to select the agents
    • Use the top left cell in the Agents table, or use Ctrl-Click (multi-select) to select the
      em12c.example.com:3872 and host01.example.com:3872 agents, and click
      OK
    • Select to Override Privileged Credentials and use the green plus to create new
      credentials. Enter the following values: username/password= root/password, RunPrivilege=none, SaveAs=NC_HOST_ROOT 
    • Click OK to return to the Upgrade Agents screen, and select your new credentials.
    • Skip the Additional Inputs field and click Submit. Click OK if a warning dialog box is presented, and then monitor the upgrade and make sure that all steps are successful. From the top left menu navigate to the Agent Upgrade Results and confirm that the
      agent upgrade was a success.
    • To save disk space you may delete the old agents.
    • Other recommended post-upgrade tasks are Delete old OMS home (in graphical or silent modes, using OUI), Set up the command-line interface, EM CLI, Set up automatic startup of the OMS and agent on the host, if not already set up, Apply custom third-party security certificates, Apply patches released after the release that you are upgrading to and Periodic Self-Update review and downloads.
Hence following all the above steps you will be able to do EM 12c CC Upgrade from Release3 to Release4, the process so termed by Oracle as "1-system upgrade EM 12c Cloud Control 12.1.0.3 to 12.1.0.4".

For any further queries, technical assistance and support on such upgrades, please don't hesitate to contact me on samiappsdba@gmail.com

Monday, November 16, 2015

Installing Oracle Enterprise Manager 12c Cloud Control

Oracle Enterprise Manager Cloud Control 12c helps to manage your IT enterprise at all levels.

Oracle Enterprise Manager Cloud Control 12c has been built around 10 major themes. Some of the key aspects of each theme are:

Enterprise-Ready Framework: Plug-in-based management of targets, user interface redesign, named credentials
Cloud Management: OVM server and server pool management, cloud topology viewer
Chargeback and Capacity Planning: Charge back based on selected target types, reporting on usage and trends
Exadata and Exalogic Management: InfiniBand monitoring, real-time and historical system views
Configuration Management: Configuration tracking, comparisons, compliance checking
Provisioning and Patching: Separation of provisioning design and execution, selfupdate, mass database patching
Application Quality Management: Application replay, real application testing, data masking
Database Management: Database creation and upgrade via Cloud Control
Middleware Management: Improved discovery, monitoring, provisioning, diagnostics
Applications Management: Fusion Applications management improvements


Step by Step Installing EM 12c Cloud Control in a Single-Server Topology

Before starting the EM 12c installation, create a database as a repository.
Preconfigured management repositories are offered by Oracle in the form of database templates and are available for download from the Oracle Technology Network (OTN).

# unzip 11.2.0.3_Database_Template_for_EM12_1_0_4_Linux_x64.zip –d $ORACLE_HOME/assistants/dbca/templates

Start DBCA.

# dbca

Select “Create a Database” and click Next.

Select the “11.2.0.3 Database Template for EM12.1.0.4 Small Deployment” template and click Next.

Enter the following values,
Global Database Name = em12rep.example.com
SID = em12rep

Uncheck the option to “Configure Enterprise Manager”. Deselecting this option will prevent the Database Control (part of the 11g database distribution) from being configured.

When complete, you will see the Database creation complete page. Click Exit.

Database and Listener should be up and running to start with the below 12c EM Cloud Control installation.

Typically, hardware and software requirements are checked ahead of time based on the installation documentation. Before starting the installation, it is recommended that you run the installer prerequisite check to verify the host’s suitability for this installation. Run the runInstaller utility with the following parameters to give yourself an opportunity to fix any parameters that may need to be adjusted. In your environment, all parameters have been set to the required values, and the output will reflect that fact.

# cd /emstage/emcc12104/
# ./runInstaller -executeSysPrereqs

Starting Oracle Universal Installer...
Checking Temp space: must be greater than 400 MB. Actual 4593 MB Passed
Checking swap space: must be greater than 150 MB. Actual 8306 MB Passed
Checking monitor: must be configured to display at least 256 colors. Actual 16777216 Passed
Exiting Oracle Universal Installer, log for this session can be
found at /u01/app/oraInventory/logs/installActions25_Oct_2015.log


Note: DO NOT run the EM Prerequisite Kit (emprereqkit) on an installation with a preconfigured database.

At this point you may download any additional plug-ins required for your system but not included in the default distribution. If additional plug-ins were needed, then check the following location for more plug-ins:

http://www.oracle.com/technetwork/oem/extensions/index.html

Then you would run the installer:

# runInstaller -pluginLocation <absolute_path_to_plugin_software_location>


# ./runInstaller


As root user from another terminal execute allroot.sh script.
# ./u01/app/oracle/product/middleware/oms/allroot.sh


On the Finish page, take note of the Cloud Control URL:
Enterprise Manager Cloud Control URL: https://em12.example.com:7802/em
Admin Server URL: https://em12.example.com:7102/console
Click Close to close the installer

Now log in to Cloud Control Console as the SYSMAN user.

To View all the targets managed by Enterprise Manager Cloud Control 12c installation.
Navigate to Targets > All Targets

Navigate to Setup > Extensibility > Self Update
To check updates on Cloud Control components such as plug-ins and new agents. By default, the
connection mode is Online and you would be able to Check Updates on a regular basis. If you select the Offline connection mode, you must perform separate metadata downloads to a known location, transfer these files to the OMS host, and then upload them to your system.

Enterprise Manager startup sequence:
1. OMR Oracle Management Repository listener and database instance
2. OMS Oracle Management Service
3. Agent on OMS server

Enterprise Manager shutdown sequence, is in the reverse order.
1. Agent on OMS Server
2. OMS
3. OMR Listener and database instance

Start, stop, and check the status of the OMS with emctl
$ORACLE_HOME/bin/emctl start oms
$ORACLE_HOME/bin/emctl stop oms [-all][-force]
$ORACLE_HOME/bin/emctl status oms [-details]
Start, stop, and check the status of an agent with emctl
$AGENT_INST_HOME/bin/emctl start|stop|status agent

OMS Oracle Management Service Log Files
Log files for the OMS are primarily in the following locations:
gc_inst/em/EMGC_OMS1/sysman/log
gc_inst/user_projects/domains/GCDomain/servers/EMGC_OMS1/sysman/log
gc_inst/user_projects/domains/GCDomain/servers/EMGC_OMS1/logs

Agent Log Files
Log files for the central agent (the agent installed on the OMS server) are in this location:
<agent_base_directory>/agent_inst/sysman/log

I hope this article helps you to understand the steps involved in installing Oracle EM 12c Cloud Control. 
Please subscribe to this blog and for any further queries please don't hesitate to contact me on samiappsdba@gmail.com

Saturday, October 24, 2015

Monitoring & Tuning JRockit JVM for Weblogic Server

The Oracle JRockit JVM is the industry's highest performing Java Virtual Machine now built into Oracle Fusion Middleware. It is a high performance JVM developed to ensure reliability, scalability, manageability, and flexibility for Java applications. The JRockit JVM delivers a new level of performance for Java applications deployed on Intel 32-bit (Xeon) and 64-bit (Xeon, Itanium, and SPARC) architectures at significantly lower costs to the enterprise.

The JRockit JVM makes it possible to gain optimal performance for your Java applications when running it on either the Windows or Linux operating platforms on either 32-bit or 64-bit architectures.

The JRockit JVM is especially well suited for running Oracle WebLogic Server.

JRockit Management Tools - Two main monitoring and administrative toolsets are provided with JRockit

You can use JRockit mission control 'jrmc' or command line utility 'jrcmd' to dynamically adjust heap size in a running instance.

Both toolset executables are located in the bin subfolder of the JRockit.

1. JRockit Command line interface ('jrcmd')

If no options are specified, jrcmd lists all the JRockit instances running on the local machine. If '0' is specified as the pid, the commands are sent to all JRockit processes.

# jrcmd [PID] <command>

To list the Ctrl-Break handlers that are available in a certain JRockit, use the help command,

# jrcmd <PID> help

Using jrcmd, you can execute many dynamic commands on a running JRockit JVM. For example, if JRockit was started without enabling the management server then by using the -Xmanagement option, it can be enabled without restarting the VM by using the jrcmd utility,

# jrcmd 2480 start_management_server
# jrcmd 2480 kill_management_server

2. JRockit Mission Control GUI ('jrmc')

JRockit Discovery Protocol (JDP) is based on multicast and enables the Mission Control to connect and manage JRockit JVMs. JRockit mission control is a group of management and monitoring tools like,
  • 'JRockit Managment Consle' is a JMX Compliant monitoring tool.
  • 'JFR JRockit Flight Recorder' records and helps you analyze the JVM and running application.
    Flight recorder can also be run using the command line using below command,

# jrcmd <pid> FlightRecorder <options>
<options> like filename, recordingtime, nomethodssampling, nogcsampling, methodtraces, nozip, sampletime, nativesamples.
  • 'JRockit Memory Leak Detector' detects and finds the cause for memory leaks.

JRockit Generational Heap
In the case of a two-generational garbage collector, objects are allocated in the young generation and eventually moved to the old generation if they are alive.
In a single-generation garbage collection, the heap is treated as a single contiguous space and there is no notion of nursery.
When a two-generational garbage collector is used, all thread-local areas (used for allocation of small objects) are allocated in the nursery, whereas large objects are allocated in the old space.


The below command starts the JVM with a heap of 800MB, allowing it to grow up to 1000MB. The garbage collection is set to optimize for pause times, and the nursery size is set to 200MB.

# java -Xms:800m -Xmx:1000m -Xns:200m -Xgc:pausetime -XpauseTarget:250ms MyTransactionApp


JVM management using Weblogic Administration Console


A sample script to start a managed server with custom JVM settings:

# exprot JAVA_VENDOR="Oracle"
# export USER_MEM_ARGS="-Xms512m -Xmx1g"
# $DOMAIN_HOME/bin/startManagedWebLogic.sh
You can also use JRockit mission control 'jrmc' or command line utility 'jrcmd' to dynamically adjust heap size in a running instance.

Heap Fragements: Repeated allocation and freeing of memory may cause pockets of small and dispersed memory.

Concurrent Collection: Frequent full garbage collection can lead to unacceptable pausingof application processing. The concurrent garbage collection strategy enables garbage collection to be run in the background without stopping all the application threads. Note that if the CPU Usage of the machine is over 80% then concurrent GC threads may not be able to work properly.

Pausing to compact: Heap compaction reduces fragmentation. Compaction requires Java threads to be paused. Pause duration depends on the number of fragments that need to be compacted.


WLS Administration Console Initiated Garbage collection:
Login to WLS console > servers > managed server > Monitoring > Performance Tab


Detecting low memory conditions using WLS console

We can configure the WLS to automatically detect low memory conditions. When low memory is detected then WLS will logs the condition and changes the server health's state to "Warning."

The average free memroy of different samples during  a cofigured time interval is compared with the average of the next time interval, and if the difference drops by a configured value, this condition is also logged and the health state of the server changes to "Warning."

Login to WLS console > servers > managed server > Monitoring > Performance Tab


For any queries on this topic don't hesitate to contact me on samiappsdba@gmail.com
 
Bibliography:
http://docs.oracle.com/cd/E13150_01/jrockit_jvm/jrockit/geninfo/diagnos
http://docs.oracle.com/cd/E13150_01/jrockit_jvm/jrockit/geninfo/pdf/diagnos.pdf
http://www.oracle.com/technetwork/middleware/jrockit/overview/index.html

An interesting article, An overview to Creating usable JVM Languages can be found in below link,

https://www.toptal.com/software/creating-jvm-languages-an-overview 

Also go through the blog that covers a variety of topics, across many programming languages and dev/design.

https://www.toptal.com/blog

Sunday, September 6, 2015

Configure Weblogic 12c 12.1.3 for ADF deployments

Below is the step-by-step process for creating a deployment environment for Application Development Framework (ADF) applications. Included are steps to install weblogic 12c server, creating a managed server and applying the Java Runtime Files (JRF) for the ADF.

Following softwares are required for this setup, WebLogic Server 12c (12.1.3.0.0), Fusion Middleware Infrastrucuture, Application Development Runtime (ADR) 12.1.3.0.0, JDK7 and JDeveloper 11g.

Download the below specific softwares from OTN site,


fmw_12.13.0.0_wls.jar 
wls1213_dev_update3.zip
fmw_ADR_12.1.3.0.0_infrastructure_Disk1_1of1.zip
jdk-7u80-linux-x64.tar.gz


Download 12c weblogic
http://www.oracle.com/technetwork/middleware/fusion-middleware/downloads/index.html


Download JDK 1.7
http://www.oracle.com/technetwork/java/javase/downloads/java-archive-downloads-javase7-521261.html#jre-7u80-oth-JPR


Download Application Development Runtime (ADR)
http://www.oracle.com/technetwork/developer-tools/adf/downloads/index.html

Pre-requisite on Linux 64bit OS

vi /etc/security/limits.conf

fmwadf   soft    nproc   2047
fmwadf   hard    nproc   16384
fmwadf   soft    nofile  4096
fmwadf   hard    nofile  65536
fmwadf   soft    stack   10240

useradd fmwadf
usermod -u 504 -g dba -G dba,oinstall fmwadf
passwd fmwadf

Install WebLogic Server

# which java
/u03/oracle/mwadf/jdk1.7.0_80/bin/java

# java -jar fmw_12.1.3.0.0.wls.jar


Install Application Development Runtime (ADR)

The Application Development Runtime (ADR) is used to extend a Java EE server (WebLogic or WebSphere) with the ADF Runtime libraries. This prepares the server to accept the deployment of ADF based applications and hence the running of said applications.

Download and install ADR 12c.
Download software from
http://www.oracle.com/technetwork/developer-tools/adf/downloads/index.html


# chmod -R 777 fmw_12.1.3.0.0_infrastructure.jar
# which java
/u03/oracle/jdk1.7.0.80/bin/java

# java -jar fmw_12.1.3.0.0_infrastructure.jar

At the end of the installation an 'em' enterprise manager directory gets created in the MW_HOME directory /u03/oracle/mwadf/em


CREATE NEW DATABASE 'REPODB' 


Create a new repository database (11g or 12c) that will host the repository schemas,


·         Metadata Services (MDS)
·         Audit Services (IAU)
·         Audit Services Append (IAU_APPEND)
·         Audit Services Viewer (IAU_VIEWER)
·         Oracle Platform Security Services (OPSS)
·         User Messaging Service (UMS)
·         WebLogic Services (WLS)
·         Call Control (UCSCC)
·         Service Table (STB)

Note: The database should character set of AL32UTF8, and National Character Set of AL16UTF16 Unicode UTF16. 

Configure the Listener and register the database service "repodb.oracle.com".


CREATE NEW RCU SCHEMAS USING  RCU 12.1.3 UTILITY


From 12c, RCU utility comes with the Infrastructure software that was installed in the previous step.

RCU will create the following schemas in the database.

Metadata Services (MDS)
Audit Services (IAU)
Audit Services Append (IAU_APPEND)
Audit Services Viewer (IAU_VIEWER)
Oracle Platform Security Services (OPSS)
User Messaging Service (UMS)
WebLogic Services (WLS)
Call Control (UCSCC)
Service Table (STB)


# su - fmwadf
# cd /u03/oracle/mwadf/bin
# which java
/u03/oracle/jdk1.7.0_80/bin/java
# export JAVA_HOME=/u03/oracle/jdk1.7.0_80
# ./rcu


Create WebLogic Domain and Managed Server for ADF

export MW_HOME=/u03/oracle/mwadf
export WL_HOME=$MW_HOME/wlserver
export ORACLE_HOME=$MW_HOME
export DOMAIN_HOME=$MW_HOME/user_projects/domains/adf_domain
export JAVA_HOME=$MW_HOME/jdk1.7.0_80
export PATH=$ORACLE_HOME/OPatch:$JAVA_HOME/bin:$PATH:/u03/oracle/mwoam/modules/org.apache.ant_1.7.1/bin:.

# cd /u03/oracle/mwadf/wlserver/common/bin
# ./config.sh


Port Pool = 10


Node Manager Listen Port set from 5556 to 5566.


On the "Assign Servers to Machines" screen, select a machine in the right pane, only ADFMachine in this case, and then select the ADFServer in the left pane and shuttle it to the right. This assign the ADFServer to the ADFMachine for purposes of management. Select Next to continue.


Apply Java Runtime Files (JRF) Template to the Managed Server

Now that the ADFServer has been started, the reader will need to apply the JRF  Template to the Managed Server in order to deploy and run their ADF applications on the server. In an earlier step, the ADR libraries (required libraries to run an ADF application on WebLogic or WebSphere) were installed and the Managed Server was created. When the  JRF Template is applied to the Managed Server, the ADR libraries ared added to that server in order to run ADF based applications. This can also be done via command line invocation or through Oracle Enterprise Manager as demonstrated here.

Launch a web browser and enter the url for Enterprise Manager:
http://ed-olraclin.oracle.com:7011/em. If a different port for the AdminServer has been used, then simply replace it with the one supplied here. This also applies to the host name. Use the same credentials (uid/pwd) here that was used during creation of the adf_domain earlier. These credentials are also the same as used to login to the Administration Server.

Click on ‘APPLY JRF TEMPLATE’


Create boot.properties file for auto login.

Create boot.properties file in /u03/oracle/mwadf/user_projects/domains/adf_domain/servers/AdminServer/security/boot.properties

Then restart the admin and managed servers.

URLs & Ports

http://ed-olraclin:7011/console
http://ed-olraclin:7011/em
ADFServer Server Listen port : 7013
Node manager listen port 5566

START NODE MANAGER FOR ADFServer

su - fmwadf
export MW_HOME=/u03/oracle/mwadf
export WL_HOME=$MW_HOME/wlserver
export ORACLE_HOME=$MW_HOME
export DOMAIN_HOME=$MW_HOME/user_projects/domains/adf_domain
export JAVA_HOME=$MW_HOME/jdk1.7.0_80
export PATH=$ORACLE_HOME/OPatch:$JAVA_HOME/bin:$PATH:/u03/oracle/mwoam/modules/org.apache.ant_1.7.1/bin:.


From 12c version of Weblogic, Node manager should be started from Domain_home/bin directory i.e from adf_domain/bin directory itself.

cd /u03/oracle/mwadf/user_projects/domains/adf_domain/bin
nohup ./startNodeManager.sh &
tail -f nohup.out

cd /u03/oracle/mwadf/user_projects/domains/adf_domain/bin
nohup ./startWebLogic.sh &

Bibliography
http://www.oracle.com/webfolder/technetwork/jdeveloper/howto/11114/managedserver/wlsadfms.html


For any further queries please don't hesitate to contact me on samiora@gmail.com