ACFS is NOT yet certified to be used for Oracle E-Business Suite application files.
https://blogs.oracle.com/stevenchan/choosing-a-shared-file-system-for-oracle-e-business-suite
OCFS2 is certified for EBS 12.2 application files.
https://blogs.oracle.com/stevenchan/ocfs2-certified-with-ebs-122-shared-file-system-configurations
https://blogs.oracle.com/stevenchan/choosing-a-shared-file-system-for-oracle-e-business-suite
OCFS2 is certified for EBS 12.2 application files.
https://blogs.oracle.com/stevenchan/ocfs2-certified-with-ebs-122-shared-file-system-configurations
This article describes three ways to create an ASM Cluster File System (ACFS)
in an Oracle 11G Release 2 RAC database. It is assumed that that RAC database
is already present.
Oracle ASM Cluster File System (ACFS) is a general purpose cluster file system implemented as part of ASM. It can be used to store almost anything, including the database executables. The only things that should not be stored in ACFS are the Grid Infrastructure home and any Oracle files that can be directly stored in Oracle ASM.
Oracle ASM Cluster File System (ACFS) is a general purpose cluster file system implemented as part of ASM. It can be used to store almost anything, including the database executables. The only things that should not be stored in ACFS are the Grid Infrastructure home and any Oracle files that can be directly stored in Oracle ASM.
ASM Configuration Assistant (ASMCA)
As the "oracle" user, switch to the ASM environment on node 1 of the RAC, then we start the ASM Configuration Assistant (asmca).
[oracle@rac1 ~]$ . oraenv
ORACLE_SID = [RAC1] ? +ASM1
The Oracle base for ORACLE_HOME=/u01/app/11.2.0/grid is /u01/app/oracle
[oracle@rac1 ~]$ dbhome
/u01/app/11.2.0/grid
[oracle@rac1 ~]$ asmca
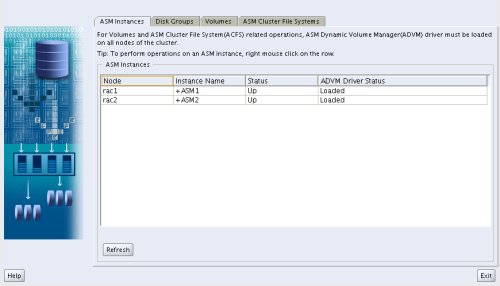
When the ASM configuration assistant starts you are presented with the "ASM Instances" tab.
Click on the "ASM Cluster File Systems" tab, then click the "Create" button.


The newly created volume will now be selected in the Volume list. Select the "General Purpose File System" option, enter a previously created mount point directory (or leave the suggested mount point), select the "Yes" option for Register MountPoint and click the "OK" button.

Click the "OK" button on the resulting message.

The newly created cluster file system is now listed under the "ASM Cluster File Systems" tab.

Either perform another action, or click the "Exit" button.
At the command line on the first RAC node, navigate to the ACFS mount point and create a test file.
[oracle@rac1 data_acfsvol1]$ cd /u01/app/oracle/acfsmounts/data_acfsvol1
[oracle@rac1 data_acfsvol1]$ echo "This is a test" > test.txt
[oracle@rac1 data_acfsvol1]$ ls -al
total 80
drwxrwx--- 4 root   dba       4096 Nov 28 16:39 .
drwxr-xr-x 3 root   root      4096 Nov 28 16:24 ..
drwxr-xr-x 5 root   root      4096 Nov 28 16:24 .ACFS
drwx------ 2 root   root     65536 Nov 28 16:24 lost+found
-rw-r--r-- 1 oracle oinstall    15 Nov 28 16:39 test.txt
[oracle@rac1 data_acfsvol1]$
Check the file is present on the second RAC node.
[oracle@rac2 data_acfsvol1]$ cd /u01/app/oracle/acfsmounts/data_acfsvol1
[oracle@rac2 data_acfsvol1]$ ls -al
total 80
drwxrwx--- 4 root   dba       4096 Nov 28 16:39 .
drwxr-xr-x 3 root   root      4096 Nov 28 16:24 ..
drwxr-xr-x 5 root   root      4096 Nov 28 16:24 .ACFS
drwx------ 2 root   root     65536 Nov 28 16:24 lost+found
-rw-r--r-- 1 oracle oinstall    15 Nov 28 16:39 test.txt
[oracle@rac2 data_acfsvol1]$ cat test.txt
This is a test
[oracle@rac2 data_acfsvol1]$
So the ASM Cluster File System is working as expected.
Oracle Enterprise Manager (OEM)
Oracle Enterprise Manager provides a similar interface for interacting with ASM Cluster File Systems.
First we need to create mount points on the file system of each node for the new volume.
# mkdir -p /u01/app/oracle/acfsmounts/data_acfsvol2
# chown oracle:oinstall /u01/app/oracle/acfsmounts/data_acfsvol2
Log in to OEM, scroll to the bottom of the home page, then click on one of the ASM instances listed. On the resulting ASM screen, click on the "ASM Cluster File System" tab. You are then presented with the following screen. Click the "Create" button.

Click the "Create ASM Volume" button.

Enter the Volume Name and Size and click the "OK" button. Wait for the volume to be created.


Command Line
First we need to create mount points on the file system of each node for the new volume.
# mkdir -p /u01/app/oracle/acfsmounts/data_acfsvol3
# chown oracle:oinstall /u01/app/oracle/acfsmounts/data_acfsvol3
As the "oracle" user, switch to the ASM environment on node 1 of the RAC, then connect to the ASM instance using SQL*Plus.
[oracle@rac1 ~]$ . oraenv
ORACLE_SID = [RAC1] ? +ASM1
The Oracle base for ORACLE_HOME=/u01/app/11.2.0/grid is /u01/app/oracle
[oracle@rac1 ~]$ dbhome
/u01/app/11.2.0/grid
[oracle@rac1 ~]$ sqlplus / as sysasm
Issue to the following command to create a new volume.
SQL> ALTER DISKGROUP DATA ADD VOLUME ACFSVOL3 SIZE 10G;
Diskgroup altered.
Exit the SQL*Plus session, then create a file system on the volume.
[oracle@rac1 ~]$ /sbin/mkfs -t acfs -b 4k /dev/asm/acfsvol3-301 -n "ASMVOL3"
mkfs.acfs: version                   = 11.2.0.1.0.0
mkfs.acfs: on-disk version           = 39.0
mkfs.acfs: volume                    = /dev/asm/acfsvol3-301
mkfs.acfs: volume size               = 10737418240
mkfs.acfs: Format complete.
[oracle@rac1 ~]$
Register the filesystem.
[oracle@rac1 ~]$ /sbin/acfsutil registry -f -a /dev/asm/acfsvol3-301 /u01/app/oracle/acfsmounts/data_acfsvol3
acfsutil registry: mount point /u01/app/oracle/acfsmounts/data_acfsvol3 successfully added to Oracle Registry
[oracle@rac1 ~]$
The ASM Cluster File System should now be mounted on all RAC nodes. If it not, then issue the following command on each node to mount it.
/bin/mount -t acfs /dev/asm/acfsvol3-301 /u01/app/oracle/acfsmounts/data_acfsvol3
General Points
You can unmount and mount all the ACFS locations using the following commands from the "root" user on each RAC node.
# /bin/umount -t acfs -a
# /sbin/mount.acfs -o all
Registering mount points, means these file systems will automatically be mounted and unmounted and startup and shutdown respectively.
Probably the easiest interface to use is the ASM Configuration Assistant (ASMCA), but Enterprise Manager does allow you to see all the commands being run to perform each task. The easiest way to learn how to use the command line utilities is to use Enterprise Manager and click the "Show Command" button each step of the way.
For any further Questions/Support on ACFS file system, email me on samiappsdba@gmail.com