The below picture illustrates the upgrade path from a Grid control to 12c Cloud control or from an earlier version of 12c CC to latest 12c CC.

12c to 12c Upgrade Utilities are
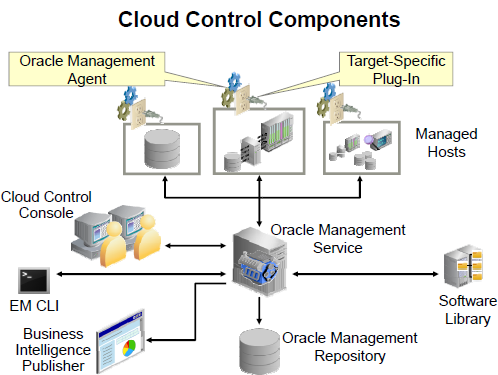
• Oracle Universal Installer (OUI)
– Upgrades the OMS and OMR to the latest 12c version
– Graphical or silent mode
• Could Control 12c built-in Agent Upgrade Console page
– Upgrade the agents
– Delete the old agents
– Perform other agent post-upgrade tasks
A Choice of Two Upgrade Processes are
• 1-System upgrade
– An upgrade of the current 10g or 11g Grid Control OMR and agents to Cloud Control 12c
– An upgrade of the current Cloud Control 12c OMR and agents to the latest version of 12c
• 2-System upgrade
– A migration of OMR and agents from the current 10g or 11g Grid Control to Cloud Control 12c
• Agent/OMS Oracle Management Service compatibility across versions:
– 10g and 11g agents cannot communicate with 12c OMS.
– 12c agents cannot communicate with 10g and 11g OMS.
– Both upgrade processes handle this in different ways.
– 12c agents can communicate with all 12c OMS versions.
In this article we will be focusing on the "1-system updgrade enterprise manager 12c cloud control from 12.1.0.3 to 12.1.0.4".
Steps for Cloud Control 12c 1-System Upgrade Process are
1. Ensure that the current 12c system is up to date.
• Minimum version 12.1.0.2
• Database patches
• Latest Cloud Control PSU
• DST Patches for database, OMS and Agents
2. Back up the OMR.
3. Copy emkey to the OMR.
4. Shut down the current OMS.
5. Run OUI in 1-System upgrade mode.
6. Upgrade agents using the Agent Upgrade Console.
• Central Agent first
• Other agents in your system
7. Clean up the old agents.
Below are steps to upgrade EM 12c from Release3 to Release4:
- Check that the EM Release3 OMR Oracle Management Repository Database and it's Listener should be up and running.
- Check that the EM Release3 OMS Oracle Management Server should be up and running.
# emctl status agent
Oracle Enterprise Manager Cloud Control 12c Release 3
Copyright (c) 1996, 2013 Oracle Corporation. All rights
reserved.
WebTier is Up
Oracle Management Server is Up
- Check that the Central Agent installed with the OMS should be up and running.
# /u01/app/oracle/product/agent12c/agent_inst/bin/emctl status agent
Oracle Enterprise Manager Cloud Control 12c Release 3
Copyright (c) 1996, 2013 Oracle Corporation. All rights
reserved.
---------------------------------------------------------------
Agent Version : 12.1.0.3.0
OMS Version : 12.1.0.3.0
Protocol Version : 12.1.0.1.0
Agent Home : /u01/app/oracle/product/agent12c/agent_inst
Agent Binaries :
/u01/app/oracle/product/agent12c/core/12.1.0.3.0
Agent Process ID : 3020
Parent Process ID : 2970
Agent URL : https://em12c.example.com:3872/emd/main/
Repository URL : https://em12c.example.com:4904/empbs/upload
Started at : 2014-04-04 10:49:35
Started by user : oracle
Last Reload : (none)
Last successful upload : 2014-04-04
11:34:39
Last attempted upload : 2014-04-04
11:34:39
Total Megabytes of XML files uploaded so far : 0.06
Number of XML files pending upload : 0
Size of XML files pending upload(MB) : 0
Available disk space on upload filesystem : 30.54%
Collection Status : Collections
enabled
Heartbeat Status : Ok
Last attempted heartbeat to OMS : 2014-04-04
11:37:31
Last successful heartbeat to OMS : 2014-04-04
11:37:31
Next scheduled heartbeat to OMS : 2014-04-04
11:38:31
---------------------------------------------------------------
Agent is Running and Ready
- At this point, in a production system, you must back up your existing system, using your predefined backup strategy.
- Next, apply all required patches for the database home in your environment, if your DB Software is 11.2.0.3 version of the database/OMR. Then, install the latest version of Patch
6880880: OPatch 11.2.0.3.6 for the OMR home. - Apply the generic database patch 11061801. This is a required database patch for
database 11.2.0.3, the OMR version. While applying the database patch, Confirm the version of Perl installed and configured for the ORACLE_HOME. The version of Perl must be 5.00503 or higher, you can check the perl version using command 'perl -v'. While applying this database patch shutdown the database and OMS services and then apply using 'opatch apply' command. - After the database patch is applied, then start the database.
- As a prerequisite for this upgrade, the Management Repository tables must not have
any snapshots created. To check, log in as the sysman user and run the following
query. It should return no rows.
SQL> select master , log_table from all_mview_logs where log_owner='SYSMAN';
no rows selected.
- Now Apply the Oracle Enterprise Manager 12c Release 3 Patch Set Update 1 (12.1.0.3.2) for
Oracle Management Service on EMRelese3 - Save the old OPatch and apply the latest required OPatch for your OMS home
environment (p6880880_111000_Linux-x86-64.zip). - The WebLogic Administration server and the database must be up in order to apply
this patch. Check all components’ status. Your OMS should already be down.
Oracle Enterprise Manager Cloud Control 12c Release 3
Copyright (c) 1996, 2013 Oracle Corporation. All rights
reserved.
WebTier is Down
Oracle Management Server is Down
If the OMS shows up then stop it using 'emctl stop oms' command.
- Check that the WebLogic Administration server is running at this stage before applying the patch.
oracle 2092 2045 0 Oct26 2015 10:11:15
/u01/app/oracle/product/middleware/jdk16/jdk/bin/java -server -Xms256m -Xmx512m -XX:MaxPermSize=512m -Dweblogic.Name=EMGC_ADMINSERVER …
- Ensure that you have the correct OMS version for this patch, it should be 12.1.0.3.0
Oracle Enterprise Manager Cloud Control 12c Release 3
Copyright (c) 1996, 2013 Oracle Corporation. All rights reserved.
Enterprise Manager 12c OMS Version 12.1.0.3.0
- Analyze your system configuration and make sure that you meet all the prerequisites for applying this Patch Set update PSU.
OPatch Automation Tool
Copyright (c) 2013, Oracle Corporation. All rights reserved.
OPatchauto version : 11.1.0.10.3
OUI version : 11.1.0.11.0
Running from : /u01/app/oracle/product/middleware/oms
Log file location :
/u01/app/oracle/product/middleware/oms/cfgtoollogs/opatch/opatch2015-10-26_15-20-56PM_1.log
opatchauto log file:
/u01/app/oracle/product/middleware/oms/cfgtoollogs/opatchauto/17513525/opatch_oms_2014-05-12_15-21-01PM_analyze.log
Please enter OMS weblogic admin server
URL(t3s://em12c.example.com:7103):> <Enter>
Please enter OMS weblogic admin server username:> weblogic
Please enter OMS weblogic admin server password:> Oracle123
Configuration Validation: Success
[…]
opatchauto succeeded.
- Apply the patch 17513525,
Copyright (c) 2013, Oracle Corporation. All rights reserved.
OPatchauto version : 11.1.0.10.3
OUI version : 11.1.0.11.0
Running from : /u01/app/oracle/product/middleware/oms
Log file location :/u01/app/oracle/product/middleware/oms/cfgtoollogs/opatch/opatch2015-10-26_15-30-13PM_1.log
opatchauto log file:
/u01/app/oracle/product/middleware/oms/cfgtoollogs/opatchauto/17
513525/opatch_oms_2015-10-26_15-30-13PM_1_deploy.log
Please enter OMS weblogic admin server
URL(t3s://em12c.example.com:7103):> <Enter>
Please enter OMS weblogic admin server username:> weblogic
Please enter OMS weblogic admin server password:> Oracle123
Configuration Validation: Success
Running apply prerequisite checks for patch(es) "17513525" and Oracle Home
"/u01/app/oracle/product/middleware/oms"...
Please monitor OPatch log file:
/u01/app/oracle/product/middleware/oms/cfgtoollogs/opatch/17513525_Oct_26_2015
_11_01_13/ApplyPrereq2015-10-26_15-30-13PM_9.log
Patches "17513525" are successfully analyzed for Oracle Home
"/u01/app/oracle/product/middleware/oms"
To continue, OPatch will do the following:
[Patch and deploy patch(es) binaries] : Apply patch(es) [ 17513525 ] to
Oracle Home "/u01/app/oracle/product/middleware/oms";
Apply RCU artifact with patch
"/u01/app/oracle/product/middleware/oms/.patch_storage/17513525_Jan_13_2014_07
_45_01/original_patch";
Register MRS artifact "swlib";
Register MRS artifact "procedures"
Do you want to proceed? [y|n] y
User Responded with: Y
y
Applying patch "17513525" to Oracle Home
"/u01/app/oracle/product/middleware/oms"...
Please monitor OPatch log file:
/u01/app/oracle/product/middleware/oms/cfgtoollogs/opatch/17513525_Oct_26_2015
_11_01_13/apply2015-10-26_15-30-13PM_11.log
- Start the OMS to ensure that the patch was applied successfully. You may log in and confirm that your system is working as expected.
- Copy the emkey from the existing OMS to the existing Management Repository
Oracle Enterprise Manager Cloud Control 12c Release 3
Copyright (c) 1996, 2013 Oracle Corporation. All rights reserved.
The EMKey has been copied to the Management Repository. This operation will cause the EMKey to become unsecure.
After the required operation has been completed, secure the EMKey by running "emctl config emkey -remove_from_repos".
- Check the emkey's status
Oracle Enterprise Manager Cloud Control 12c Release 3
Copyright (c) 1996, 2013 Oracle Corporation. All rights reserved.
Enter Enterprise Manager Root (SYSMAN) Password :
The EMKey is configured properly, but is not secure. Secure the EMKey by running "emctl config emkey -remove_from_repos".
- Now stop the OMS that you are about to upgrade to Enterprise Manager Cloud Control 12c R4,
your primary and only OMS
Note that if you are running a JVMD or ADP engine you must stop them explicitly. For example:
# emctl extended oms jvmd stop -all
# emctl extended oms adp stop –all
- Shut down the central Management Agent. Even though this agent is not yet being upgraded, it must be stopped because it monitors the management repository that is being upgraded.
- In a production environment, prior to upgrading you should back up the OMS (the middleware home and the inventory), the Management Repository, and the Software Library so that you can always restore your system to a known state. You can upgrade the OMS and the Management Repository in graphical or silent mode. You can also choose to install the software binaries at one point and upgrade them later in graphical or silent mode. Here we will perform an upgrade in graphical mode.
- If you have additional non-default plug-ins that you want to upgrade during this
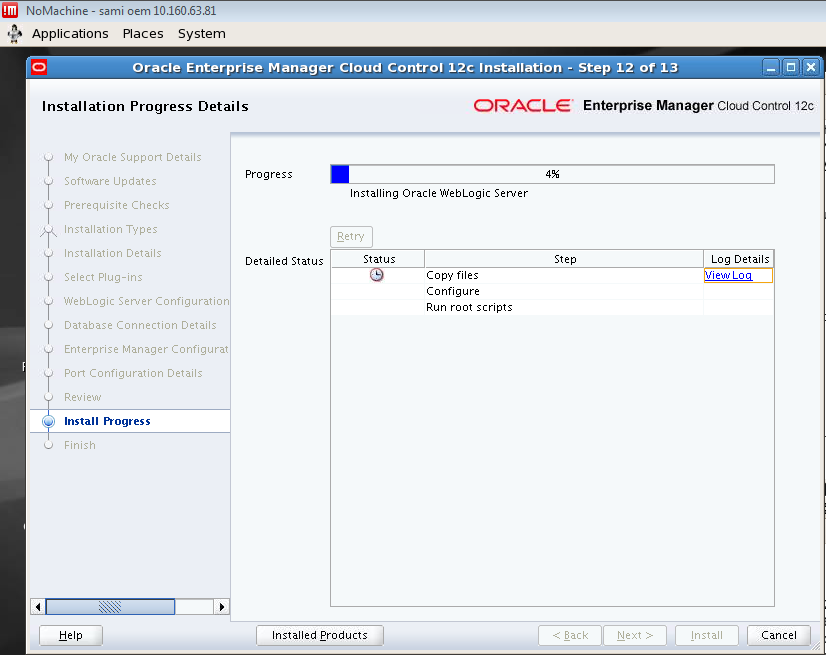
upgrade process, download them from http://www.oracle.com/technetwork/oem/grid-control/downloads/oemupgrade-console-502238.html and place them in a known location. Then run the installer as: runInstaller -pluginLocation <absolute_path_to_plugin_software_location> - Launch the Oracle Universal Installer


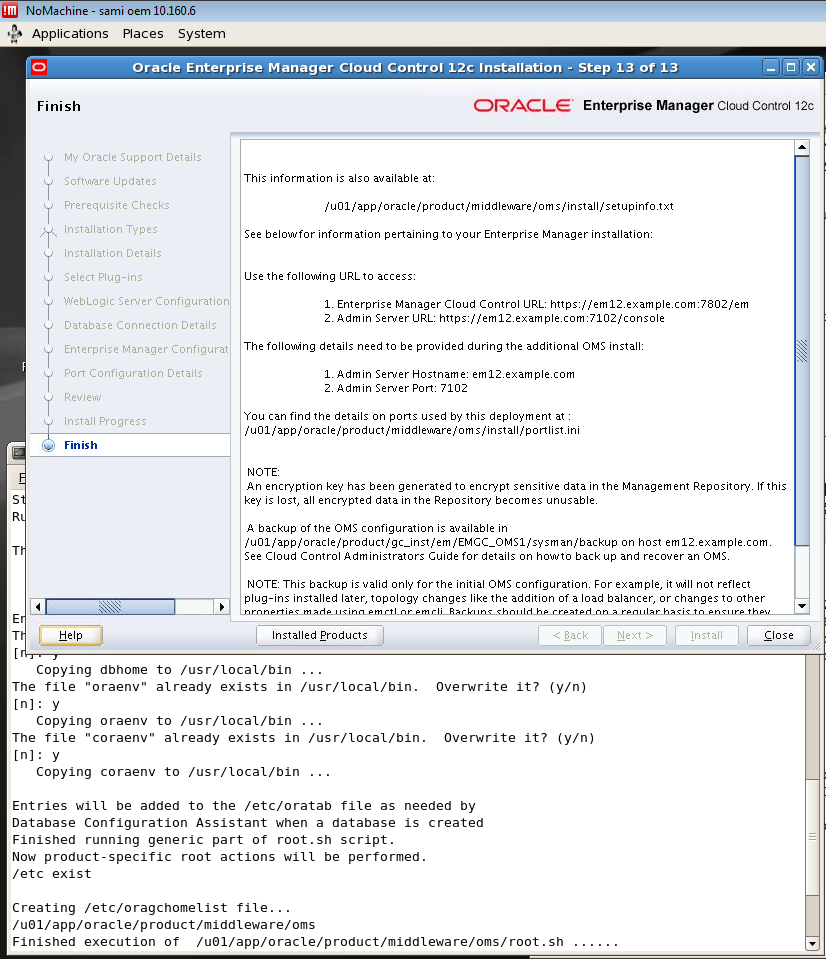
- The Enterprise manager console URL remains the same after an upgrade.
− Connect to https://em12c.example.com:7803/em - − Accept the security certificate exception.
− Log in as sysman/Oracle123.
− Review the default Accessibility Preferences.
− Click Save and Continue.
− Note the status of all targets. Remember that the central agent or other agents have yet to be upgraded; therefore, most targets will be in status “unknown.” - Upgrade the management agents
- First, you must upgrade the central agent installed with the old OMS. The agents to be
upgraded must be up and running and secure. You stopped the central agent for the
repository upgrade, and you must now restart it
# /u01/app/oracle/product/agent12c/agent_inst/bin/emctl status agent
Oracle Enterprise Manager Cloud Control 12c Release 3
Copyright (c) 1996, 2013 Oracle Corporation. All rights
reserved.
---------------------------------------------------------------
Agent Version : 12.1.0.3.0
OMS Version : 12.1.0.4.0
Protocol Version : 12.1.0.1.0
Agent Home : /u01/app/oracle/product/agent12c/agent_inst
Agent Binaries :
/u01/app/oracle/product/agent12c/core/12.1.0.3.0
Agent Process ID : 20594
Parent Process ID : 20546
Agent URL : https://em12c.example.com:3872/emd/main/
Repository URL : https://em12c.example.com:4904/empbs/upload
Started at : 2014-04-08 20:21:18
Started by user : oracle
Last Reload : (none)
Last successful upload : (none)
Last attempted upload : 2014-04-08
20:21:48
Total Megabytes of XML files uploaded so far : 0
Number of XML files pending upload : 18
Size of XML files pending upload(MB) : 0.02
Available disk space on upload filesystem : 23.04%
Collection Status : Collections
enabled
Heartbeat Status : Ok
Last attempted heartbeat to OMS : 2014-04-08
20:21:38
Last successful heartbeat to OMS : 2014-04-08
20:21:38
Next scheduled heartbeat to OMS : 2014-04-08
20:22:48
---------------------------------------------------------------
Agent is Running and Ready
Note the Agent URL points to https, indicating that the agent is secure
- In the EM Console, navigate to Setup > Manage Cloud Control > Upgrade Agents. This leads you to the Agent Upgrade Console (AUG).
- Under Job Name, maintain the default name. Click Add to select the agents
- Use the top left cell in the Agents table, or use Ctrl-Click (multi-select) to select the
em12c.example.com:3872 and host01.example.com:3872 agents, and click
OK - Select to Override Privileged Credentials and use the green plus to create new
credentials. Enter the following values: username/password= root/password, RunPrivilege=none, SaveAs=NC_HOST_ROOT - Click OK to return to the Upgrade Agents screen, and select your new credentials.
- Skip the Additional Inputs field and click Submit. Click OK if a warning dialog box is presented, and then monitor the upgrade and make sure that all steps are successful. From the top left menu navigate to the Agent Upgrade Results and confirm that the
agent upgrade was a success. - To save disk space you may delete the old agents.
- Other recommended post-upgrade tasks are Delete old OMS home (in graphical or silent modes, using OUI), Set up the command-line interface, EM CLI, Set up automatic startup of the OMS and agent on the host, if not already set up, Apply custom third-party security certificates, Apply patches released after the release that you are upgrading to and Periodic Self-Update review and downloads.
For any further queries, technical assistance and support on such upgrades, please don't hesitate to contact me on samiappsdba@gmail.com


