Showing posts with label Oracle Weblogic Server. Show all posts

Monday, October 29, 2018

Steps to enable HA in ADF Application


Consider each point if you are planning to deploy your ADF application in a WebLogic clustered server.
1. Expand your View project, WEB-INF, and open the WebLogic.xml file. (Create a WebLogic.xml file if it does not exist). Add the following element inside <weblogic-web-app> in the WebLogic.xml file
weblogic.xml

<session-descriptor>

<persistent-store-type>replicated_if_clustered</persistent-store-type>

</session-descriptor>


2. Expand your View project, WEB-INF, and open the web.xml file. Set the parameter org.apache.myfaces.trinidad. CHECK_FILE_MODIFICATION to false

web.xml

<context-param>

<param-name>org.apache.myfaces.trinidad.CHECK_FILE_MODIFICATION</param-name>

<param-value>false</param-value>

</context-param>


3. Open your Model project, Open the Application Module, Select the Configurations tab, Click on the link bc4j.xcfg (ADF Business Component Configuration file). Click on the source tab. Add jbo.dofailover=”true” to <AppModuleConfig> element

bc4j.xcfg

<AppModuleConfig ...

 <AM-Pooling jbo.dofailover="true"/>

</AppModuleConfig>


4. Click on the Overview tab of the bc4j.xcfg file. Edit each Application module configuration and make sure to toggle on ENABLE APPLICATION MODULE POOLING as shown below

5. Expand the Application Resources, Descriptors, ADF-META-INF, open adf-config.xml file and click on the Source Tab. Add the following element.
adf-config.xml
<adf-controller-config xmlns="http://xmlns.oracle.com/adf/controller/config">
<adf-scope-ha-support>true</adf-scope-ha-support>
</adf-controller-config>

Troubleshooting

ADF_FACES-60098:Faces lifecycle receives unhandled exceptions in phase RENDER_RESPONSE 6
ADF 11.1.2.4.0 I have faced below errors when run the application
ADF ADF_FACES-60098:Faces lifecycle receives unhandled exceptions in phase RENDER_RESPONSE 6
<Oct 29, 2018 11:20:25,928 AM GST> <Warning> <oracle.adfinternal.view.faces.context.RichExceptionHandler> <BEA-000000> <ADF_FACES-60098:Faces lifecycle receives unhandled exceptions in phase RENDER_RESPONSE 6
javax.faces.FacesException: Broken pipe
        at oracle.adfinternal.view.faces.lifecycle.LifecycleImpl._renderResponse(LifecycleImpl.java:1273)
        at oracle.adfinternal.view.faces.lifecycle.LifecycleImpl._executeRenderResponse(LifecycleImpl.java:1107)
        at oracle.adfinternal.view.faces.lifecycle.LifecycleImpl._executePhase(LifecycleImpl.java:348)
        at oracle.adfinternal.view.faces.lifecycle.LifecycleImpl.render(LifecycleImpl.java:258)
        at javax.faces.webapp.FacesServlet.service(FacesServlet.java:651)
        Truncated. see log file for complete stacktrace
Caused By: java.io.IOException: Broken pipe
        at sun.nio.ch.FileDispatcherImpl.write0(Native Method)
        at sun.nio.ch.SocketDispatcher.write(SocketDispatcher.java:47)
        at sun.nio.ch.IOUtil.writeFromNativeBuffer(IOUtil.java:93)
        at sun.nio.ch.IOUtil.write(IOUtil.java:65)
        at sun.nio.ch.SocketChannelImpl.write(SocketChannelImpl.java:471)
        Truncated. see log file for complete stacktrace
>
Solution:
When add libraries make sure to check the 'Deployed by Default' option. Otherwise it will not be available in server application deployment folder to refer run time.


Wednesday, September 12, 2018

Oracle EBS R12 Component Versions

There are various components in Oracle Applications setup. Below commands can be used to find the exact version of the components.


SQL> select release_name from apps.fnd_product_groups;
RELEASE_NAME
12.2.5


SQL> SELECT * FROM V$VERSION;
BANNER  CON_ID
Oracle Database 12c Enterprise Edition Release 12.1.0.2.0 - 64bit Production         0
PL/SQL Release 12.1.0.2.0 - Production         0
CORE    12.1.0.2.0      Production         0
TNS for Linux: Version 12.1.0.2.0 - Production         0
NLSRTL Version 12.1.0.2.0 - Production         0


UNIX OPERATING SYSTEM VERSION
Solaris -> cat /etc/release
Red Hat Linux -> cat /etc/redhat-release
Oracle Linux -> cat /etc/oracle-release

Oracle Linux Server release 7.2


Log in as Application user, set environment variable and run below query,


Apache version
#$IAS_ORACLE_HOME/ohs/bin/httpd -v


FORMS VERSION
#frmcmp_batch | grep Version | grep Forms
Forms 10.1 (Form Compiler) Version 10.1.2.3.0 (Production)


REPORT VERSION
#$ORACLE_HOME/bin/rwrun | grep Release
Report Builder: Release 10.1.2.3.0 - Production on Tue Sep 11 11:02:13 2018


FILE VERSION ON FILE SYSTEM
#adident Header <file_name>
#strings -a select * from v$version;


PERL VERSION
$IAS_ORACLE_HOME/perl/bin/perl -v | grep built
This is perl, v5.10.0 built for x86_64-linux-thread-multi


JAVA VERSION
#sh -c "`awk -F= '$1 ~ /^JSERVJAVA.*$/ {print$2}' $ADMIN_SCRIPTS_HOME/java.sh` -version;"
#java -version

java version "1.7.0_85"
Java(TM) SE Runtime Environment (build 1.7.0_85-b15)
Java HotSpot(TM) 64-Bit Server VM (build 24.85-b06, mixed mode)


CLIENT JRE VERSION
#cat $FORMS_WEB_CONFIG_FILE|grep sun_plugin_version| cut -c 1-35
sun_plugin_version=1.6.0_27


FORMS VERSION
#$ORACLE_HOME/bin/frmcmp_batch|grep Forms| grep Version
Forms 10.1 (Form Compiler) Version 10.1.2.3.0 (Production)


PL/SQL VERSION
#$ORACLE_HOME/bin/frmcmp_batch | grep PL/SQL|grep Version
PL/SQL Version 10.1.0.5.0 (Production)


FORMS COMMUNICATION MODE (If the serverURL parameter has no value then Forms is implemented in socket mode else servlet mode)
#cat $FORMS_WEB_CONFIG_FILE|grep serverURL=
serverURL=/forms/lservlet


WEBLOGIC VERSION
cd $FMW_HOME/wlserver_10.3/server/lib
#java -cp weblogic.jar weblogic.version

WebLogic Server 10.3.6.0  Tue Nov 15 08:52:36 PST 2011 1441050
Use 'weblogic.version -verbose' to get subsystem information
Use 'weblogic.utils.Versions' to get version information for all modules


#more $EBS_DOMAIN_HOME/servers/AdminServer/logs/AdminServer.log | grep 10.3.6
WebLogic Server 10.3.6.0.160719 PSU Patch for BUG23094342 MON MAY 23 12:34:42 IST 2016
WebLogic Server 10.3.6.0  Tue Nov 15 08:52:36 PST 2011 1441050 >
WebLogic Server 10.3.6.0.160719 PSU Patch for BUG23094342 MON MAY 23 12:34:42 IST 2016
WebLogic Server 10.3.6.0  Tue Nov 15 08:52:36 PST 2011 1441050  Copyright (c) 1995, 2011, Oracle and/or its affiliates. All rights reserved.


For any queries you can email me on samiappsdba@gmail.com

Monday, August 6, 2018

EBS Adding a node in Shared File System


The Oracle E-Business Suite Release 12.2 architecture is a framework for multi-tiered, distributed computing. In a shared file system, all application tier files including the INSTANCE_TOP are installed on a shared disk resource, which is mounted on each application tier node. Any application tier node can be configured to perform any of the standard application tier services, such as Forms, Web and Concurrent Processing (Batch) services. All changes made to the shared file system are immediately accessible to all application tier nodes.
Note:
•All application tier nodes in a shared file system must be running the same operating system.
•Shared Application Tier File System can not be a read-only-file system unlike in the previous releases.
•User ID and Group ID should be consistent across all nodes to avoid file access permission issues.
•The same absolute path must be retained for the shared file system mount points on each node.
•The value for the context variable "s_atName" must be same across all the application tier node context files.
General Three Tier Architecture
Application/Database Tier Components
Release 12.2 Dual File System Setup on a Single Tier
Shared Application Tier File System Layout
Step by Step Configuration
1. Start weblogic admin server and then Run pre-clone on application tier node 1 on both RUN (fs2) and PATCH (fs1) file systems.


On the RUN file system:
[applmgr@ed-olapplin1 ~]$ ./t1/tst/fs2/EBSapps/appl/APPStst_ed-olapplin1.env
[applmgr@ed-olapplin1 ~]$ cd $ADMIN_SCRIPTS_HOME
[applmgr@ed-olapplin1 scripts]$ adadminsrvctl.sh start 
[applmgr@ed-olapplin1 scripts]$ adadminsrvctl.sh status
[applmgr@ed-olapplin1 scripts]$ adpreclone.pl appsTier
On the PATCH file system:
[applmgr@ed-olapplin1 ~]$ . /t1/tst/fs1/EBSapps/appl/APPStst_ed-olapplin1.env
[applmgr@ed-olapplin1 ~]$ cd $ADMIN_SCRIPTS_HOME
[applmgr@ed-olapplin1 scripts]$ adadminsrvctl.sh status
[applmgr@ed-olapplin1 scripts]$ adadminsrvctl.sh start forcepatchfs
[applmgr@ed-olapplin1 scripts]$ adpreclone.pl appsTier
2. Check below context file parameters settings on both RUN & PATCH files systems.
<shared_file_system oa_var="s_shared_file_system">true</shared_file_system>
<APPL_TOP_NAME oa_var="s_atName">ed-olapplin1</APPL_TOP_NAME>

3. On the new node (ed-olapplin2) that is to be added do the below steps. The node to be added now will be known as the secondary application tier node. This node can be configured to run all services except for the Oracle WebLogic Administration Server.
[applmgr@ed-olapplin2 ~]$  more /etc/oraInst.loc
inventory_loc=/t1/tst/oraInventory
inst_group=oinstall
[applmgr@ed-olapplin2 ~]$ export PATH=/t1/tst/fs2/FMW_Home/webtier/perl/bin:$PATH
4. It is recommended to keep the Instance Top (INST_TOP=/t1/tst/fs2/inst/apps/tst_edolapplin1 AND /t1/tst/fs2/inst/apps/tst_ed-olapplin2) on the shared file system for Ease of maintenance and The number of application tier processes writing to this location is limited when compared with the previous releases.
5. Ensure the WebLogic Administration Server is running from both run and Patch file system on the primary application tier node [on ED-OLAPPLIN1] if not run it as shown in Step 1 above.
[applmgr@ed-olapplin2 ~]$ export PATH=/t1/tst/fs2/FMW_Home/webtier/perl/bin:$PATH
6. A sample pairsfile for the run/patch file system is instantiated into the instance home on the primary application tier node. The file is called <SID>_<primary_node_name>_.txt, and located in the <inst_top>/appl/admin/ directory. For a configuration with an instance name of VIS, the pairsfile will be /u01/12.2/fs1/inst/apps/VIS_appstier1/appl/admin/VIS_appstier1.txt.
/t1/tst/fs2/inst/apps/tst_ed-olapplin1/appl/admin/tst_ed-olapplin1.txt
# cd $INST_TOP/appl/admin
# pwd
/t1/tst/fs2/inst/apps/tst_ed-olapplin1/appl/admin
# mkdir –p /t1/tst/pairsfile
# cp /t1/tst/fs2/inst/apps/tst_ed-olapplin1/appl/admin/tst_ed-olapplin1.txt /t1/tst/pairsfile/mypairsfile.txt
7. Execute adclonectx utility to configure both run and Patch file system. Note that since we have to execute the adconectx.pl script from the new node [ED-OLAPPLIN2] that will be added that is why we are copying the mypairsfile.txt and tst_ed-olapplin1.xml file on common shared location.
[applmgr@ed-olapplin2 ~]$ export PATH=/t1/tst/fs2/FMW_Home/webtier/perl/bin:$PATH
[applmgr@ed-olapplin2 bin]$ cd /t1/tst/fs2/EBSapps/comn/clone/bin
[applmgr@ed-olapplin2 bin]$ perl adclonectx.pl addnode contextfile=/t1/tst/fs2/inst/apps/tst_ed-olapplin1/appl/admin/tst_ed-olapplin1.xml pairsfile=/t1/tst/pairsfile/mypairsfile.txt outfile=/t1/tst/pairsfile /mypairsOUTPUT.txt dualfs=yes
Below is the mypairsfile.txt file content,
# $Header: pairs_file_dualfsclone_ux_txt.tmp 120.0.12020000.2 2015/07/29 19:36:02 jmajumde noship $
# Copyright (c) 2005, 2015  Oracle and/or its affiliates.
# All rights reserved.
# Version 12.0.0
#
# This is a sample pairs file generated by the autoconfig tool based on the
# context values set on the primary application tier node.
# This pairs file can be modified and used when adding additional
# application tier nodes. Some of the parameters set in this pairs file
# assume that you are using a shared file system.
[Base]
s_base=/t1/tst
s_current_base=/t1/tst/fs2
s_other_base=/t1/tst/fs1
s_ne_base=/t1/tst/fs_ne
[General]
s_applptmp=/usr/tmp
s_appsgroup=oinstall
s_appsuser=applmgr
s_dbuser=oracle
s_dbgroup=dba
s_dbdomain=samiora.blogspot.com
s_at=/t1/tst/fs2/EBSapps/appl
s_com=/t1/tst/fs2/EBSapps/comn
s_tools_oh=/t1/tst/fs2/EBSapps/10.1.2
s_weboh_oh=/t1/tst/fs2/FMW_Home/webtier
s_fmw_home=/t1/tst/fs2/FMW_Home
s_dbGlnam=tst
s_dbSid=tst
s_dbhost=edolraclin-dbsrv
s_clonestage=/t1/tst/fs2/EBSapps/comn/clone
s_dbport=1522
s_options_symlinks=Options -FollowSymLinks
s_proxyhost=
s_proxybypassdomain=samiora.blogspot.com
s_proxyport=
s_nonproxyhosts=
s_javamailer_imapdomainname=NoImapDomain
s_javamailer_imaphost=NoImapHost
s_javamailer_reply_to=NoReplyTo
s_javamailer_outbound_user=changeOnJavaMailerInstall
s_smtphost=ed-olapplin1
s_smtpdomainname=samiora.blogspot.com
s_file_edition_type=run
s_port_pool=1
patch_s_port_pool=2
s_admhost=ed-olapplin1
s_atName=ed-olapplin1
s_shared_file_system=true
[Web Entry Point Configuration]
s_webentryurlprotocol=http
s_webentryhost=ed-olapplin2
s_webentrydomain=samiora.blogspot.com
s_active_webport=8001
s_endUserMonitoringURL=http://ed-olapplin2.samiora.blogspot.com:8001/oracle_smp_chronos/oracle_smp_chronos_sdk.gif
s_external_url=http://ed-olapplin2.samiora.blogspot.com:8001
s_login_page=http://ed-olapplin2.samiora.blogspot.com:8001/OA_HTML/AppsLogin
[Instance Specific]
# Please provide values for the context variables listed below. On the source
# instance they are instantiated as shown in the comment section below.
# These values should only be used as reference to fill out the instance
# values for the new node.
#s_temp=/t1/tst/fs2/inst/apps/tst_ed-olapplin1/temp
#s_contextname=tst_ed-olapplin1
#s_hostname=ed-olapplin1
#s_domainname=samiora.blogspot.com
#s_cphost=ed-olapplin1
#s_webhost=ed-olapplin1
#s_config_home=/t1/tst/fs2/inst/apps/tst_ed-olapplin1
#s_inst_base=/t1/tst
#s_display=ed-olapplin1:0.0
#s_forms-c4ws_display=ed-olapplin1:0.0
#s_ohs_instance=EBS_web_erp_OHS1
#s_webport=8001
#s_http_listen_parameter=8001
#s_https_listen_parameter=4444
s_temp=/t1/tst/fs2/inst/apps/tst_ed-olapplin2/temp
s_contextname=tst_ed-olapplin2
s_hostname=ed-olapplin2
s_domainname=samiora.blogspot.com
s_cphost=ed-olapplin2
s_webhost=ed-olapplin2
s_config_home=/t1/tst/fs2/inst/apps/tst_ed-olapplin2
s_inst_base=/t1/tst
s_display=ed-olapplin2:0.0
s_forms-c4ws_display=ed-olapplin2:0.0
s_ohs_instance=EBS_web_erp_OHS2
s_webport=8031
s_http_listen_parameter=8001
s_https_listen_parameter=4444
[Services]
# Please provide values for the context variables listed below .
# Enter "enabled" without the quotes to enable the service on the new node .
# Enter "disabled" without the quotes to disable the service on the new node .
# The Root service include the Node Manager .
# The Web Application Services include the Node Manager, Admin Server,
# Managed Servers ( oacore, forms, oafm, formsc4-ws).
# To enable the configuration of Node Manager and the Managed Servers,
# set s_web_applications_status to enabled
# The Web Entry Services include the OPMN and Oracle HTTP Server .
# To enable the configuration of OPMN,OHS , set s_webentry_status and s_apcstatus to enabled.
# The Batch Processing Services include the FNDFS Listener, Concurrent Mgr, ICSM# and JTF FullFillment Server
# To enable the configuration of Concurrent Manager# set s_batch_status to enabled.
# The Other Services group include the Forms Metric Server, Forms Metric Clients# Forms Server for the socket mode configuration and Mobile Web Application
# Server (MWA).
# s_adminserverstatus is set to disabled since this service can only be enabled
# on the primary application tier.
# The services enabled on the primary application tier node are as shown
# below in the comment section.
[Services Enabled on the Primary Application Tier Node]
#s_web_applications_status=enabled
#s_web_entry_status=enabled
#s_apcstatus=enabled
#s_root_status=enabled
#s_batch_status=enabled
#s_other_service_group_status=disabled
#s_adminserverstatus=enabled
#s_web_admin_status=enabled
[Services To be Enabled on the Secondary Application Tier Node]
s_web_applications_status=enabled
s_web_entry_status=enabled
s_apcstatus=enabled
s_root_status=enabled
s_batch_status=enabled
s_other_service_group_status=disabled
s_adminserverstatus=disabled
s_web_admin_status=enabled
# Additional variables can be added below as per your requirement.

8. This command adclonectx.pl needs to be run only 1 time on 2nd node without setting any environment.
Verify using the below SQL Script,
SQL> select * from APPS.FND_OAM_CONTEXT_FILES where name not in( 'METADATA','TEMPLATE') order by creation_date desc;If there is ERROR WHILE ADDING A NODE DUE TO any reason then use below command to DELETE THE NODE AND THEN ADD IT AGAIN.  Run this from node1,
[applmgr@ed-olapplin1 bin]$ cd /t1/tst/fs2/EBSapps/appl/ad/12.0.0/patch/115/bin/
[applmgr@ed-olapplin1 bin]$ perl adProvisionEBS.pl ebs-delete-node -contextfile=/t1/tst/fs2/inst/apps/tst_ed-olapplin1/appl/admin/tst_ed-olapplin1.xml -hostname=ed-olapplin2 -logfile=ebs-delete-node2_I.logAlso delete the inst directory that was created while we added the node for first time /t1/tst/fs2/inst/apps/tst_ed-olapplin2
Now Register the new topology from the newly added application tier node. Get port from Below file and change accordingly to below perl scripts.
[applmgr@ed-olapplin2]$ vi /t1/tst/fs2/FMW_Home/webtier/instances/EBS_web_tst_OHS2/config/OHS/EBS_web_tst/mod_wl_ohs.conf
[applmgr@ed-olapplin2]$. /t1/tst/fs2/EBSapps/appl/APPStst_ed-olapplin2.env
cd /t1/tst/fs2/EBSapps/comn/clone/bin
perl adclonectx.pl addnode contextfile=/t1/tst/fs2/inst/apps/tst_ed-olapplin1/appl/admin/tst_ed-olapplin1.xml pairsfile=/t1/tst/pairsfiles/mypairsfile.txt outfile=/t1/tst/pairsfile/mypairsOUTPUT.txt dualfs=yes
[applmgr@ed-olapplin2 EBS_web_tst]$ . /t1/tst/fs2/EBSapps/appl/APPStst_ed-olapplin2.env
perl /t1/tst/fs2/EBSapps/appl/fnd/12.0.0/patch/115/bin/txkSetAppsConf.pl -contextfile=/t1/tst/fs2/inst/apps/tst_ed-olapplin2/appl/admin/tst_ed-olapplin2.xml -configoption=removeMS -oacore=ed-olapplin2.samiora.blogspot.com:7202,ed-olapplin2.samiora.blogspot.com:7203,ed-olapplin2.samiora.blogspot.com:7204,ed-olapplin2.samiora.blogspot.com:7205 -oafm=ed-olapplin2.samiora.blogspot.com:7602 -forms=ed-olapplin2.samiora.blogspot.com:7402 -formsc4ws=ed-olapplin2.samiora.blogspot.com:7802 -ekanban=ed-olapplin2.samiora.blogspot.com:6802 -accessgate=ed-olapplin2.samiora.blogspot.com:6802 -yms=ed-olapplin2.samiora.blogspot.com:6802
perl /t1/tst/fs2/EBSapps/appl/fnd/12.0.0/patch/115/bin/txkSetAppsConf.pl -contextfile=/t1/tst/fs2/inst/apps/tst_ed-olapplin2/appl/admin/tst_ed-olapplin2.xml -configoption=addMS -oacore=ed-olapplin2.samiora.blogspot.com:7202,ed-olapplin2.samiora.blogspot.com:7205,ed-olapplin2.samiora.blogspot.com:7207,ed-olapplin2.samiora.blogspot.com:7209 -oafm=ed-olapplin2.samiora.blogspot.com:7602 -forms=ed-olapplin2.samiora.blogspot.com:7402 -formsc4ws=ed-olapplin2.samiora.blogspot.com:7802
more /t1/tst/fs2/FMW_Home/webtier/instances/EBS_web_tst_OHS2/config/OHS/EBS_web_tst/mod_wl_ohs.conf
perl $AD_TOP/patch/115/bin/adProvisionEBS.pl ebs-create-managedserver -contextfile=/t1/tst/fs2/inst/apps/tst_ed-olapplin2/appl/admin/tst_ed-olapplin2.xml -managedsrvname=oacore_server2 -servicetype=oacore -managedsrvport=7205 -logfile=/tmp/oacore2log.log
perl $AD_TOP/patch/115/bin/adProvisionEBS.pl ebs-create-managedserver -contextfile=/t1/tst/fs2/inst/apps/tst_ed-olapplin2/appl/admin/tst_ed-olapplin2.xml -managedsrvname=oacore_server5 -servicetype=oacore -managedsrvport=7209 -logfile=/tmp/oacore5log.log
perl $AD_TOP/patch/115/bin/adProvisionEBS.pl ebs-create-managedserver -contextfile=/t1/tst/fs2/inst/apps/tst_ed-olapplin2/appl/admin/tst_ed-olapplin2.xml -managedsrvname=oacore_server7 -servicetype=oacore -managedsrvport=7207 -logfile=/tmp/oacore7log.log
perl $AD_TOP/patch/115/bin/adProvisionEBS.pl ebs-create-managedserver -contextfile=/t1/tst/fs2/inst/apps/tst_ed-olapplin2/appl/admin/tst_ed-olapplin2.xml -managedsrvname=oacore_server9 -servicetype=oacore -managedsrvport=7202 -logfile=/tmp/oacore9log.log
for oacore_server9>>>ERROR: There is already a managed server with the name oacore_server9>>>>>>ignore this and continue below.
>>>now run autoconfig on node2 (ed-olapplin2)
>>>now without stopping node1 servies execute autoconfig on node 1 (ed-olapplin1)
>>>>start all services on NODE 2 (ed-olapplin2)
[applmgr@ed-olapplin2 ~]$ more $CONTEXT_FILE | grep oacore_server
      <oacore_server>
      </oacore_server>
         <oacore_server_ports oa_var="s_oacore_server_ports">oacore_server9:7202,oacore_server2:7205,oacore_server5:7209,oacore_server7:7207</oacore_server_ports>
            <oa_service_name oa_var="s_oacorename" type="managed_server">oacore_server9,oacore_server2,oacore_server5,oacore_server7</oa_service_name>
            <oa_managed_server_name oa_var="s_oacore_managed_servers">oacore_server9,oacore_server2,oacore_server5,oacore_server7</oa_managed_server_name>
>>>Below Additional command only to delete a managed server
perl $AD_TOP/patch/115/bin/adProvisionEBS.pl ebs-delete-managedserver -contextfile=/t1/tst/fs2/inst/apps/tst_ed-olapplin2/appl/admin/tst_ed-olapplin2.xml -managedsrvname=oacore_server2 -servicetype=oacore -logfile=/tmp/oacore_server1_remove.log


9. On all Application tier nodes, perform the following steps to register the newly added Application tier node with the Application tier TNS Listener (FNDFS listener) on each node:
On ed-olapplin2:
[applmgr@ed-olapplin2 ~]$ kill -9 -1
[applmgr@ed-olapplin2 ~]$ cd $ADMIN_SCRIPTS_HOME
[applmgr@ed-olapplin2 scripts]$ adautocfg.sh
[applmgr@ed-olapplin2 scripts]$ echo $TWO_TASK
[applmgr@ed-olapplin2 scripts]$ sh adalnctl.sh start
[applmgr@ed-olapplin2 admin]$ lsnrctl reload APPS_tst
[applmgr@ed-olapplin2 scripts]$ sh adalnctl.sh stop
On ed-olapplin1:
[applmgr@ed-olapplin1 tstuat]$ cd $ADMIN_SCRIPTS_HOME
[applmgr@ed-olapplin1 scripts]$ adautocfg.sh
[applmgr@ed-olapplin1 scripts]$ echo $TWO_TASK
[applmgr@ed-olapplin1 scripts]$ sh adalnctl.sh start
[applmgr@ed-olapplin1 admin]$ lsnrctl reload APPS_tst
[applmgr@ed-olapplin1 scripts]$ sh adalnctl.sh stop
10.If the Node Manager service is up on the Patch Edition File System of the newly added Application tier node, shut it down as follows:
[applmgr@ed-olapplin2 ~]$ . /t1/tst/fs1/EBSapps/appl/APPStst_ed-olapplin2.env
[applmgr@ed-olapplin2 ~]$ adnodemgrctl.sh stop
11. Shut down the Admin Server and the Node Manager on the Patch Edition File System of the primary node as follows:
[applmgr@ed-olapplin1 ~]$ . /t1/tst/fs1/EBSapps/appl/APPStst_ed-olapplin1.env
[applmgr@ed-olapplin1 ~]$ echo $FILE_EDITION
Patch
[applmgr@ed-olapplin1 ~]$ adadminsrvctl.sh stop forcepatchfs
[applmgr@ed-olapplin1 ~]$ adnodemgrctl.sh stop
[applmgr@ed-olapplin1 scripts]$ ps -ef | grep wlsport verify wls for patchfs is down.
12.Perform the following steps on all Database tier nodes to add the newly added node to the Access Control List
on Database server ed-olraclin-db:
[oracle@ed-olraclin-db~]$ cd /u01/oracle/12.2.0.1/tsthome
[oracle@ed-olraclin-dbtsthome1]$ . ed-olraclin-db.env
[oracle@ed-olraclin-dbtsthome1]$ cd appsutil/scripts/ed-olraclin-db/
[oracle@ed-olraclin-dbtst2_ed-olraclin-db]$ adautocfg.sh
[oracle@ed-olraclin-dbtst2_ed-olraclin-db]$ lsnrctl reload tst
13. Now Load balancer configuration for both URLs from two nodes
14. Now SSH Connectivity Requirements for Online Patching (Required)
# su - applmgr
# . /t1/tst/EBSapps.env RUN
On node 1 & node 2 both execute the below script respectively,
On ed-olapplin1# perl $AD_TOP/patch/115/bin/txkRunSSHSetup.pl enablessh -contextfile=/t1/tst/fs2/inst/apps/tst_ed-olapplin1/appl/admin/tst_ed-olapplin1.xml -hosts=ed-olapplin1,ed-olapplin2
On ed-olapplin2# perl $AD_TOP/patch/115/bin/txkRunSSHSetup.pl enablessh -contextfile=/t1/tst/fs2/inst/apps/tst_ed-olapplin2/appl/admin/tst_ed-olapplin2.xml -hosts=ed-olapplin2,ed-olapplin1
This finishes the ADDING NODE IN SHARED FILE SYSTEM SETUP.
Reference: Sharing the application tier file system in oracle EBS release 12.2. 1375769.1
For any questions on this article please email me on samiappsdba@gmail.com, and do subscribe to this blog as well.


Wednesday, June 20, 2018

EBS R12.2 Adding managed server

By default there is single Web Application Services in EBS 12.2
If you want to increase number of server either oacore, oafm, forms or forms-c4ws then follow below steps. In below example we are adding one more oacore server.


Step 1: Take backup of $CONTEXT_FILE from both edition


Step 2: Run script on RUN edition:
[applmgr@ebs122 ~]$ perl $AD_TOP/patch/115/bin/adProvisionEBS.pl ebs-create-managedserver
-contextfile=/apps01/applmgr/TEST/fs2/inst/apps/TEST_ebs122/appl/admin/TEST_ebs122.xml
-managedsrvname=oacore_server2 -servicetype=oacore -managedsrvport=7203 -logfile=/tmp/oacore2.log


Step 3: Run autoconfig on run edition
[applmgr@ebs122 ~]$ adautocfg.sh
Enter the APPS user password:
AutoConfig completed successfully.


Step 4: [applmgr@ebs122 ~]$ perl $FND_TOP/patch/115/bin/txkSetAppsConf.pl -ctxfile=$CONTEXT_FILE -outfile=/tmp/txkSetAppsConf.log
mod_wl_ohs.conf generated successfully
apps.conf generated successfully

Step 5: Stop/start http services on run edition
[applmgr@ebs122 ~]$ cd $ADMIN_SCRIPTS_HOME
[applmgr@ebs122 scripts]$ adapcctl.sh stop
[applmgr@ebs122 scripts]$ adapcctl.sh start


Now add oacore server info into PATCH edition:


Step 6: Set patch edition env
[applmgr@ebs122 ~]$ echo $FILE_EDITION
patch


Step 7:
Start up the WebLogic Administration Server of the PATCH file system by executing the below command on the PATCH file system
[applmgr@ebs122 scripts]$ adadminsrvctl.sh start forcepatchfs                  


Step 8: From Patch Addition execute below script with service name and port number
[applmgr@ebs122 scripts]$ perl $AD_TOP/patch/115/bin/adProvisionEBS.pl ebs-create-managedserver
-contextfile=$CONTEXT_FILE -managedsrvname=oacore_server2 -servicetype=oacore -managedsrvport=7204 -logfile=\tmp\oacore2_2.log


Step 9:
[applmgr@ebs122 scripts]$ perl $AD_TOP/bin/adSyncContext.pl
-contextfile=/apps01/applmgr/TEST/fs1/inst/apps/TEST_ebs122/appl/admin/TEST_ebs122.xml


Step 10:
Instantiate the fsclone_config.txt file on the PATCH file system of all Application tier nodes by running the following command after sourcing the RUN file system:


#java oracle.apps.ad.autoconfig.InstantiateFile -e <PATCH_CONTEXT_FILE> -tmpl 
<PATCH_AD_TOP>/admin/template/fsclone_config_txt.tmp -out 
<PATCH_INST_TOP>/appl/admin/fsclone_config.txt

[applmgr@ebs122 scripts]$ java oracle.apps.ad.autoconfig.InstantiateFile -e /apps01/applmgr/TEST/fs1/inst/apps/TEST_ebs122/appl/admin/TEST_ebs122.xml -tmpl  /apps01/applmgr/TEST/fs1/EBSapps/appl/ad/12.0.0/admin/template/fsclone_config_txt.tmp -out  /apps01/applmgr/TEST/fs1/inst/apps/TEST_ebs122/appl/admin/fsclone_config.txt
Enter the APPS password : APPS


Step 11:
Execute below script from RUN file system
On the node containing the Oracle HTTP Server, execute the following script from the RUN file system, passing the context file from the PATCH file system. This will update the Oracle HTTP Server configuration files on the PATCH file system with the new managed server port number.
[applmgr@ebs122 scripts]$ perl $FND_TOP/patch/115/bin/txkSetAppsConf.pl -ctxfile=/apps01/applmgr/TEST/fs1/inst/apps/TEST_ebs122/appl/admin/TEST_ebs122.xml
> -outfile=/tmp/oacore2_3.log
mod_wl_ohs.conf generated successfully
apps.conf generated successfully


Step 12: Stop weblogic services from PATCH file system:
[applmgr@ebs122 scripts]$ adadminsrvctl.sh stop


Step 13: Start newly added managed server from run edition:
admanagedsrvctl.sh start oacore_server2


Step 14: Check the status of server weblogic console


For any queries you can contact me on samiappsdba@gmail.com

Monday, March 12, 2018

Setup Oracle Business Intelligence OBIEE 12c Step by Step

Following are the steps to do the Oracle Business Intelligence 12c Setup.
1. Install JDK 1.8
2. Setup Weblogic 12c
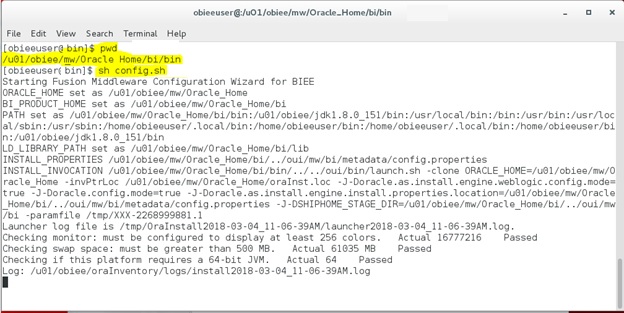
3. Oracle Business Intelligence setup
4. RCU to create BI related schemas in database
5. Configure Oracle BI Domain
6. Oracle BI Developer Client tool to create BI repository files (.rpd)
7. Upload the RPD BI Repository file to BI Server
8. Run Analysis through analytics web console


All required software to do this setup are available in below link,
[OF COURSE YOU MUST LICENSE ALL REQUIRED ORACLE SOFTWARE BEFORE USING IT]
http://www.oracle.com/technetwork/middleware/bi-enterprise-edition/downloads/business-intelligence-3046226.html


Step 1: Install JDK 1.8
[obieeuser@ed-olbiapplin1 ~]$ which java
/u01/obiee/jdk1.8.0_151/bin/java
[obieeuser@ed-olbiapplin1 ~]$ java -version
java version "1.8.0_151"
Java(TM) SE Runtime Environment (build 1.8.0_151-b12)
Java HotSpot(TM) 64-Bit Server VM (build 25.151-b12, mixed mode)

2. Setup Weblogic 12c


3. Oracle Business Intelligence Setup
4. RCU to create BI related schemas in database
Selecting ‘Oracle Business Intelligence’ will select all the other options check boxes automatically.


5. Configure Oracle BI Domain

6. Oracle BI Developer Client tool 12.2.1.3.0 to create BI repository files (.rpd)


Start Oracle BI Administrator Tool by running below file,
D:\BIToolHome\bi\bitools\bin\admintool.cmd
We can now open any repository .rpd file and it will display all the three layers of the administrator tool as follows,
Physical Layer, Model and Mapping Layer (MML) and Presentation layer
7. Upload the BI Repository file (.rpd) to BI Server
8. Run Analysis through analytics web console
You will now be able to access the below analytics tool to create Analysis and Dashboards based on the repository .rpd file that we uploaded in step 7.
http://ed-olapplin1.samiora.blogspot.com:9502/analytics


9. Creating a Repository Using the Oracle Business Intelligence Administration Tool:
Below link on Oracle site is a step by step tutorial covering using the Oracle Business Intelligence (BI) Administration Tool to build, modify, enhance, and manage an Oracle BI repository.
http://www.oracle.com/webfolder/technetwork/tutorials/obe/fmw/bi/bi1113/biadmin11g_01/biadmin11g.htm


The figure shows how a logical SQL query traverses the layers of an Oracle BI Repository.
For any further queries on topics related to this article please email me on samiappsdba@gmail.com

Monday, January 15, 2018

Performance Tune Oracle SOA 12c EM Console

This article applies to Enterprise Manager for Fusion Middleware Version 11.1.1.2.0 and later, i.e., it applies to 11g and 12c. Logging into Enterprise Manager Fusion Middleware Control (FMWC) takes a long time.  Sometimes as long as 45-60 seconds.  This is often viewed as slow response time, performance or hanging issues. This time is expected because EM discovery 'mbeans' need to be invoked for every target.
Solution is to cache the discovery results in the servlet context and use it for subsequent logins. This discovery result will be shared by all the FMWC users. This will still require the entire discovery to be done at least once. 

Enable the “Data Display Option”: Login into EM console and make the data display option to 30 minutes default, so when user will login into EM console, it will load data of last 30 minutes process and it will load EM console faster as with default configuration.
  • Enable the checkbox for below options-
  • Disabled fetching of instance and fault matrices count.
Restrict display of instance and fault to the last 30 minute


Decrease the frequency of DMS application: EM has one inbuilt application called Dynamic Monitoring System (DMS) which does the status collection for all the targets wherever DMS got deployed, if the frequency of DMS stats collection will be too fast then it makes EM console to slow down. To increase the frequency here are the steps-
Increased below parameters in dms_config.xml file given at this location –
$MiddlewareHome/fmw/soa11.1.1.6/oracle_common/modules/oracle.dms_11.1.1/server_config
prefetch intervalSeconds from 15 second to 120,
Discover intervalSeconds from 180 second to 300 seconds
<collectorConfiguration>
   <prefetch intervalSeconds="120" removeCycle="2" isDefault="true"/>
   <prefetch intervalSeconds="300" removeCycle="3"/>
   <discover intervalSeconds="300"/>
</collectorConfiguration>

Disabled “BPEL recovery console” option from Dashboard: Once you logged in into EM console, during dashboard page loading, EM will try to fetch the data from “DLV_MESSAGE” tables for “invoke” and “callback” activities which take longer time since DLV_ MESSAGE table normally is quite huge.
In order to disable the same please perform this –
EM console>>Farm>>soa-infra>>Administration>>System Mbeam Browser>> Filter>> Type bean name "oracle.as.soainfra.config:name=soa-infra,*", >> In result click on "AduitConfig" attribute and change the "bpelRecoveryStatus=Off", default value for bpelRecoveryStatus is "all"

Added JVM parameter at domain level “-Dweblogic.management.disableManagedServerNotifications=true”
Above JVM parameter has been suggested by Oracle, this parameter will help to reduce JMX notification which occur between Admin and Managed servers whenever any new component get added, any state get changes etc.
This configuration got added only for Admin Server Instance, not at Manage server level, and we have notice huge benefit in EM after this change, now EM was not at all hanging during login time, internal link were slow but at least multiple users were able to login into EM.

Increased cache timeout for discovery: During login process in EM console, EM does three things:
  • Authentication
  • Discovery of targets
  • Loading the page.
 Discovery of target step was taking too long around 10 minute since Domain was big and having a list of targets.

From Oracle note 1423893.1 we can implement to cache the discovery result, so the sub sequent login attempt will be fast - Following given Mbeans attributes has been added into to improve performance.

All timing for mbeans in milliseconds. After implementing above change, very first user login will take time after restart of Admin and the discovery result will be stored in cache and sub sequent login attempt will be fast.
  • If the caching is enabled, fmwc will use the cached discovery results.
  • The default setting is "not use the cached results"


  • This step applies to FMW 11g & 12c.

    -If FMW version is lower than 11.1.1.6,  upgrade to FMw 11.1.1.6 or apply available patch 13251077 for your version.
    -If applying patch 13251077, pay attention to patch README for setting of ORACLE_HOME.

    Navigate to fmwc System mBean browser. (Screenshots are shown for fmw 11g, it is similar for 12c)

    Access following AdminServer mBean for setting the cache property.
    • emoms.props:Location=AdminServer,name=emoms.properties,type=Properties,Application=em
    Setting following three properties.  Unless using non-default values, the last two properties are optional.

    # Enable caching of FMw Discovery data and use it for other subsequent users.
    # Values=true/false   Default=false
    oracle.sysman.emas.discovery.wls.FMW_DISCOVERY_USE_CACHED_RESULTS=true
    # If caching of discovery data is true, this parameter indicates how long the discovery data
    # from cache should be used before requiring a fresh discovery.
    # Time value is in milliseconds.  Default is 7200000 milliseconds.
    oracle.sysman.emas.discovery.wls.FMW_DISCOVERY_MAX_CACHE_AGE=7200000
    # If caching of discovery data is true, a user logs in and a discovery session is in progress,
    # this parameter indicates how long the user can wait for current discovery to complete.
    # After this wait time is elapsed and discovery is still not finished:  If there is already data
    # in cache it will be used, else the user will launch a new discovery session.
    # Time value is in milliseconds.  Default is 10000 milliseconds.
    oracle.sysman.emas.discovery.wls.FMW_DISCOVERY_MAX_WAIT_TIME=10000

    If new targets are added after enabling discovery cache and new targets are not displayed in fmwc, perform a manual refresh of the Farm to update the discovery cache.

    Please subscribe to the blog and For any further queries you can email me on samiappsdba@gmail.com

    I wish you all a Very Happy and Prosperous New Year 2018.