Showing posts with label Single Sign on SSO. Show all posts

Sunday, December 7, 2025

Oracle Asserter IDCS setup and integration with Oracle EBS 12.2 for SSO

Introduction

The Oracle E-Business Suite (EBS) Asserter is a lightweight Java application that enables single sign-on (SSO) authentication and password management for Oracle EBS using Oracle Identity Cloud Service (IDCS). It acts as a bridge between EBS and IDCS, deployed on Oracle WebLogic Server. This guide provides a step-by-step process for setup and integration with EBS Release 12.2, based on official Oracle documentation. Ensure you have administrative access to EBS, IDCS, and WebLogic environments.

Prerequisites

Before starting, verify the following:

  • Software Versions:
    • Oracle EBS 12.2.4 or later (with latest patches applied).
    • Oracle WebLogic Server 12c (12.2.x) Standard Edition (not Enterprise Edition).
    • Java JDK/JRE 8 or later, with Java Cryptography Extension (JCE) installed.
    • EBS Asserter version 19.1.4-1.2.2 or later (download from IDCS console: Settings > Downloads > Identity Cloud Service E-Business Suite Asserter).
  • Environment Setup:
    • EBS and Asserter hosts must be in the same domain (e.g., example.com).
    • Use HTTPS for all communications (IDCS requires SSL/TLS).
    • Synchronize clocks between EBS, Asserter, and IDCS servers.
    • EBS must not have prior SSO integrations (e.g., Oracle Access Manager or Internet Directory); remove them and restart servers.
    • Note key details: EBS hostname/URL, Asserter WebLogic hostname/URL (e.g., https://asserter.example.com:7002), IDCS base URL (e.g., https://idcs-tenant.identity.oraclecloud.com), EBS database details (host, port, SID), and APPS user password.
  • Access Rights:
    • IDCS: Admin rights to create users/applications.
    • EBS: Sysadmin access.
    • WebLogic: Admin console access.
  • Downloads:
    • Extract the Asserter ZIP to a working directory (e.g., /opt/ebssdk on both EBS and Asserter servers).
    • Key files: ebs.war, idcs-wallet-<version>.jar, and fndext.jar (from ebs.war/WEB-INF/lib).

For multiple EBS instances, deploy one Asserter per instance (or multiple on the same server starting from Asserter 19.2.1-1.5.0 by renaming WAR files).

Step 1: Create an Application User in EBS for the Asserter

  1. Log in to EBS as an administrator (e.g., SYSADMIN).
  2. Navigate to User Management > Users.
  3. From the Register dropdown, select User Account and click Go.
  4. In Create User Account:
    • User Name: Enter a unique name (e.g., EBSSERVICEUSER).
    • Password: Set a strong password.
    • Description: "EBS Asserter Service User".
    • Password Expiration: None.
    • Click Submit.
  5. Click Assign Roles > Assign Roles.
  6. Search for role code UMX|APPS_SCHEMA_CONNECT, select Apps Schema Connect Role, and assign it with justification ("EBS Asserter Service User"). Click Save.
  7. Log out and log back in with the new user to reset the password (ignore Workflow warnings).

This user connects the Asserter to the EBS database.

Step 2: Create and Configure the SYSADMIN User in IDCS

  1. Sign in to the IDCS console.
  2. Go to Users > Add.
  3. In Add User:
    • First Name: EBS.
    • Last Name: Sysadmin.
    • Uncheck Use the email address as the user name.
    • User Name: sysadmin.
    • Email: Use the email from the EBS SYSADMIN account (update EBS if needed—see Step 3).
    • Click Finish.

Step 3: Update SYSADMIN Email in EBS to Match IDCS

  1. Log in to EBS as SYSADMIN.
  2. Go to User Management > Users, search for SYSADMIN, and click the update icon.
  3. Update the Email field to match the IDCS email.
  4. Click Apply and close EBS.

Step 4: Register the Asserter Server with EBS

  1. On the EBS application server, run echo $JAVA_HOME and echo $WL_HOME (note values for EBS 12.2+).
  2. Create /opt/ebssdk and copy fndext.jar from ebs.war/WEB-INF/lib to it (and to Asserter's $DOMAIN_HOME/lib).
  3. Source the EBS environment: source $APPL_TOP/APPS<CONTEXT_NAME>_env (e.g., EBSapps.env).
  4. Locate the .dbc file in $FND_SECURE (e.g., VISION.dbc).
  5. Run: cd /opt/ebssdk; java oracle.apps.fnd.security.AdminDesktop apps/<APPS_PASSWORD> 0 Y CREATE_NODE NODE_NAME=<asserter_hostname> DBC=<full_path_to_dbc>.
    • Replace <asserter_hostname> with the Asserter WebLogic hostname.
  6. Verify: cat <SID>_<hostname>.dbc and note the APPL_SERVER_ID value.
  7. Copy the new .dbc file to /opt/ebssdk on the Asserter server.

Step 5: Register a Confidential Application in IDCS for the Asserter

  1. In IDCS, go to Applications > Add > Confidential Application.
  2. Details tab:
    • Name: EBS Asserter.
    • Description: EBS Asserter Application.
    • Application URL: /ebs.
    • Check Display in My Apps.
    • Click Next.
  3. Client tab:
    • Select Configure this application as a client now.
    • Allowed Grant Types: Client Credentials, Authorization Code.
    • Allowed Scopes: Check all.
    • Redirect URI: https://<asserter_host>:<port>/ebs/response.
    • Logout URI: https://<asserter_host>:<port>/ebs/logout.
    • Post Logout Redirect URI: https://<asserter_host>:<port>/ebs.
    • Click Next.
  4. Resources tab:
    • Under Grant the client access to Identity Cloud Service Admin APIs, add Authenticator Client and Me scopes.
    • Click Next > Finish.
  5. Note the Client ID and Client Secret, then Activate the application.

Step 6: Create a Wallet File for IDCS Credentials

  1. On the Asserter server, cd /opt/ebssdk.
  2. Run: java -jar idcs-wallet-<version>.jar.
  3. Enter:
    • Wallet Path: Full path (e.g., /opt/ebssdk/cwallet.sso).
    • Client ID: From Step 5.
    • Client Secret: From Step 5.
    • IDCS Base URL: e.g., https://idcs-tenant.identity.oraclecloud.com.
  4. This generates cwallet.sso.

Step 7: Configure the Asserter Properties (bridge.properties)

  1. Unzip ebs.war to a temp directory.
  2. Edit WEB-INF/bridge.properties (uncomment and set):
    text
    app.url=https://<asserter_host>:<port>/ebs
    app.serverid=<APPL_SERVER_ID from Step 4>
    ebs.url.homepage=https://<ebs_host>:<port>/OA_HTML/OA.jsp?OAFunc=OANEWHOMEPAGE
    ebs.ds.name=visionDS  # Example; match your datasource name
    ebs.user.identifier=username  # Or 'email' based on EBS user field
    idcs.iss.url=https://identity.oraclecloud.com
    wallet.path=/opt/ebssdk/cwallet.sso
    whitelist.urls=https://<ebs_host>:<port>/OA_HTML/RF.jsp?,https://<ebs_host>:<port>/OA_HTML/OA.jsp?,https://<ebs_host>:<port>/OA_HTML/BneApplicationService
    ebs.renew.session=true  # Optional: Renews EBS session on each request
    post.logout.url=/ebs  # Optional: Must match IDCS post-logout URI
    • For proxy mode (switch user): Set proxy.mode=true and proxy.home.url=<EBS switch user URL>.
    • Ensure idcs.user.identifier matches ebs.user.identifier for user mapping.
  3. Re-zip the directory to recreate ebs.war.

Step 8: Configure WebLogic Server

  1. Access WebLogic Console (e.g., https://<asserter_host>:<admin_port>/console).
  2. Disable Hostname Verification (for SSL):
    • Lock & Edit > Environment > Servers > [Server Name] > SSL > Advanced.
    • Set Hostname Verification to None.
    • Activate Changes and restart the server.
  3. Handle IDCS Certificates (if needed for trust):
    • Use default Java trust store; avoid custom imports.
    • For renewals: Remove old certs with keytool commands on $WL_HOME/server/lib/DemoTrust.jks and $JAVA_HOME/jre/lib/security/cacerts (default password: changeit), then restart.

Step 9: Define Data Source and Deploy the Asserter

  1. Create Data Source:
    • In WebLogic Console: Services > Data Sources > New > Generic Data Source.
    • Name/JNDI: visionDS (match ebs.ds.name).
    • Database Type: Oracle.
    • Driver: Oracle's Driver (Thin) Versions: 12.x or later (non-XA) or Thin XA for XA.
    • Connection: Database Name (SID), Host, Port (e.g., 1521), User/Password (from Step 1).
    • Driver Class Name: oracle.apps.fnd.ext.jdbc.datasource.AppsDataSource (non-XA) or AppsXADataSource (XA).
    • Properties: dbcFile=/opt/ebssdk/<SID>_<hostname>.dbc.
    • Test Configuration, target EBSAsserter_server (create if needed), Finish > Activate Changes.
  2. Deploy:
    • Copy updated ebs.war to /opt/ebssdk.
    • Deployments > Install, select ebs.war, install as application, target the managed server, Activate Changes.
    • Start the server if stopped.

Step 10: Update EBS Profiles for SSO

  1. Log in to EBS as SYSADMIN.
  2. Go to System Administrator > Profiles > System.
  3. Update:
    • APPS_AUTH_AGENT: Site level = Asserter URL (e.g., https://asserter.example.com:7002/ebs).
    • APPS_SSO: Site level = SSWA w/ SSO.
    • APPS Session: Site level = DOMAIN (from HOST).
  4. Sign-off and restart EBS application servers.

Step 11: Test the Integration

  1. In IDCS, create a test user with username matching an EBS user; assign the EBS Asserter app.
  2. Access the Asserter URL (e.g., https://asserter.example.com:7002/ebs) → Redirects to IDCS login.
  3. Log in with IDCS credentials → Redirects to EBS homepage.
  4. Test logout: Should redirect to IDCS logout and back to Asserter.
  5. Verify password changes in IDCS sync to EBS.
  6. For issues: Check WebLogic logs ($DOMAIN_HOME/servers/<server>/logs), enable diagnostics in bridge.properties (log.level=DEBUG), or review IDCS audit logs.

Additional Considerations

  • Monitoring: Use WebLogic Console for deployment status; enable Asserter metrics via properties.
  • Mobile Apps: For EBS mobile, configure additional IDCS apps (see Oracle docs).
  • Troubleshooting: Common issues include mismatched user identifiers, network ports, or certificate trust. Collect diagnostics by setting log.level=TRACE and reviewing asserter.log.
  • High Availability: Deploy multiple Asserters behind a load balancer.

For the latest patches or variations, refer to Oracle Support. If using Docker for deployment, additional steps apply (e.g., build WebLogic image). 

Friday, February 16, 2024

EBS SSO integration with IDCS

 Introduction

The post introduces Oracle Identity Cloud Service (IDCS) integration with the existing Oracle e-Business Suite (EBS) environments.

IDCS is an Oracle cloud-based Identity platform, which enables SSO services to access EBS applications. It does not require any installations. Oracle Cloud maintains everything, including backup, recovery, patching, upgrade, and scaling.

You need only one component called EBS Asserter, which IDCS provides to implement SSO for Oracle e-Business Suite and other applications.

Features of EBS Asserter

Asserter has the following key features:

  • You don't need to make configuration changes to EBS.
  • You should deploy in WebLogic 12C with SSL configuration.
  • It supports single login for EBS applications, IDCS, and EBS Asserter.
  • It has multiple access modes for SSO with EBS.

In IDCS, you can also integrate with the existing active directory (AD). To integrate IDCS with an existing AD, you need to download the Oracle IDCS AD agent from IDCS and install it on the AD server by providing client ID and client secret details. After the installation completes, the system updates the AD server details in the IDCS directory integrations.
 

To synchronize AD users, you need to configure the bridge and perform synchronization.

Following is an illustration of the new approach of EBS integration with IDCS:


EBS Integration with IDCS for SSO

Oracle supports all EBS modules having browser-based logins to work with EBS Asserter and also supports Excel-based logins for Web ADI. Mobile Apps for EBS don't use browser-based authentication, so Mobile apps are not supported.

Installation prerequisites
To install EBS Asserter, make sure you have the following elements in place:

  • Oracle JRE/JDK version 8 or later
  • Java Cryptography Extension file for Java 8
  • Access to the IDCS console to download the EBS Asserter and permission to register confidential applications.
  • Access to EBS applications.
  • A separate Oracle WebLogic server 12C and a new managed server, EBSAsserter_server, where you can deploy the EBS Asserter Java application. This WebLogic server and EBS servers must be in the same domain.
  1. Download and extract the EBS Asserter zip file.
  2. Access the Identity Cloud Service console, expand the NavigationDrawer, click Settings, and click Downloads. Click Download to download IDCS EBS Asserter, and then save the zip file.
  3. Extract the contents of the EBS Asserter zip file.
  4. Copy the ebs.war and idcs-wallet-<version>.jar files to a working folder into the EBS Asserter's WebLogic Server machine.
  • Make sure the EBS Asserter URL has access over the SSL.

    If you have multiple EBS instances, you can configure and deploy EBS Asserter for each EBS instance. You can use the same WebLogic server for all EBS Asserter-managed servers.

    Configuration steps

    Perform the following configuration steps:

    1. Create an application user on EBS

    To create a user for EBS Asserter to communicate with EBS applications, perform the following steps from the Oracle Asserter documentation:

    1. Log in to EBS as the sysadmin user.
    2. Go to User Management Responsibility and click Users.
    3. Select User Account from the Register drop-down menu and click Go.
    4. On the Create User Account page, enter the following details to create a new user,
       and click Submit:

         - UsernameEBSASSERTER
         - Password: The user password.
         - DescriptionEBS Asserter Service User
         - Password Expire: None

    5. After user creation, click Assign roles, and then click Assign roles on the
       Update User page.
    6. Use Search and Select: Assign Roles by code UMX|APPS_SCHEMA_CONNECT.
    7. Select Apps Schema Connect Role and click Select
    8. Justify EBS asserter service user and click Save.

2. Create EBS system administrator in IDCS

Perform the following steps from Oracle Asserter documentation to create a user in IDCS that communicates to the system administrator in EBS applications.

1. Log in to IDCS to access the console.
2. In the IDCS console, expand the navigation, click Users, and click Add on the
   Users page.
3. In the Add User window, provide the following values and click Finish:

     - First NameEBS
     - Last NameSysadmin
     - Uncheck Use the email address as the username.
     - Usernamesysadmin
     - Email: Provide the email address set to the SYSADMIN account in your Oracle E-Business Suite.

4. After you create the user in IDCS, log in to EBS applications and update the sysadmin
user email address to match the IDCS sysadmin address.

########

Perform the following steps from Oracle Asserter documentation to register the EBS Asserter with EBS:

1. Log in to the EBS application server as `applmgr` and identify the directories for
   $JAVA_HOME and $WLS_HOME.
2. Run the following commands to create a working directory:

        cd /u01/app/SID
        mkdir ebssdk
        cd ebssdk

3. Extract fndext.jar from ebs.war, which you downloaded from IDCS. Copy it both to the working directory and the EBS asserter WebLogic server $DOMAIN\_HOME/lib folder.
4. Source the EBS environment file and run the following commands to register EBS asserter with EBS applications:

        cd /u01/app/SID/ebssdk
        java oracle.apps.fnd.security.AdminDesktop apps/<apps_pwd> CREATE NODE_NAME=ebsasserter.example.com DBC=$FND_SECURE/EBSDB.dbc

5. Copy the generated EBSDB_ebsasserter.example.com.dbc file to the EBS Asserter server and make a note of the APPL_SERVER_ID.

4. Register EBS Asserter in IDCS

Perform the following steps from Oracle Asserter documentation to create a confidential application to represent EBS asserter:
 

1. Log in to the IDCS console and expand the navigation and then click applications.
2. Click on Add and select Confidential applications in the dialog box


3. Enter the following information and click next:

     - NameEBS Asserter
     - DescriptionEBS Asserter Application
     - Application URLhttps://ebsasserter.example.com:7002/ebs
     - Display in My Apps: Select this check box.

4. In the Client pane, select Configure this application as a client now and enter
   the following information:
   
     - Allowed Grant Types: Select Client Credentials and Authorization Code.
     - Redirect URLhttps://ebsasserter.example.com:7002/ebs/response
     - Logout URLhttps://ebsasserter.example.com:7002/ebs/logout
     - Post Logout Redirect URLhttps://ebsasserter.example.com:7002/ebs

5. Beneath Grant the client access to Identity Cloud Service Admin APIs, click Add.
6. In the Add App Role dialog window, select Authenticator Client and Me in the list and click Add.
7. Click Next in the Client pane and the following panes. Click Finish.
8. In the Application Added dialog box, make a note of the Client ID and Client Secret values and click Close.
9. Click Activate to activate the application. 


5. Create a WebLogic wallet 

According to Oracle Asserter documentationfor security purposes, you need to register client ID, client secret, and IDCS URL in the wallet used by the EBS Asserter.  Perform the following steps described in the Oracle documentation:

1. Log in to the EBS Asserter server and go to the directory where the idcs-wallet-<version>.jar file exists.

2. Run the following command to generate the cwallet.sso file and fill in the details
   as prompted:

        java -jar idcs-wallet-<version>.jar  

     - Enter Wallet Path: Enter the path to the store wallet file.
     - Enter Client ID: Enter the Client ID

     - Enter Client Secret: Enter the Client Secret for the client ID.
     - Enter IDCS base URL: Enter the IDCS base URL.

6. Update the configuration file

Update EBS Asserter configuration file, bridge.properties with EBS instance and IDCS details.

 7. Deploy EBS Asserter

Perform the following steps from Oracle Asserter documentation to create a new data source and deploy the EBS Asserter application.

Define the data source

1. Log in to the EBS Asserter WebLogic console and select Data Sources.
2. Click **New** and select Generic Data Source.
3. Enter the following database details and click Next.

     - NameEBSDB (The name should be same as the ebs.ds.name in file.)
     - JNDI NameEBSDB
     - Database TypeOracle
     - Database Driver\*Oracle's Driver (Thin) for Instance connections; Versions:Any.

4. Enter the following database connection details:

     - Database NameEBSDB
     - Host Nameebs.example.com
     - Port1521
     - Database UsernameEBSASSERTER
     - Password: Enter the username password.

5. Select driver class name" oracle.apps.fnd.ext.jdbc.datasource.AppsDataSource.
6. Update the following details in Properties:

        user=IDETITYADMIN
        dbcFile=/u01/app/SID/ebssdk/EBSDB_ebsasserter.example.com.dbc

7. Click Test Configuration

Deploy EBS Asserter on the WebLogic server

1. Log in to the EBS Asserter WebLogic console and click Lock & Edit.
2. Click Deployments and Install
3. Select the ebs.war file and click Next
4. Select Install this deployment as an application and click Next.
5. Select the target server, EBSAsserter\_server. Click Next.
6. Accept the default values and click Finish.
7. Click Activate Changes.

8. Update EBS profiles

Update the following EBS profiles:

Application Authenticate Agenthttps://ebsasserter.example.com:7002/ebs
Oracle Applications Session Cookie Domain (ICX_SESSION_COOKIE_DOMAIN)**: DOMAIN
- **Applications SSO Type**: `SSWA_SSO`
- **FND_SEC_ALLOW_UNRESTRICTED_REDIRECT: Yes

9. Restart and test

Restart the EBS services and test your SSO logins.

Conclusion

The preceding steps help implement SSO functionality for EBS by using Oracle IDCS and facilitate integration between active AD, EBS, and IDCS.

Monday, February 12, 2018

Deregister Oracle EBS from Oracle Access Manager

Oracle Access Manager maintains a single registration for your Oracle E-Business Suite instance and does not distinguish between run and patch file systems. Hence removing the registration from Oracle Access Manager will affect the running system.


Below are the steps to deregister your Oracle E-Business Suite instance from Oracle Access Manager:


Source the Oracle E-Business Suite environment file of your run file system.
$ cd <EBS_BASE_HOME>
 $ . EBSapps.env
 $ echo $FILE_EDITION
EBS_BASE_HOME is the top directory where fs1, fs2, and others are installed.
Type "R" to select the run file system environment when prompted. Echo $FILE_EDITION returns "run" to indicate that the run file system is sourced. Ensure there is no active Online Patching cycle.


Stop the OHS server on the Oracle E-Business Suite Environment:


$ adapcctl.sh stop
Execute the following command to deregister Oracle E-Business Suite from Oracle Access Manager.


Reference:
Integrating Oracle E-Business Suite Release 12.2 with Oracle Access Manager 11gR2 (11.1.2) using Oracle E-Business Suite AccessGate (Doc ID 1576425.1)


[applmgr@ed-olapplin2 ~]$ txkrun.pl -script=SetOAMReg -deregisteroam=yes
*** ALL THE FOLLOWING FILES ARE REQUIRED FOR RESOLVING RUNTIME ERRORS
*** Log File = /u02/ebsdev/fs2/inst/apps/ebsdev_ed-olapplin1/logs/appl/rgf/TXK/txkSetOAMReg_Sun_Jan_28_14_07_54_2018.log
Enter OAM Console URL (for ex: http://myoam.us.oracle.com:7001): http://oamsrv1.wl.oracle.nz:7012
Enter OAM console user name (for ex: weblogic): weblogic
Enter OAM console password:
Enter APPS password:
######################################################################
oamHost                 = http://oamsrv1.wl.oracle.nz:7012
oamApplicationDomain    = ebsdev_f5url.wl.oracle.nz_443
oamHostIdentifier       = ebsdev_f5url.wl.oracle.nz_443
contextFile             = /u02/ebsdev/fs2/inst/apps/ebsdev_ed-olapplin1/appl/admin/ebsdev_ed-olapplin2.xml
webGateInternal         = Yes
ebsProfileLevel         = Site
webGateUrl              = https://f5url.wl.oracle.nz:443
contextRoot             = accessgate
######################################################################
Do you wish to continue (y|n)?
y


admanagedsrvctl.sh stop oaea_server1
perl $AD_TOP/patch/115/bin/adProvisionEBS.pl ebs-delete-managedserver -contextfile=$CONTEXT_FILE -managedsrvname=oaea_server1
perl $FND_TOP/patch/115/bin/txkSetAppsConf.pl -contextfile=$CONTEXT_FILE -configoption=removeMS -accessgate=ed-olapplin1.wl.oracle.nz:6801


[applmgr@ed-olapplin1 ~]$ txkrun.pl -script=SetOAMReg -deregisteroam=yes
*** ALL THE FOLLOWING FILES ARE REQUIRED FOR RESOLVING RUNTIME ERRORS
*** Log File = /u02/ebsdev/fs2/inst/apps/ebsdev_ed-olapplin1/logs/appl/rgf/TXK/txkSetOAMReg_Sun_Jan_28_14_07_54_2018.log
Enter OAM Console URL (for ex: http://myoam.us.oracle.com:7001): http://oamsrv1.wl.oracle.nz:7012
Enter OAM console user name (for ex: weblogic): weblogic
Enter OAM console password:
Enter APPS password:
######################################################################
oamHost                 = http://oamsrv1.wl.oracle.nz:7012
oamApplicationDomain    = ebsdev_f5url.wl.oracle.nz_443
oamHostIdentifier       = ebsdev_f5url.wl.oracle.nz_443
contextFile             = /u02/ebsdev/fs2/inst/apps/ebsdev_ed-olapplin1/appl/admin/ebsdev_ed-olapplin1.xml
webGateInternal         = Yes
ebsProfileLevel         = Site
webGateUrl              = https://f5url.wl.oracle.nz:443
contextRoot             = accessgate
######################################################################
Do you wish to continue (y|n)?
y

admanagedsrvctl.sh stop oaea_server1
perl $AD_TOP/patch/115/bin/adProvisionEBS.pl ebs-delete-managedserver -contextfile=$CONTEXT_FILE -managedsrvname=oaea_server1
perl $FND_TOP/patch/115/bin/txkSetAppsConf.pl -contextfile=$CONTEXT_FILE -configoption=removeMS -accessgate=ed-olapplin1.wl.oracle.nz:6802


Now run autoconfig on all nodes.


Reference:
Integrating Oracle E-Business Suite Release 12.2 with Oracle Access Manager 11gR2 (11.1.2) using Oracle E-Business Suite AccessGate (Doc ID 1576425.1)


$ txkrun.pl -script=SetOAMReg -deregisteroam=yes -ebsProfileLevel=[Site|Server]


This will switch back the Oracle E-Business Suite profile options Application Authenticate Agent (APPS_AUTH_AGENT) and Applications SSO Type (APPS_SSO) to local login.


 Specify -ebsProfileLevel=Server if you registered the instance at server level. This will not affect the site level profiles, and only remove the profiles at server level for the server that you deregister.


The script will prompt for the following information.

•Enter OAM console URL (for example: http://myoam.us.oracle.com:7001)
•Enter OAM console user name (for example: weblogic)
•Enter OAM console password
•Enter APPS password
Enter the required information when prompted.


The script will provide a summary of input values. Confirm that these are correct and start the deregistration.


Do you wish to continue (y|n)? y


The script will now perform the following main tasks automatically:
•Deregister Oracle E-Business Suite AccessGate with Oracle Access Manager.
•Disable WebGate in your Oracle E-Business Suite webtier.
•Clear Oracle E-Business Suite profile options Application Authenticate Agent
(APPS_AUTH_AGENT) and Applications SSO Type (APPS_SSO) to switch back to local login. If you registered the instance with -ebsProfileLevel=Site (default), deregistration will clear the profiles at SITE level. If you registered the instance with -ebsProfileLevel=Server, deregistration will clear the profiles at SERVER level.


Alternatively, you can execute the script with parameters. For example:


$ txkrun.pl -script=SetOAMReg -deregisteroam=yes \
 -oamHost=http://myoam.us.oracle.com:7001 \
 -oamUserName=weblogic \
 -skipConfirm=yes


The script must complete successfully. Review the log files for any error messages.


The script will not automatically delete the following entries, as you may have also used these for other partner applications:

•Authentication Scheme (by default named EBSAuthScheme)
•Authentication Module (by default named LDAP_EBS)
•Identity Store (by default named OIDIdentityStore)


If you exclusively used these entries for the Oracle E-Business Suite instance that you deregistered, you may delete the Authentication Scheme, Authentication Module, and Identity Store in the order listed, using your OAM Administration Console.


After de-registering your Oracle E-Business Suite instance from Oracle Access Manager, you no longer need the Oracle E-Business Suite AccessGate deployment. Delete your Oracle E-Business Suite AccessGate using your WebLogic Administration Console, for example:
http://ebshost.example.com:7001/console


In the WebLogic Administration Console, navigate to EBS_domain_sid > Deployments, stop then delete the Oracle E-Business Suite AccessGate application named "accessgate". Ensure that you click 'Activate Changes' in the 'Change Center' pane, for the changes to take effect.


If you do not use the data source "OAEADatasource" for any other application, you may also delete the datasource. Navigate to EBS_domain_sid > Services > Data Sources, and delete data source "OAEADatasource". Ensure that you click 'Activate Changes' in the 'Change Center' pane, for the changes to take effect.


Delete the managed server on which accessgate was deployed:

1.If the managed server oaea_server1 is currently running, shut it down as follows:

$ sh $ADMIN_SCRIPTS_HOME/admanagedsrvctl.sh stop oaea_server1
The script will prompt for the following passwords:
•Enter the WebLogic Admin password.
Enter the required information when prompted.


2.Run the command below on the application tier node where the oaea_server1 managed server resides. This will delete the managed server, and also update the respective context variables that contain references to the deleted managed server:

$ perl $AD_TOP/patch/115/bin/adProvisionEBS.pl \
 ebs-delete-managedserver \
 -contextfile=$CONTEXT_FILE -managedsrvname=oaea_server1
The script will prompt for the following passwords:
•Enter the APPS Schema password.
•Enter the WebLogic AdminServer password.
Enter the required information when prompted.
The following confirmation message will be displayed: ManagedServer oaea_server1 deleted successfully.


3.Remove the managed server and port from the mod_wl_ohs.conf configuration:

$ perl $FND_TOP/patch/115/bin/txkSetAppsConf.pl \
 -contextfile=$CONTEXT_FILE \
 -configoption=removeMS \
 -accessgate=<host>.<domain>:<port>
To determine the value of the Port that was used for the oaea_server1 managed server, search for 's_wls_oaeaport' in $CONTEXT_FILE.


Stop and restart the Oracle E-Business Suite Application Tier services.


Reference:Integrating Oracle E-Business Suite Release 12.2 with Oracle Access Manager 11gR2 (11.1.2) using Oracle E-Business Suite AccessGate (Doc ID 1576425.1)

Wednesday, August 30, 2017

AccessGate Login Fails with HTTP 500 Error after ADOP Cycle

I was facing the subject problem after successful ADOP cycle, Single Sign On SSO does not work and throws HTTP 500 Error at login.
Below shows that ADOP cycle was successful,
But when we try to access the application we get below error,
EBS 12.2 AccessGate Login Fails with HTTP 500 Error 'Request Failed for : /accessgate/ssologin?, Resp Code : [500]' On Secondary Nodes After A Complete ADOP Patching Cycle As File oaea_wls.properties is Not Updated On Multiple Filesystems (fs2)

In some cases fs_clone can fail to copy the file oaea_wls.properties to the other filesystem fs2 for the additional apps nodes.
For example, on the secondary apps tiers using a different filesystem (fs2), file oaea_wls.properties will have null settings for some parameters:
# +======================================================================+
# |    Copyright (c) 2005, 2014 Oracle and/or its affiliates.           |
# |                         All rights reserved.                         |
# |                           Version 12.0.0                             |
# +======================================================================+
# $Header: oaea_wls_properties.tmp 120.0.12020000.1 2014/07/15 12:36:37 mmanku noship $
#
# This file lists all the  parameters required to start acessgate application
# /u03/eruat/fs1/EBSapps/appl/fnd/12.0.0
# ###############################################################
#
# Do not edit settings in this file manually. They are managed
# automatically and will be overwritten when AutoConfig runs.
# For more information about AutoConfig, refer to the Oracle
# E-Business Suite Setup Guide.
#
# ###############################################################
SSO_SERVER_RELEASE=
SSO_SERVER_URL=
SSO_SERVER_TYPE=
LOG_CONFIG_FILE=DEFAULT
APPL_SERVER_ID=
OAM_LOGOUT_URL=
CONNECTION_REF=
WEBGATE_LOGOUT=
oracle.apps.fnd.sso.WebEntries=DEFAULT

In certain cases for an ONLINE patching cycle, the file $INST_TOP/appl/admin/oaea_wls.properties does not get copied from RUN to PATCH.
The issue is documented in the following unpublished defect:
Bug 25720619 - ERROR 500 INTERNAL SERVER ERROR TRYING TO LOGIN AFTER PATCH CYCLE
Workaround Fix:
To resolve the issue test the following steps in a development instance and then migrate accordingly:
1. Ensure a valid backup exists for the instance where the solution is being testing.
2. Copy file $INST_TOP/appl/admin/oaea_wls.properties from the original filesystem (fs1) over to the additional filesystems (fs2), to migrate the proper node settings to oaea_wls.properties
3. Restart the servers to ensure the file changes are processed.
4. Retest the login and confirm the error is resolved.
Following should be the content of the file oaea_wls.properties
This is the latest update as of 28-August-2017 for this issue, there is a patch for this defect 25720619 that is planned to be released in the next AD / TXK Delta patchset, with no release date information currently available.

For any queries on this article, kindly email me samiappsdba@gmail.com

Monday, July 31, 2017

Install Webgate, Deploy AccessGate, Register EBS with OAM

In this article we will see how to Install webgate, Deploy Access Gate and Register EBS with OAM.


1. Install Webgate and apply patch to Webgate Home Directory
Firstly copy the webgate patch p21118593 and webgate software to node 1 EBS server and then install using txkrun.pl script


# scp -rp p21118593_111230_Linux-x86-64.zip webgate appluat@ed-olraclin3:/home/appluat/ssoPatches
# txkrun.pl -script=SetOAMReg -installWebgate=yes -webgatestagedir=/home/appluat/ssoPatches/webgate

Now apply WEBGATE Patch to webgate HOME Directory
[appluat@ed-olraclin3 FMW_Home]$ export ORACLE_HOME=/u03/eruat/fs1/FMW_Home/Oracle_OAMWebGate1
[appluat@ed-olraclin3 FMW_Home]$ export PATH=/u03/eruat/fs1/FMW_Home/Oracle_OAMWebGate1/OPatch/:$PATH
[appluat@ed-olraclin3 ssoPatches]$ unzip p21118593_111230_Linux-x86-64.zip
[appluat@ed-olraclin3 21118593]$ pwd
/home/appluat/ssoPatches/21118593
[appluat@ed-olraclin3 21118593]$ opatch apply

2. Deploy Access Gate
[appluat@ed-olraclin3 21118593]$ wget http://uatoam.qa.qia.net:7014 (test the connection)--2017-06-18 10:44:45--  http://uatoam.qa.qia.net:7014/
Resolving uatoam.qa.qia.net (uatoam.qa.qia.net)... 192.168.1.10
Connecting to uatoam.qa.qia.net (uatoam.qa.qia.net)|192.168.1.10|:7014... connected.
HTTP request sent, awaiting response... 404 Not Found
2017-06-18 10:44:45 ERROR 404: Not Found.


On EBS Node 1 (ed-olraclin3) server execute the below command,
# perl $AD_TOP/patch/115/bin/adProvisionEBS.pl ebs-create-oaea_resources -contextfile=$CONTEXT_FILE -deployApps=accessgate -SSOServerURL=http://uatoam.qa.qia.net:7014 -managedsrvname=oaea_server1 -managedsrvport=6801 -logfile=/tmp/deployeag.log


On EBS Node 2 (ed-olraclin4) server execute the below command,
# perl $AD_TOP/patch/115/bin/adProvisionEBS.pl ebs-create-oaea_resources -contextfile=$CONTEXT_FILE -deployApps=accessgate -SSOServerURL=http://uatoam.qa.qia.net:7014 -managedsrvname=oaea_server2 -managedsrvport=6802 -logfile=/tmp/deployeag.log
On EBS Node 1 (ed-olraclin3) server execute the below command,
#perl $FND_TOP/patch/115/bin/txkSetAppsConf.pl -contextfile=$CONTEXT_FILE -configoption=addMS -accessgate=ed-olraclin3.qa.qia.net:6801
On EBS Node 2 (ed-olraclin4) server execute the below command,
#perl $FND_TOP/patch/115/bin/txkSetAppsConf.pl -contextfile=$CONTEXT_FILE -configoption=addMS -accessgate=ed-olraclin4.qa.qia.net:6802


--> Now Start Accessgate managed servers and make sure that accessgate + datasource are up and running. Test the datasource too from weblogic console datasources link.
3. Register EBS with OAM
Execute below command on EBS Node 1 ed-olraclin3 server
# txkrun.pl -script=SetOAMReg -registeroam=yes -oamHost=http://uatadmin.qa.qia.net:7012 -oamUserName=weblogic -ldapUrl=ldap://uatoid.qa.qia.net:3060 -oidUserName=cn=orcladmin -skipConfirm=yes -ldapSearchBase=cn=Users,dc=qa,dc=qia,dc=net -ldapGroupSearchBase=cn=Groups,dc=qa,dc=qia,dc=net


Execute below command on EBS Node 2 ed-olraclin4 server
#txkrun.pl -script=SetOAMReg -registeroam=yes -oamHost=http://uatadmin.qa.qia.net:7012 -oamUserName=weblogic -ldapUrl=ldap://uatoid.qa.qia.net:3060 -oidUserName=cn=orcladmin -ldapSearchBase=cn=Users, dc=qa,dc=qia,dc=net - ldapGroupSearchBase=cn=Groups, dc=qa,dc=qia,dc=net -authScheme=EBSAuthScheme -authSchemeMode=reference


Note: If you are setting up SSO for EBS then firstly you should be ready with OID, OAM setup and then do this article steps, set required EBS profile settings and finally restart all EBS Services and test EBS Single Sign On SSO.
Moreover, kindly follow my previously posted articles to do setup for OID, OAM, Windows Native Authentication WNA Zero Sign-on, etc.


For any further queries please email me on samiappsdba@gmail.com

Monday, September 26, 2016

Configure Security Store for Oracle Identity and Access Management Domain to Database

After configuring the WebLogic Server Administration Domain for Oracle Identity and Access Management components and before starting the Oracle WebLogic Administration Server, you must run the configureSecurityStore.py script to configure the Database Security Store as it is the only security store type supported by Oracle Identity and Access Management 11g Release 2 (11.1.2.3.0).

The configureSecurityStore.py script is located in the $IAM_HOME/common/tools.

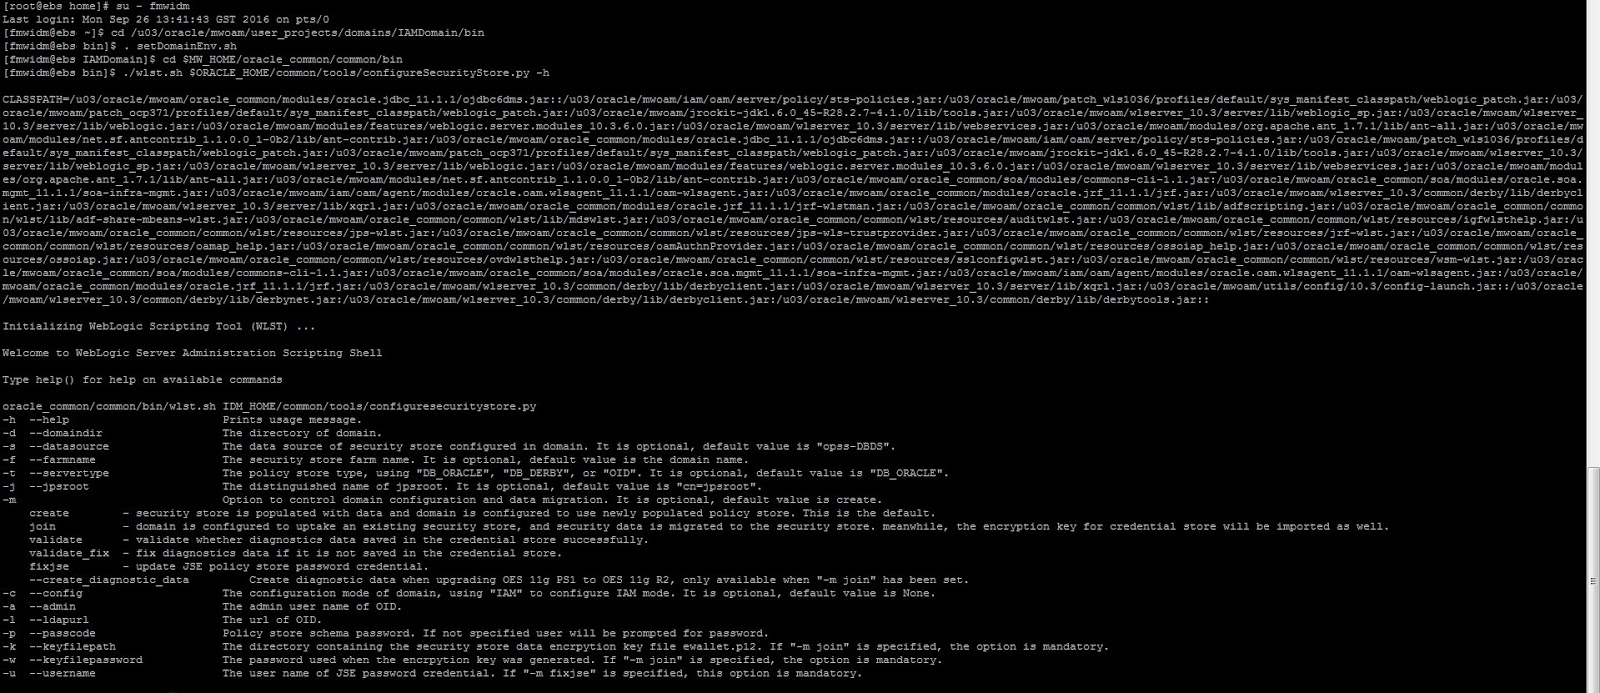
Use the -h option for help information about using the script. Note that not all arguments will apply to configuring the Database Security Store.

# . oam.env
export MW_HOME=/u03/oracle/mwoam
export WL_HOME=$MW_HOME/wlserver_10.3
export ORACLE_HOME=$MW_HOME/iam
export DOMAIN_HOME=$MW_HOME/user_projects/domains/IAMDomain
export JAVA_HOME=$MW_HOME/jrockit-jdk1.6.0_45-R28.2.7-4.1.0
export PATH=$ORACLE_HOME/bin:$ORACLE_HOME/OPatch:$JAVA_HOME/bin:$PATH:.

# cd $DOMAIN_HOME/bin
# pwd
/u01/orafmw/mwoam/user_projects/domains/IAMDomain/bin

# . setDomainEnv.sh
# cd $MW_HOME/oracle_common/common/bin
# pwd
/u01/orafmw/mwoam/oracle_common/common/bin
# ./wlst.sh $ORACLE_HOME/common/tools/configureSecurityStore.py -h
Each Oracle Identity and Access Management 11g Release 2 (11.1.2.3.0) domain must be configured to have a Database Security Store. Before you configure the Database Security Store for an Oracle Identity and Access Management 11g Release 2 (11.1.2.3.0) domain, you must identify the products to be configured in a single-domain scenario or in a multiple-domain scenario.

Following configureSecurityStore.py options are available for configuring the domain to use the Database Security Store:
•-m join
•-m validate - To validate whether the security store has been created or joined correctly
# $MW_HOME/oracle_common/common/bin/wlst.sh $IAM_HOME/common/tools/configureSecurityStore.py -d /u01/oracle/admin/domains/base_domain -m validate
•-m create
# ./wlst.sh $ORACLE_HOME/common/tools/configureSecurityStore.py -d $DOMAIN_HOME -c IAM -p passwordhere -m create

# ./wlst.sh /u01/orafmw/mwoam/iam/common/tools/configureSecurityStore.py -d $DOMAIN_HOME -c IAM -p passwordhere -m create

You will see the below huge output when we run configureSecurityStore.py script with create option,

OUTPUT
CLASSPATH=/u01/orafmw/mwoam/oracle_common/modules/oracle.jdbc_11.1.1/ojdbc6dms.jar::/u01/orafmw/mwoam/iam/oam/server/policy/sts-
policies.jar:/u01/orafmw/mwoam/patch_wls1036/profiles/default/sys_manifest_classpath/weblogic_patch.jar:/u01/orafmw/mwoam/patch_ocp371/profiles/default/sys_manifest_classpath/weblogic_patch.jar:/u01/orafmw/mwoam/jrockit-jdk1.6.0_45-R28.2.7-4.1.0/lib/tools.jar:/u01/orafmw/mwoam/wlserver_10.3/server/lib/weblogic_sp.jar:/u01/orafmw/mwoam/wlserver_10.3/server/lib/weblogic.jar:/u01/orafmw/mwoam/modules/features/weblogic.server.modules_10.3.6.0.jar:/u01/orafmw/mwoam/wlserver_10.3/server/lib/webservices.jar:/u01/orafmw/mwoam/modules/org.apache.ant_1.7.1/lib/ant-all.jar:/u01/orafmw/mwoam/modules/net.sf.antcontrib_1.1.0.0_1-0b2/lib/ant-contrib.jar:/u01/orafmw/mwoam/oracle_common/modules/oracle.jdbc_11.1.1/ojdbc6dms.jar::/u01/orafmw/mwoam/iam/oam/server/policy/sts-policies.jar:/u01/orafmw/mwoam/patch_wls1036/profiles/default/sys_manifest_classpath/weblogic_patch.jar:/u01/orafmw/mwoam/patch_ocp371/profiles/default/sys_manifest_classpath/weblogic_patch.jar:/u01/orafmw/mwoam/jrockit-jdk1.6.0_45-R28.2.7-4.1.0/lib/tools.jar:/u01/orafmw/mwoam/wlserver_10.3/server/lib/weblogic_sp.jar:/u01/orafmw/mwoam/wlserver_10.3/server/lib/weblogic.jar:/u01/orafmw/mwoam/modules/features/weblogic.server.modules_10.3.6.0.jar:/u01/orafmw/mwoam/wlserver_10.3/server/lib/webservices.jar:/u01/orafmw/mwoam/modules/org.apache.ant_1.7.1/lib/ant-all.jar:/u01/orafmw/mwoam/modules/net.sf.antcontrib_1.1.0.0_1-0b2/lib/ant-contrib.jar:/u01/orafmw/mwoam/oracle_common/soa/modules/commons-cli-1.1.jar:/u01/orafmw/mwoam/oracle_common/soa/modules/oracle.soa.mgmt_11.1.1/soa-infra-mgmt.jar:/u01/orafmw/mwoam/iam/oam/agent/modules/oracle.oam.wlsagent_11.1.1/oam-wlsagent.jar:/u01/orafmw/mwoam/oracle_common/modules/oracle.jrf_11.1.1/jrf.jar:/u01/orafmw/mwoam/wlserver_10.3/common/derby/lib/derbyclient.jar:/u01/orafmw/mwoam/wlserver_10.3/server/lib/xqrl.jar:/u01/orafmw/mwoam/oracle_common/modules/oracle.jrf_11.1.1/jrf-wlstman.jar:/u01/orafmw/mwoam/oracle_common/common/wlst/lib/adfscripting.jar:/u01/orafmw/mwoam/oracle_common/common/wlst/lib/adf-share-mbeans-wlst.jar:/u01/orafmw/mwoam/oracle_common/common/wlst/lib/mdswlst.jar:/u01/orafmw/mwoam/oracle_common/common/wlst/resources/auditwlst.jar:/u01/orafmw/mwoam/oracle_common/common/wlst/resources/igfwlsthelp.jar:/u01/orafmw/mwoam/oracle_common/common/wlst/resources/jps-wlst.jar:/u01/orafmw/mwoam/oracle_common/common/wlst/resources/jps-wls-trustprovider.jar:/u01/orafmw/mwoam/oracle_common/common/wlst/resources/jrf-wlst.jar:/u01/orafmw/mwoam/oracle_common/common/wlst/resources/oamap_help.jar:/u01/orafmw/mwoam/oracle_common/common/wlst/resources/oamAuthnProvider.jar:/u01/orafmw/mwoam/oracle_common/common/wlst/resources/ossoiap_help.jar:/u01/orafmw/mwoam/oracle_common/common/wlst/resources/ossoiap.jar:/u01/orafmw/mwoam/oracle_common/common/wlst/resources/ovdwlsthelp.jar:/u01/orafmw/mwoam/oracle_common/common/wlst/resources/sslconfigwlst.jar:/u01/orafmw/mwoam/oracle_common/common/wls/resources/wsm-wlst.jar:/u01/orafmw/mwoam/oracle_common/soa/modules/commons-cli-1.1.jar:/u01/orafmw/mwoam/oracle_common/soa/modules/oracle.soa.mgmt_11.1.1/soa-infra-mgmt.jar:/u01/orafmw/mwoam/iam/oam/agent/modules/oracle.oam.wlsagent_11.1.1/oam-wlsagent.jar:/u01/orafmw/mwoam/oracle_common/modules/oracle.jrf_11.1.1/jrf.jar:/u01/orafmw/mwoam/wlserver_10.3/common/derby/lib/derbyclient.jar:/u01/orafmw/mwoam/wlserver_10.3/server/lib/xqrl.jar:/u01/orafmw/mwoam/utils/config/10.3/confi
g-launch.jar::/u01/orafmw/mwoam/wlserver_10.3/common/derby/lib/derbynet.jar:/u01/orafmw/mwoam/wlserver_10.3/common/derby/lib/derbyclient.jar:/u01/orafmw/mwoam/wlserver_10.3/common/derby/lib/derbytools.jar::


Initializing WebLogic Scripting Tool (WLST) ...
Welcome to WebLogic Server Administration Scripting Shell
Type help() for help on available commands

Info: Data source is: opss-DBDS
Info: DB JDBC driver: oracle.jdbc.OracleDriver
Info: DB JDBC URL: jdbc:oracle:thin:@ed-olraclin1.samiora.blogspot.com:1521/idmdb.samiora.blogspot.com
Connected:oracle.jdbc.driver.T4CConnection@1e3d6cac
Disconnect:oracle.jdbc.driver.T4CConnection@1e3d6cac
INFO: Found persistence provider "org.eclipse.persistence.jpa.PersistenceProvider". OpenJPA will not be used.
[oracle.security.jps.internal.config.db.DbCredStoreServiceConfigurator]  checkServiceSetup - done
Apr 2, 2014 8:14:14 AM oracle.security.jps.internal.config.ldap.LdapCredStoreServiceConfigurator schemaCompatibleHandler
INFO: Credential store schema upgrade not required. Store Schema version 11.1.1.7.0 is compatible to the seed schema version 11.1.1.4.0
[oracle.security.jps.internal.config.db.DbCredStoreServiceConfigurator]  checkServiceSchema - Store schema has been seeded completely
[oracle.security.jps.internal.config.db.DbCredStoreServiceConfigurator]  updateServiceConfiguration - done
[oracle.security.jps.internal.config.db.DbCredStoreServiceConfigurator]  seedSchemaAndCreateDIT - done
Apr 2, 2014 8:14:17 AM oracle.security.jps.internal.tools.utility.JpsUtilMigrationCredImpl migrateCredentialData
INFO: Migration of Credential Store data in progress.....
Apr 2, 2014 8:14:17 AM oracle.security.jps.internal.tools.utility.JpsUtilMigrationCredImpl migrateCredentialData
INFO: Migration of Credential Store data completed, Time taken for migration is 00:00:00
[oracle.security.jps.internal.config.db.DbCredStoreServiceConfigurator]  migrateData - done
[oracle.security.jps.internal.config.db.DbCredStoreServiceConfigurator]  testJpsService - done
[oracle.security.jps.internal.config.db.DbKeyStoreServiceConfigurator]  checkServiceSetup - done
[oracle.security.jps.internal.config.db.DbKeyStoreServiceConfigurator]  checkServiceSchema - Store schema has been seeded completely
Apr 2, 2014 8:14:18 AM oracle.security.jps.internal.config.ldap.LdapKeyStoreServiceConfigurator schemaCompatibleHandler
INFO: Keystore schema upgrade not required. Store Schema version 11.1.1.7.0 is compatible to the seed schema version 11.1.1.4.0
[oracle.security.jps.internal.config.db.DbKeyStoreServiceConfigurator]  updateServiceConfiguration - done
[oracle.security.jps.internal.config.db.DbKeyStoreServiceConfigurator]  seedSchemaAndCreateDIT - done
[oracle.security.jps.internal.config.db.DbKeyStoreServiceConfigurator]  migrateData - done
[oracle.security.jps.internal.config.db.DbKeyStoreServiceConfigurator]  testJpsService - done
Apr 2, 2014 8:14:19 AM oracle.security.jps.internal.policystore.ldap.LdapPolicyStore initial
INFO: Your Policy store schema is not upgraded to the latest version!
Please run the PSA (Patch Set Assistant) to upgrade the current schema version 11.1.1.7.0 to the latest version 11.1.1.7.2.
Or, you could continue to run in the backward-compatibility mode.
[oracle.security.jps.internal.config.db.DbPolicyStoreServiceConfigurator]  checkServiceSetup - done
[oracle.security.jps.internal.config.db.DbPolicyStoreServiceConfigurator]  checkServiceSchema - Store schema has been seeded completely
Apr 2, 2014 8:14:19 AM oracle.security.jps.internal.config.ldap.LdapPolicyStoreServiceConfigurator schemaCompatibleHandler
INFO: Policy schema upgrade not required. Store Schema version 11.1.1.7.0 is compatible to the seed schema version 11.1.1.4.0
[oracle.security.jps.internal.config.db.DbPolicyStoreServiceConfigurator]  updateServiceConfiguration - done
Apr 2, 2014 8:14:19 AM oracle.security.jps.internal.policystore.ldap.LdapPolicyStore initial
INFO: Your Policy store schema is not upgraded to the latest version!
Please run the PSA (Patch Set Assistant) to upgrade the current schema version 11.1.1.7.0 to the latest version 11.1.1.7.2.
Or, you could continue to run in the backward-compatibility mode.
[oracle.security.jps.internal.config.db.DbPolicyStoreServiceConfigurator]  seedSchemaAndCreateDIT - done
WLS ManagedService is not up running. Fall back to use system properties for configuration.
Apr 2, 2014 8:14:24 AM oracle.security.jps.internal.tools.utility.destination.apibased.JpsDstPolicy migrateData
INFO: Migration of Admin Role Members started
Apr 2, 2014 8:14:24 AM oracle.security.jps.internal.tools.utility.destination.apibased.JpsDstPolicy migrateData
INFO: Migration of Admin Role Members completed in 00:00:00
[oracle.security.jps.internal.config.db.DbPolicyStoreServiceConfigurator]  migrateData - done
[oracle.security.jps.internal.config.db.DbPolicyStoreServiceConfigurator]  testJpsService - done
[oracle.security.jps.internal.config.db.DbAuditStoreServiceConfigurator]  checkServiceSetup - done
[oracle.security.jps.internal.config.db.DbAuditStoreServiceConfigurator]  checkServiceSchema - Store schema has been seeded completely
Apr 2, 2014 8:14:25 AM oracle.security.jps.internal.config.ldap.LdapAuditServiceConfigurator schemaCompatibleHandler
INFO: Audit store schema upgrade not required. Store Schema version 11.1.1.7.0 is compatible to the seed schema version 11.1.1.4.0
[oracle.security.jps.internal.config.db.DbAuditStoreServiceConfigurator]  updateServiceConfiguration - done
[oracle.security.jps.internal.config.db.DbAuditStoreServiceConfigurator]  seedSchemaAndCreateDIT - done
Apr 2, 2014 8:14:25 AM oracle.security.jps.internal.audit.AuditServiceImpl registerInternal
WARNING: Cannot register to audit service for component "JPS".
Apr 2, 2014 8:14:25 AM oracle.security.jps.internal.tools.utility.JpsUtilMigrationAuditStoreImpl migrateAuditStoreData
INFO: Migration of Audit Store data in progress.....
Apr 2, 2014 8:15:14 AM oracle.security.jps.internal.tools.utility.JpsUtilMigrationAuditStoreImpl migrateAuditStoreData
INFO: Migration of Audit Store data completed, Time taken for migration is 00:00:49
[oracle.security.jps.internal.config.db.DbAuditStoreServiceConfigurator]  migrateData - done
[oracle.security.jps.internal.config.db.DbAuditStoreServiceConfigurator]  testJpsService - done
persist to output: /u01/orafmw/mwoam/user_projects/domains/IAMDomain/config/fmwconfig - done
INFO: Found persistence provider "org.eclipse.persistence.jpa.PersistenceProvider". OpenJPA will not be used.
[oracle.security.jps.internal.config.db.DbCredStoreServiceConfigurator]  checkServiceSetup - done
[oracle.security.jps.internal.config.db.DbCredStoreServiceConfigurator]  updateServiceConfiguration - done
[oracle.security.jps.internal.config.db.DbKeyStoreServiceConfigurator]  checkServiceSetup - done
[oracle.security.jps.internal.config.db.DbKeyStoreServiceConfigurator]  updateServiceConfiguration - done
Apr 2, 2014 8:15:24 AM oracle.security.jps.internal.policystore.ldap.LdapPolicyStore initial
INFO: Your Policy store schema is not upgraded to the latest version!
Please run the PSA (Patch Set Assistant) to upgrade the current schema version 11.1.1.7.0 to the latest version 11.1.1.7.2.
Or, you could continue to run in the backward-compatibility mode.
[oracle.security.jps.internal.config.db.DbPolicyStoreServiceConfigurator]  checkServiceSetup - done
[oracle.security.jps.internal.config.db.DbPolicyStoreServiceConfigurator]  updateServiceConfiguration - done
[oracle.security.jps.internal.config.db.DbAuditStoreServiceConfigurator]  checkServiceSetup - done
[oracle.security.jps.internal.config.db.DbAuditStoreServiceConfigurator]  updateServiceConfiguration - done
persist to output: /u01/orafmw/mwoam/user_projects/domains/IAMDomain/config/fmwconfig - done
Apr 2, 2014 8:15:32 AM oracle.security.jps.internal.policystore.ldap.LdapPolicyStore initial
INFO: Your Policy store schema is not upgraded to the latest version!
Please run the PSA (Patch Set Assistant) to upgrade the current schema version 11.1.1.7.0 to the latest version 11.1.1.7.2.
Or, you could continue to run in the backward-compatibility mode.
INFO: Found persistence provider "org.eclipse.persistence.jpa.PersistenceProvider". OpenJPA will not be used.
Apr 2, 2014 8:15:49 AM oracle.security.jps.internal.policystore.ldap.LdapPolicyStore initial
INFO: Your Policy store schema is not upgraded to the latest version!
Please run the PSA (Patch Set Assistant) to upgrade the current schema version 11.1.1.7.0 to the latest version 11.1.1.7.2.
Or, you could continue to run in the backward-compatibility mode.
Using default context in /u01/orafmw/mwoam/user_projects/domains/IAMDomain/config/fmwconfig/jps-config-migration.xml file for credential store.
Credential store location : jdbc:oracle:thin:@ed-olraclin1.samiora.blogspot.com:1521/idmdb.samiora.blogspot.com
Credential with map Oracle-IAM-Security-Store-Diagnostics key Test-Cred stored successfully!
 

        Credential for map Oracle-IAM-Security-Store-Diagnostics and key Test-Cred is:
                GenericCredential
Info: diagnostic credential created in the credential store.
Info:  Create operation has completed successfully.


Now that the configuration of the Database Security Store which is the only security store type supported by Oracle Identity and Access Management 11g Release 2 (11.1.2.3.0) is completed, now you can start the Weblogic Administration Server.

For any queries please email me on samiappsdba@gmail.com.

Tuesday, April 12, 2016

EBS R12 Integration with OAM 11g to enable SSO

E-Business Suite (EBS) integration with Oracle Access Manager (OAM) for Single Sign-On
(SSO) involves integrating EBS with Oracle Internet Directory (OID) for user synchronization,
pointing OAM’s identity store to use OID, and delegating EBS authentication to OAM.

OAM EBS Integration Components
In order to understand Oracle Access Manager (OAM) integration with Oracle E-Business Suite, let us first understand various components that are part of OAM-EBS integration.

1. Oracle Internet Directory (OID)
Oracle Internet Directory (OID) is Lightweight Directory Access Protocol (LDAP) server from
Oracle where all enterprise users are stored. Users in OID are synchronized with users in EBusiness
Suite (EBS) using Directory Integration Platform (DIP). Oracle Access Manager
(OAM) should use LDAP Server (like OID or Oracle Virtual Directory- OVD pointing to this
OID) as its identity store for authentication. There are various version of OID like 10g & 11g
(11.1.1.2/3/4/5/6/7), as of Oct 2013 latest OID version is 11.1.1.7. Recommended to use OID version
11.1.17 to integrate with Oracle E-Business Suite R12.1.x/R12.2.x

2. Directory Integration Platform (DIP)
Directory Integration Platform (DIP) 11g is a J2EE application deployed on WebLogic server
and used for provisioning/synchronization of users/groups across other LDAP servers &
applications. DIP consists of two type of engine, Synchronization and Provisioning.

Synchronization component is used to sync users/groups between OID and other LDAP servers
like Microsoft Active Directory (MS-AD) or IBM Directory Server.
Provisioning component is used to sync OID with applications like EBS, Portal, and Collaboration Suite. For user synchronization between OID and EBS, DIP uses its provisioning component.
DIP Provisioning component will be used to sync users between OID and E-Business Suite

3. Oracle Directory Services Manager (ODSM)
Oracle Directory Services Manager (ODSM) is a web application deployed on WebLogic server
and used to manage OID using web browser. Using ODSM you can configure/manage OID, and
create/delete users/groups.

4. Oracle WebLogic Server (WLS)
Oracle WebLogic Server (WLS) is J2EE Application Server from Oracle. WebLogic Domain is
logical component in which all resources (Admin Server, Managed Server, Java Database
Connectivity(JDBC), Java Messaging Server(JMS)) are deployed/configured. WebLogic
Domain consists of one and only one Admin Server and zero or more managed server.
In EBS-OAM deployment we should use two WebLogic Servers and two WebLogic Domain.
One for OID (DIP & ODSM) and second for OAM.

WebLogic version 10.3.6 (11g) can be used for both OAM & OID (DIP/ODSM) where EBS
AccessGate (EBS-AG) will be deployed on OAM WebLogic Domain.

  • On IDMDomain, Deployments are DIP & ODSM,
http://ed-olraclin.samiora.blogspot.com:7031/em

  • On IAMDomain, Deployments are EBS Access Gate, OAM and any custom login application, 
http://ed-olraclin.samiora.blogspot.com:7021/em

5.  Oracle Access Manager (OAM)
Oracle Access Manager is a J2EE application deployed on Weblogic Server and used as
Authentication & Authorization Server. There are various version of OAM like 10g, 11gR1
(11.1.1.3/5/7), and 11gR2 (11.1.2.0/1/2).

OAM Server consists of,
• OAM Server deployed on WebLogic Managed Server (default port 14100). There is
OAM-Proxy server running in background on default port 5575. Agents (WebGate)
connect to OAM-Proxy Port.
• OAM Console is a web application deployed on WebLogic Admin Server (default port
7001). OAM Console application is used to manage configuration, and define/manage
policies, authentication schemes.
• OAM Configuration is stored in XML file (oam-config.xml) on server and contains all
OAM configurations like Server Name, port, Webgate details, and Audit store details.
• OAM Policy Store is a repository (database) which stores policy (details like which
URL is protected using what authentication/authorization schemes)

http://ed-olraclin.samiora.blogspot.com:7021/oamconsole

6. Oracle HTTP Server (OHS)
Oracle HTTP Server is a Web Server from Oracle on which Web Gate is deployed. Users are redirected from EBS Middle Tier to this server for authentication (URL of this server is configured in EBS Profile option “Application Authentication Agent”). OHS acts as proxyserver to WebLogic Server on which EBS AccessGate (EBS-AG) is deployed. This OHS server also has mod_wl_ohs configured to forward request to WebLogic Server where Oracle EBusiness Suite AccessGate (EBS-AG) is deployed.
Note: E-Business Suite R12 comes with its own Oracle HTTP Server (OHS), OHS server mentioned here is different OHS server than one shipped with EBS R12 technology stack.

7. Web Gate
Web Gate is a web server plug-in (deployed with WebServer like Apache, OHS, IHS) which
intercepts user's request and send it to Oracle Access Manager Server to check if user is authenticated/authorised to access requested resource. Web Gate is installed on same machine, as
WebServer (OHS) and webgate configuration settings are pointed OHS configuration file (httpd.conf). For Web Gate to work an instance of Web Gate must be configured in OAM
Server using Remote Registration (RREG) utility or OAM Console and Web Gate must be
installed with OHS using same user as OHS.

8. mod_wl_ohs
This is module in Oracle HTTP Server (OHS) which forward request from OHS to WebLogic
Server where EBS Access Gate is deployed as defined in mod_wl_ohs.conf

Do the below configuration to Redirect HTTP Server to WebLogic Server for Oracle E-Business Suite AccessGate

Set the OHS environment file
. $HOME/ohs.env

Modify mod_wl_ohs.conf file under $ORACLE_INSTANCE/config/OHS/ohs1 directory.

<IfModule mod_weblogic.c>
WebLogicHost ed-olraclin1.samiora.blogspot.com -- This is the Server that has Access gate deployed on it.
WebLogicPort 7043
</IfModule>
<Location /ebsauth_eprd>
SetHandler weblogic-handler
</Location>

Now restart HTTP Server.
opmnctl stopall
opmnctl startall


9. Oracle E-Business Suite Access Gate
EBS AccessGate (EBS-AG) is a Java EE Application that maps a Single Sign-On user (authenticated via OAM) to an Oracle E-Business Suite user (stored in FND_USER table), and creates E-Business Suite session for that user. EBS-AG is deployed on WebLogic Server using ANT script that creates a web application and JDBC connection to EBS Database. Login Page for E-Business Suite is also configured as part of EBS AG. There are currently multiple version of E-Business Suite Access Gate i.e. 1.0.2 is certified with OAM 10g R3 where as EBS-AG version 1.1.2.0 is certified with OAM 11g R2 (11.1.2.1).
Note: If WebLogic Server (which hosts EBS-AG) is on different machine than EBS Middle Tier then you must register node (hosting EBS-AG) in EBS database, create DBC file and use this DBC file during EBS AccessGate deployment. If EBS-AG and EBS Middle Tier are running on same machine then you can use existing dbc file under $FND_SECURE.

10. Profile Option
Profile Option is used in E-Business Suite to update behaviour of environment, two profile option which are used in Oracle E-Business Suite are "Application SSO Type" and "Application Authentication Agent".

• Application SSO Type (APPS_SSO) - This profile option can be set only at site level
from one of four values SSWA, Portal, SSWA w/SSO or Portal w/SSO. To inform EBusiness
Suite that Single Sign-On is configured and redirect user to Single Sign-On
Page and NOT to Local Login page, set this profile option to either SSWA w/SSO or
Portal w/SSO

• Application Authentication Agent (APPS_AUTH_AGENT) - When this profile option
is set with profile option Application SSO Type, user is redirected to page generated
from value of this profile option. Lets assume value of profile option Application SSO
Type is set to http://ohsserver:ohsport/ebsauth_eprd/ then user will be redirected to page
http://ohsserver:ohsport/ebsauth_dev/OAMLogin.jsp . Value of profile option
Application Authentication Agent is set to format http://server:port/<context_root>
where server is name of server where Oracle HTTP Server (OHS) with Web Gate installed, port is OHS Listen Port and context_root is context root defined during AccessGate deployment.
Note- If Application Authenticate Agent profile option is missing ensure you have below
patches applied as per the version:-
For R12.1.1 – Patch Number – 9824524
For R12.1.2/R12.1.3 – Patch Number – 9454600

• Applications SSO Login Types at site level to SSO (or BOTH)

• Applications SSO Auto Link User at site level to Enabled

Applications SSO Enable OID Identity Add Event at profile option
to “Enabled”


Applications Single Sign On Hint Cookie” at site level to <blank> 


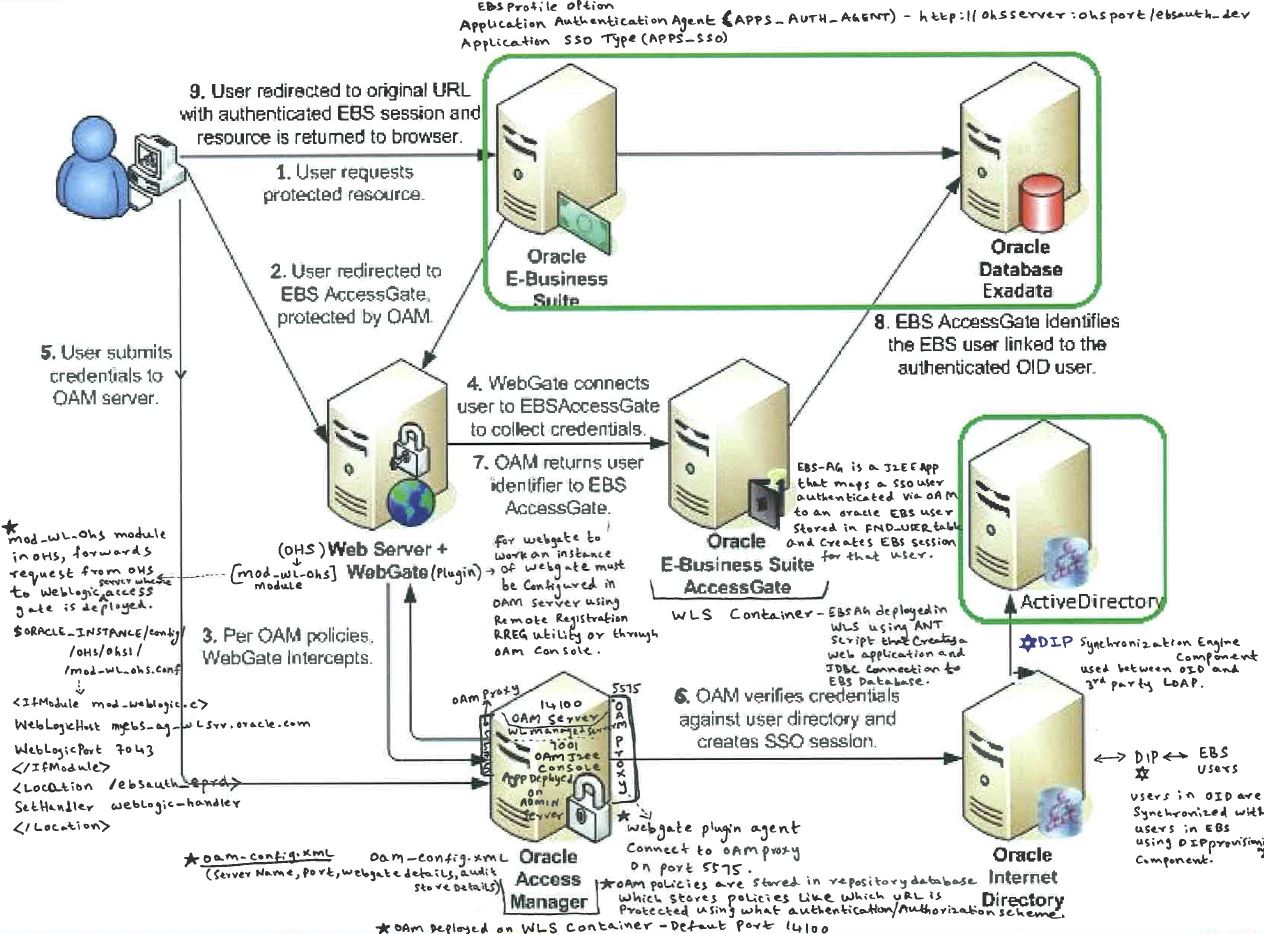
Request flow for E-Business Suite integrated with Oracle Access Manager


Above Pictures depicts the request flow when an unauthenticated user access E-Business Suite
integrated with Oracle Access Manager.

1. User access E-Business Suite URL http://<ebs_mid_tier>:<ebs_ohs_port> . EBS checks that profile option 'Application SSO Type' is set to either 'Portal w/SSO' or 'SSWA w/SSO' (w/SSO signifies that EBS is integrated with Single Sign-On Server).
2. EBS then check value of profile option Application Authentication Agent (value is set to http://<ohs_with_wg>:<ohs_with_wg:port>/<context_root>/ , where <context_root> is value set during E-Business Suite Access Gate Deployment) and redirect user to value set for profile option Application Authentication Agent
3. Web Gate deployed with OHS server then check if any token (Cookie) is available in user session and forwards this request to OAM server for validation.
4. OAM server will then check authentication URL configured for Web Gate (Host:Port or Host Identifier) and redirect user to authentication page configured by authentication URL. User will type username/password on authentication page, which OAM will validate against OAM’s identity store (Oracle Internet Directory). Oracle Internet Directory will validate username and password against attribute UID (login attribute) and attribute userPassword (password attribute)
5. On successful authentication OAM will forward response back to WebGate with generated Cookie
6. Web Gate will then redirect user to E-Business Suite Access Gate (EBS-AG) for user validation or user mapping.
7. E-Business Suite Access Gate will take this user ID and map/validate against user in EBusiness Suite (FND_USER)
8. On successful validation response is returned back to Web Gate
9. Web Gate will forward response back to user
10. User with token/cookie from WebGate/Access Gate is redirected back to E-Business Middle Tier
11. E-Business Suite Middle Tier will generate E-Business Suite specific cookie to user and from subsequently requests user talks directly to Oracle E-Business Suite until explicit log out or timeout

Attention: User in E-Business Suite (FND_USER) are synchronized with Oracle Internet Directory using Directory Integration Platform’s(DIP) Provisioning Framework
Attention: OIM (another product from Oracle IAM Suite) Connector (EBS User Management and EBS Employee Reconciliation) can also be used to synchronize users between OIM and EBS. Users in OID and OIM are also synchronized using LDAPSync. This integration is NOT required for EBS integration with OAM to enable SSO feature.

High Level Steps to integrate Oracle EBS R12 with OAM for Single Sign-On
Below are the high-level steps to integrate Oracle E-Business Suite with Oracle Access Manager to enable SSO.
1. Install Database for IAM (OID/OAM)
2. Install Oracle Internet Directory (OID)
3. Install Oracle Access Manager (OAM)
4. Integrate OAM with OID
5. Integrate EBS with OID
6. Install Oracle HTTP Server (OHS)
7. Install WebGate
8. Integrate EBS with OAM
9. WNA configuration (Optional but recommended) -http://samiora.blogspot.ae/2015/03/wna-configuration-in-oracle-access.html
10. Test OAM-EBS Integration

Bibliography:
http://www.otn.oracle.com
http://samiora.blogspot.ae/2014/02/steps-to-integrate-oracle-ebs-r12-with.html
http://samiora.blogspot.ae/2015/12/oam-application-domain-and-policy.html
http://samiora.blogspot.ae/2014/03/oracle-access-management-sso.html
http://samiora.blogspot.ae/2016/01/setup-ad-and-oid-plug-in-for-passwords.html
http://samiora.blogspot.ae/2014/10/start-oid-oam-components-integrated.html
http://samiora.blogspot.ae/2014/08/deregister-sso-oid-from-oracle.html

Join/Subscribe to this blog and I will email you the Step by step document I prepared for SSO setup with WNA Configuration.

For any further queries on this article, please don't hesitate to contact me on samiora@gmail.com