Oracle has released the On-Premise version of Oracle Database 21c ( only on Linux for now ), last week. You can download it from either MOS or Oracle edelivery:
- https://www.oracle.com/database/technologies/oracle-database-software-downloads.html
- https://edelivery.oracle.com
This release is an “Innovation Release”, which means it comes with only 2 years of Premier Support and no extended support, as opposed to a “Long Term Release” which comes with 5 years of Premier Support followed by 3 years of Extended Support. Tim Hall has explained in details why you shouldn’t jump onto upgrading to Oracle Database 21c in this post. So has Connor McDonald in this hilarious video. However, if you are looking to install and explore the new features in Oracle Database 21c, which are anyways going to be included in the upcoming Long Term Support Release, then this post should hopefully help.
In this post, I will show a step-by-step process of installing and setting up an Oracle Database 21c on Oracle Linux 7. I have configured Linux 7 on Oracle Virtual Box. I won’t go through the steps to setup OL7 in this post. You can refer to this link to go through the detailed steps of installing Linux 7 (OL7). The software I used are:
Prerequisites
Once you have downloaded and setup OL7, there are some prerequisite setups that needs to be performed before kicking of the installation. These steps are shown below.
Get the IP Address using ‘ifconfig’ or ‘ip addr’ command. For example:
[root@oracledb21col7 ~]# ifconfigGet the hostname.
[root@oracledb21col7 ~]# hostname
oracledb21col7.rishoradev.com
Amend the IP address and hostname to “/etc/hosts” file to resolve the hostname. You can use the vi editor for this.
[ Note: This can also be done with DNS ].
127.0.0.1   localhost localhost.localdomain localhost4 localhost4.localdomain4
::1         localhost localhost.localdomain localhost6 localhost6.localdomain6
192.168.XX.X oracledb21col7.rishoradev.com
Next, download “oracle-database-preinstall-21c” package. This package will perform all the setups that are necessary to install 21c. Check the available packages using ‘yum list’ command.
[root@oracledb21col7 ~]# yum list oracle-database-preinstall-21c
Loaded plugins: langpacks, ulninfo
Available Packages
oracle-database-preinstall-21c.x86_64               1.0-1.el7                ol7_latest
Use ‘yum install’ to install the “oracle-database-preinstall-21c” package. Once this is done, you should see a ‘Complete!’ message.
[root@oracledb21col7 ~]# yum install oracle-database-preinstall-21c.x86_64
Loaded plugins: langpacks, ulninfo
Resolving Dependencies
--> Running transaction check
---> Package oracle-database-preinstall-21c.x86_64 0:1.0-1.el7 will be installed
--> Processing Dependency: ksh for package: oracle-database-preinstall-21c-1.0-1.el7.x86_64
--> Running transaction check
---> Package ksh.x86_64 0:20120801-142.0.1.el7 will be installed
--> Finished Dependency Resolution

....

....
Installed:
  oracle-database-preinstall-21c.x86_64 0:1.0-1.el7

Dependency Installed:
  ksh.x86_64 0:20120801-142.0.1.el7

Complete!
Issue the ‘yum list’ command again to confirm that the package was successfully installed.
[root@oracledb21col7 ~]#  yum list oracle-database-preinstall-21c
Loaded plugins: langpacks, ulninfo
Installed Packages
oracle-database-preinstall-21c.x86_64            1.0-1.el7              @ol7_latest
The next step is not mandatory. But I ran the ‘yum update’ because I wanted to make sure I had also the latest OS packages. It might take a while for all the packages to be installed.
[root@oracledb21col7 ~]# yum update -y --skip-brokenEdit “/etc/selinux/config” file and set “SELINUX=permissive“. It is recommended that you restart the server after this.
[root@oracledb21col7 ~]# vi /etc/selinux/configDisable firewall.
[root@oracledb21col7 ~]# systemctl stop firewalld
[root@oracledb21col7 ~]# systemctl disable firewalld
Removed symlink /etc/systemd/system/multi-user.target.wants/firewalld.service.
Removed symlink /etc/systemd/system/dbus-org.fedoraproject.FirewallD1.service.
Create the directory structure for Oracle 21c to be installed and grant privileges.
[root@oracledb21col7 ~]# mkdir -p /u01/app/oracle/product/21c/dbhome_1
[root@oracledb21col7 ~]# mkdir -p /u02/oradata
[root@oracledb21col7 ~]# chown -R oracle:oinstall /u01 /u02
[root@oracledb21col7 ~]# chmod -R 777 /u01 /u02
Create a directory for hosting the scripts and navigate to the directory.
[root@oracledb21col7 ~]# mkdir /home/oracle/scriptsCreate an environment file called “setEnv.sh” using the script below.
[root@oracledb21col7 ~]# cat > /home/oracle/scripts/setEnv.sh <<EOF
> # Oracle Settings
> export TMP=/tmp
> export TMPDIR=\$TMP
>
> export ORACLE_HOSTNAME=oracledb21col7.rishoradev.com
> export ORACLE_UNQNAME=cdb1
> export ORACLE_BASE=/u01/app/oracle
> export ORACLE_HOME=\$ORACLE_BASE/product/21c/dbhome_1
> export ORA_INVENTORY=/u01/app/oraInventory
> export ORACLE_SID=cdb1
> export PDB_NAME=pdb1
> export DATA_DIR=/u02/oradata
>
> export PATH=/usr/sbin:/usr/local/bin:\$PATH
> export PATH=\$ORACLE_HOME/bin:\$PATH
>
> export LD_LIBRARY_PATH=\$ORACLE_HOME/lib:/lib:/usr/lib
> export CLASSPATH=\$ORACLE_HOME/jlib:\$ORACLE_HOME/rdbms/jlib
> EOF
Issue the following command to add the reference of the environment file created above in the “/home/oracle/.bash_profile”.
[root@oracledb21col7 ~]# echo ". /home/oracle/scripts/setEnv.sh" >> /home/oracle/.bash_profileCopy the Oracle software that you have downloaded to a directory. I have copied it under dbhome1.
[root@oracledb21col7 Downloads]# cp LINUX.X64_213000_db_home.zip /u01/app/oracle/product/21c/dbhome_1/.Change the password of “oracle” user.
[root@oracledb21col7 ~]# passwd oracleLogin using “oracle” user.
[root@oracledb21col7 ~]# su - oracleUnzip the Oracle software in ‘/u01/app/oracle/product/21c/dbhome_1’ directory, using the ‘unzip’ command as shown below. We’ll set this path as the ORACLE_HOME later on during the installation.
[oracle@oracledb21col7 dbhome_1]$ unzip -q LINUX.X64_213000_db_home.zip
[oracle@oracledb21col7 dbhome_1]$ ls
addnode     crs  data       diagnostics  hs             javavm  ldap                          mgw      olap    oracore  oui    precomp  racg      runInstaller   sqldeveloper  srvm      utl
assistants  css  dbs        dv           install        jdbc    lib                           network  oml4py  ord      owm    python   rdbms     schagent.conf  sqlj          suptools  xdk
bin         ctx  deinstall  env.ora      instantclient  jdk     LINUX.X64_213000_db_home.zip  nls      OPatch  ords     perl   QOpatch  relnotes  sdk            sqlpatch      ucp
clone       cv   demo       has          inventory      jlib    md                            odbc     opmn    oss      plsql  R        root.sh   slax           sqlplus       usm
This completes all the prerequite steps and now we are all set to kick off the installation.
Installation
For installing Oracle, I used MobaXterm, to launch the Installer. Download MobaXterm on the Host machine, open a console and connect to your Linux machine using ‘ssh’ and IP address of the Linux machine with oracle user, as shown in the screenshot below. [ I want to thank Jason Shannon for recommending MobaXterm]

Navigate to the folder where you have unzipped the Oracle using MobaXterm console and execute ‘runInstaller’.
[oracle@oracledb21col7 ~]$ cd /u01/app/oracle/product/21c/dbhome_1/
[oracle@oracledb21col7 dbhome_1]$ ./runInstaller
Launching Oracle Database Setup Wizard...
This will open up the GUI as shown below. Click on ‘Set Up Software Only’ and click ‘Next’.

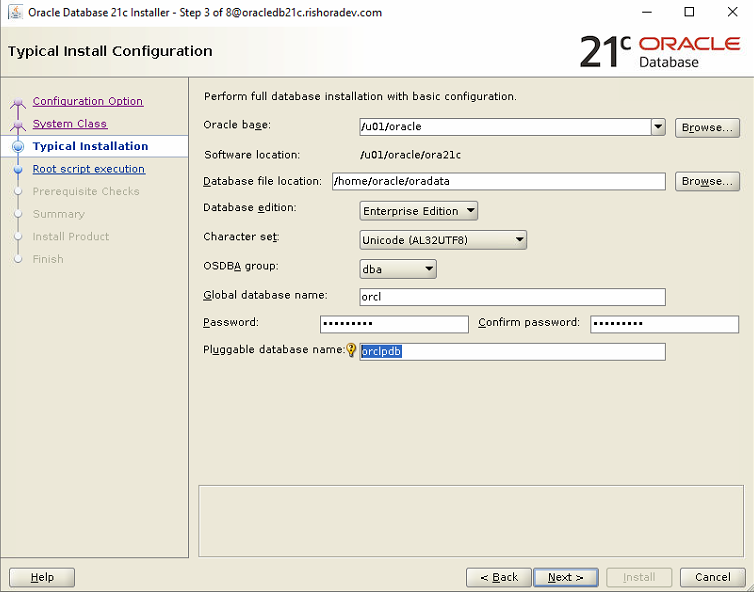
Provide the basic configuration details as shown below. Also set the Global DB Password. When you are done, click Next.
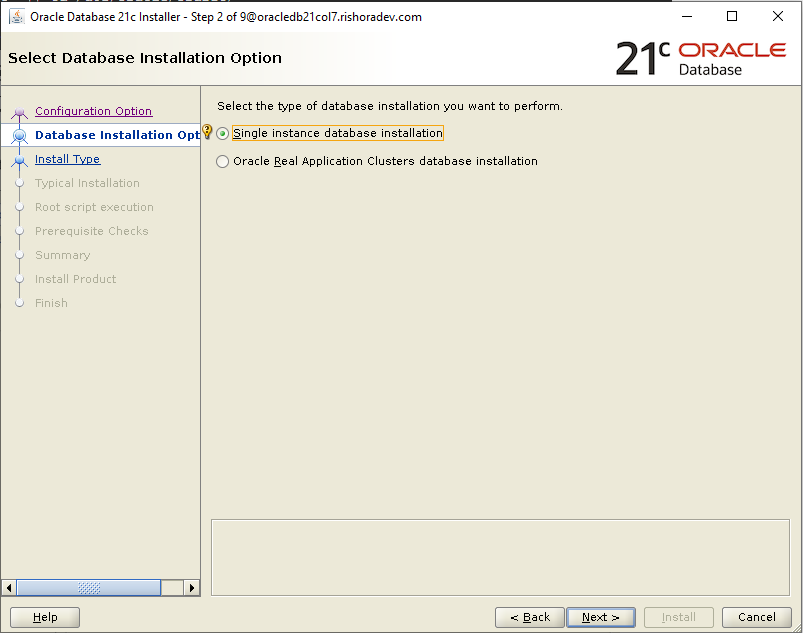
Select Single instance database installation and click Next.
Choose the preferred edition. I chose the Enterprise Edition. Click Next.

Set Oracle Base path and click Next.

Set the Inventory Directory and click Next.

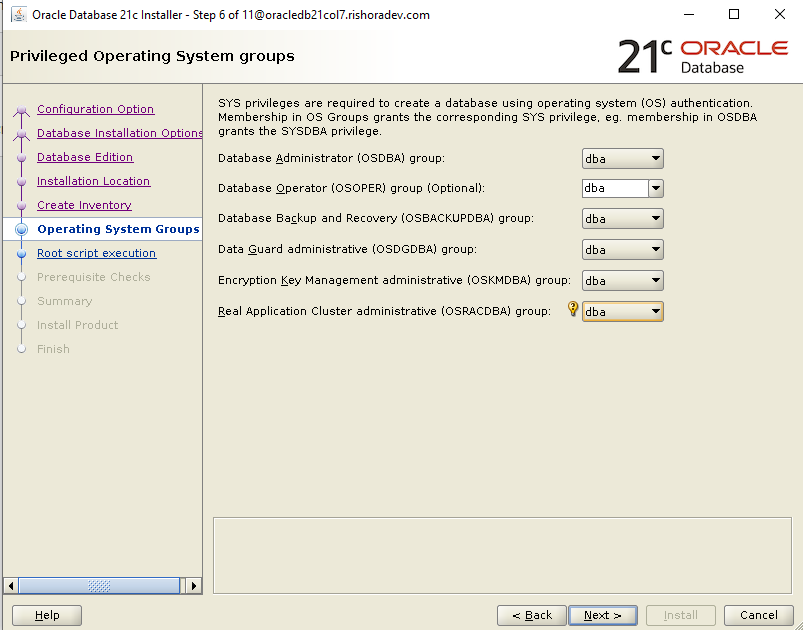
Set the Privileged Operating System groups. I chose dba for all the groups.
Leave the Root script execution configuration with the default settings. In the final step of the installation, the system will prompt to connect to another terminal using the “root” user and run the scripts – orainstRoot.sh and root.sh.

System will perform the system checks. Once it is completed, click Next.

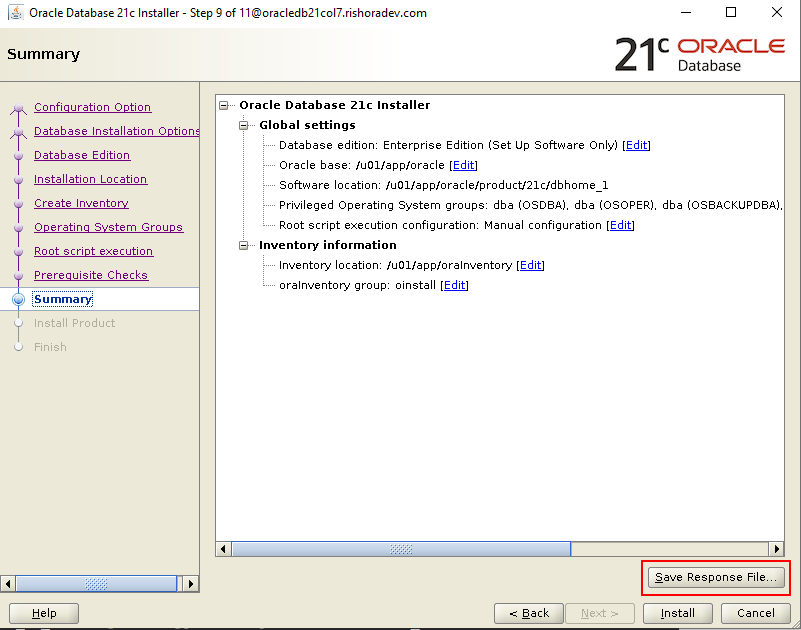
Save the Response File, if you want to reuse this for performing a Silent install in future.
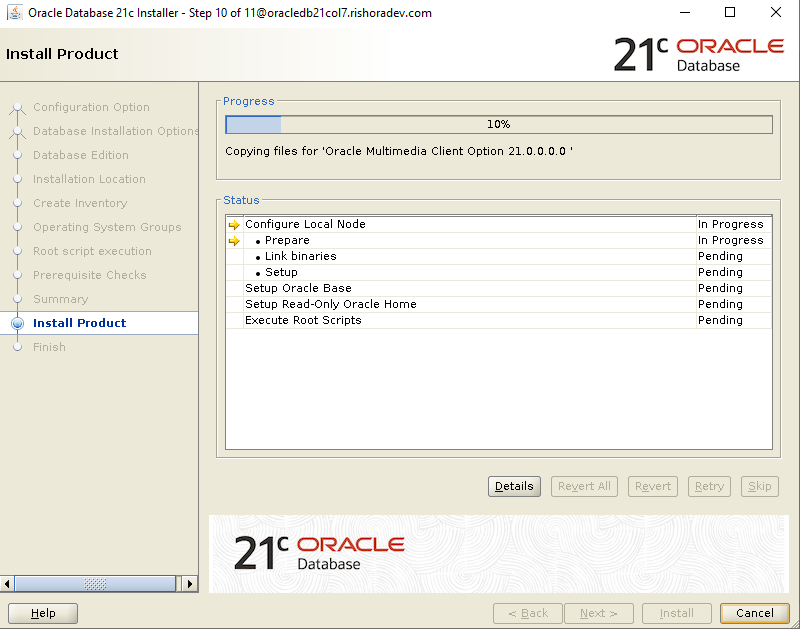
Click Install to kick off the installation process.
You will be prompted to execute the scripts – orainstRoot.sh and root.sh using “root” user.
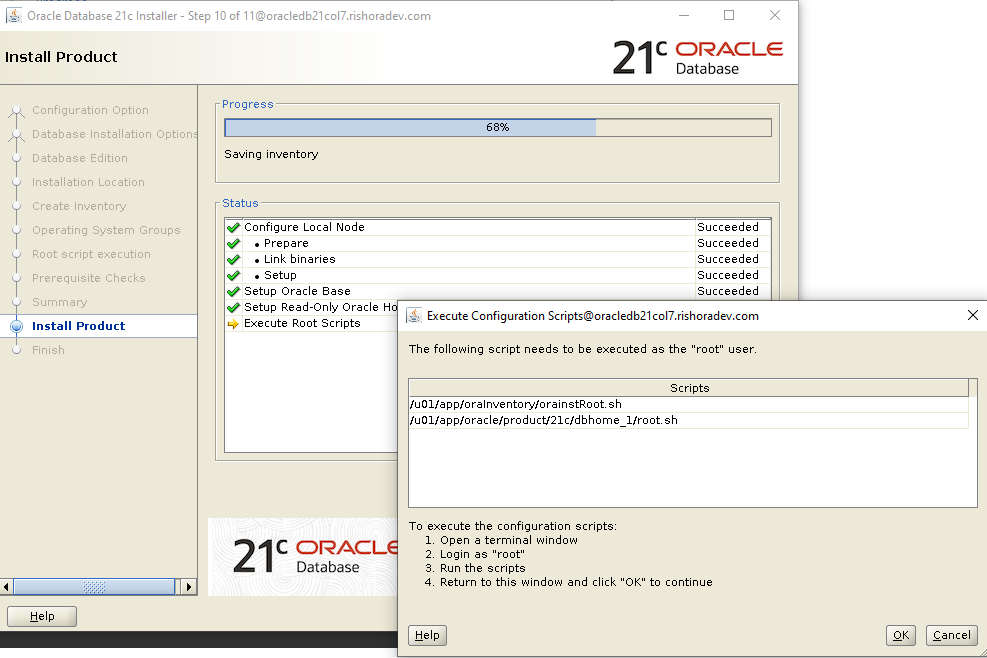
Open another terminal window and execute the scripts as shown below. Once completed, come back to the installation screen and click OK.
[root@oracledb21col7 CVU_21.0.0.0.0_oracle]# cd /u01/app/oraInventory/
[root@oracledb21col7 oraInventory]# ls
ContentsXML  logs  oraInst.loc  orainstRoot.sh
[root@oracledb21col7 oraInventory]# ./orainstRoot.sh
Changing permissions of /u01/app/oraInventory.
Adding read,write permissions for group.
Removing read,write,execute permissions for world.

Changing groupname of /u01/app/oraInventory to oinstall.
The execution of the script is complete.
[root@oracledb21col7 oraInventory]# cd /u01/app/oracle/product/21c/dbhome_1/
[root@oracledb21col7 dbhome_1]# ./root.sh
Performing root user operation.

The following environment variables are set as:
    ORACLE_OWNER= oracle
    ORACLE_HOME=  /u01/app/oracle/product/21c/dbhome_1

Enter the full pathname of the local bin directory: [/usr/local/bin]: /usr/local/bin/
   Copying dbhome to /usr/local/bin/ ...
   Copying oraenv to /usr/local/bin/ ...
   Copying coraenv to /usr/local/bin/ ...


Creating /etc/oratab file...
Entries will be added to the /etc/oratab file as needed by
Database Configuration Assistant when a database is created
Finished running generic part of root script.
Now product-specific root actions will be performed.
That should complete the installation process. The next stage will be to create the database.

Create Database
Before we create the database, the first thing we need to do is to start the listener services, using “lsnrctl start”.
[oracle@oracledb21col7 ~]$ lsnrctl start

LSNRCTL for Linux: Version 21.0.0.0.0 - Production on 18-AUG-2021 23:33:29

Copyright (c) 1991, 2021, Oracle.  All rights reserved.

Starting /u01/app/oracle/product/21c/dbhome_1/bin/tnslsnr: please wait...

TNSLSNR for Linux: Version 21.0.0.0.0 - Production
Log messages written to /u01/app/oracle/diag/tnslsnr/oracledb21col7/listener/alert/log.xml
Listening on: (DESCRIPTION=(ADDRESS=(PROTOCOL=tcp)(HOST=oracledb21col7.rishoradev.com)(PORT=1521)))

Connecting to (ADDRESS=(PROTOCOL=tcp)(HOST=)(PORT=1521))
STATUS of the LISTENER
------------------------
Alias                     LISTENER
Version                   TNSLSNR for Linux: Version 21.0.0.0.0 - Production
Start Date                18-AUG-2021 23:33:29
Uptime                    0 days 0 hr. 0 min. 0 sec
Trace Level               off
Security                  ON: Local OS Authentication
SNMP                      OFF
Listener Log File         /u01/app/oracle/diag/tnslsnr/oracledb21col7/listener/alert/log.xml
Listening Endpoints Summary...
  (DESCRIPTION=(ADDRESS=(PROTOCOL=tcp)(HOST=oracledb21col7.rishoradev.com)(PORT=1521)))
The listener supports no services
The command completed successfully
Once the listener is up and running, you need to create the database using the Database Configuration Assistant (DBCA). This can be done using the interactive mode by issuing the dbca command, through MobaXterm. Once you execute the dbca command, the GUI should pop up .
OR, you can opt the Silent mode, as I have done below. To learn more about Silent mode, click here.
dbca -silent -createDatabase                                                   \
     -templateName General_Purpose.dbc                                         \
     -gdbname ${ORACLE_SID} -sid  ${ORACLE_SID} -responseFile NO_VALUE         \
     -characterSet AL32UTF8                                                    \
     -sysPassword Welcome1                                                     \
     -systemPassword Welcome1                                                  \
     -createAsContainerDatabase true                                           \
     -numberOfPDBs 1                                                           \
     -pdbName ${PDB_NAME}                                                      \
     -pdbAdminPassword PdbPassword1                                            \
     -databaseType MULTIPURPOSE                                                \
     -memoryMgmtType auto_sga                                                  \
     -totalMemory 2000                                                         \
     -storageType FS                                                           \
     -datafileDestination "${DATA_DIR}"                                        \
     -redoLogFileSize 50                                                       \
     -emConfiguration NONE                                                     \
     -ignorePreReqs
This would create the database for you. Now you have successfully installed Oracle Database 21c. Happy exploring!!!
[oracle@oracledb21col7 ~]$ sqlplus / as sysdba
....
....
SQL> Select BANNER_FULL from v$version;

BANNER_FULL
----------------------------------------------------------------------------------------------------------------------------------------------------------------
Oracle Database 21c Enterprise Edition Release 21.0.0.0.0 - Production
Version 21.3.0.0.0