Showing posts with label RAC Real Application Clusters. Show all posts

Saturday, August 10, 2024

Display Oracle RAC Cluster Name

 Below are different ways to know the RAC cluster name,

1. The command “cemutlo” provides cluster name and version.

$GI_HOME/bin/cemutlo [-n] [-w]

[oracle@rac1 ~]$ cemutlo -n
sami-rac-scan <—– This is the Cluster name.

2. $CRS_HOME/cdata/<cluster_name> directory

3. ocrdump
which will create a text file called OCRDUMPFILE open that file and look for this entry
+[SYSTEM.css.clustername]+ ORATEXT : crs_cluster In this case, “crs_cluster” is the cluster name.

4. gpnptool get
search for keyword “ClusterName

5. ASM SP File location
[root@rac1 ]# gpnptool getpval -asm_spf (or) SQL> show parameter spfile 
+DATA/<clusterName>/asmparameterfile/registry.253.783619900

Note: We cannot change the cluster name. 

The only way to change the cluster name is to reinstall the Clusterware and provide a new name to the cluster. 

Friday, November 24, 2023

Relink Oracle Grid Infrastructure RAC/Cluster Installation

After installing Oracle Grid Infrastructure for a cluster (Oracle Clusterware and Oracle ASM configured for a cluster), if you need to modify the binaries, then use the following procedure, where Grid_home is the Oracle Grid Infrastructure for a cluster home. Relink the Oracle Grid Infrastrucutre, Oracle Restart and Oracle ASM binaries every time you apply an operating system patch or after an operating system upgrade.

Caution:Before relinking executables, you must shut down all executables that run in the Oracle home directory that you are relinking. In addition, shut down applications linked with Oracle shared libraries. If present, unmount all Oracle Automatic Storage Management Cluster File System (Oracle ACFS) filesystems.

You must relink the Oracle Clusterware and Oracle ASM binaries every time you apply an operating system patch or after you perform an operating system upgrade that does not replace the root file system. For an operating system upgrade that results in a new root file system, you must remove the node from the cluster and add it back into the cluster.

For upgrades from previous releases, if you want to deinstall the prior release Grid home, then you must first unlock the prior release Grid home. Unlock the previous release Grid home by running the command rootcrs.sh -unlock from the previous release home. After the script has completed, you can run the deinstall command.

 1. As root user first stop CRS

# crsctl stop crs

2. As root user, unlock the Grid Infrastructure Oracle Home (on every node) as follows:

# cd < Grid Infrastructure Oracle Home >/crs/install

# perl rootcrs.pl -unlock

Note: On 12.1/12.2/19c releases, rootcrs.sh can be used instead of rootcrs.pl. Command as 

rootcrs.sh -unlock

Note: On 12c/21c <GI_HOME>/crs/install/rootcrs.sh -prepatch can be used to stop and unlock the GI home -- clusterware must be up and running to use this option

3. As the Oracle Grid Infrastructure owner (on every node) relink the Grid Infrastructure Oracle Home as follows:

$ export ORACLE_HOME=< Grid Infrastructure Oracle Home >

$ < Grid Infrastructure Oracle Home>/bin/relink all

4. As root OS user again, please execute the next commands (on every node):

# cd < Grid Infrastructure Oracle Home >/rdbms/install/

# ./rootadd_rdbms.sh

# cd < Grid Infrastructure Oracle Home >/crs/install

# perl rootcrs.pl -patch

Note: On 12.1, use "rootcrs.sh -patch".

Note: On 12.2/21c, use "rootcrs.sh -lock" then "crsctl start crs"

Note: On 12/21c <GI_HOME>/crs/install/rootcrs.sh -postpatch can be used to start and lock the GI home

Note: CRS services (CRS, CSS ASM instances, diskgroups, listeners, DB instances, etc.) will automatically start.

5. Review relink.log file located at the following directory (to confirm or discard any error):

$ < Grid Infrastructure Oracle Home>/install/relink.log


Wednesday, June 2, 2021

Modify START_DEPENDENCIES in 19c Clusterware

While starting database if you get the below error, then you must check the resource that is missing in the START_DEPENDENCIES attribute of the Clusterware and correct the value of this attribute. 
Let's see how to troubleshoot this problem and fix it.

ERROR when starting the database Instance: 

[oracle@ed-olraclin1:TESTCDB1:~]$ srvctl start database -d TESTCDB
PRCR-1079 : Failed to start resource ora.testcdb.db
CRS-2640: Required resource 'uniform' is missing.

SQL> startup nomount;
ORA-32004: obsolete or deprecated parameter(s) specified for RDBMS instance
ORA-39511: Start of CRS resource for instance '222' failed with error:[CRS-2640: Required resource 'uniform' is missing.
CRS-0222: Resource 'ora.testcdb.db' has dependency error.
clsr_start_resource:260 status:222
clsrapi_start_db:start_asmdbs status:222
]

Get Full list of RESOURCE Attributes and their values

[grid@ed-olraclin1:+ASM1:~]$ crsctl status resource ora.testcdb.db -f

START_DEPENDENCIES=hard(uniform:,global:uniform:ora.TEST.dg) pullup(,global:ora.TEST.dg) weak(type:ora.listener.type,global:type:ora.scan_listener.type,uniform:ora.ons,global:ora.gns)

In the above Attribute value, the uniform:, and a comma , that is highlighted are causing the database not to start, so we will correct this attribute value.

Correct the START_DEPENDENCIES Attribute value

[oracle@ed-olraclin1:TESTCDB1:~]$ /u01/19.0/grid/bin/crsctl modify resource ora.testcdb.db -attr "START_DEPENDENCIES='hard(global:uniform:ora.TEST.dg) pullup(global:ora.TEST.dg) weak(type:ora.listener.type,global:type:ora.scan_listener.type,uniform:ora.ons,global:ora.gns)'" -unsupported

Note the -unsupported option used to modify this Attribute value while this option is not required to modify any other Attribute's value. Moreover this option is not mentioned in the Syntax as shown below,

[grid@ed-olraclin1:+ASM1:~]$ crsctl modify resource -help
Usage:
  crsctl modify resource <resName> -attr "<specification>[,...]" [-f] [-delete] [-i] [-group <resourceGroupName>] [-env "env1=val1,env2=val2,..."]
     <specification>:   {<attrName>=<value> | <attrName>@<scope>=<value>}
        <scope>:   {@SERVERNAME(<server>)[@DEGREEID(<did>)] |
                       @CARDINALITYID(<cid>)[@DEGREEID(<did>)] }
where
     resName            Modify named resource
     attrName           Attribute name
     value              Attribute value
     server             Server name
     cid                Resource cardinality ID
     did                Resource degree ID
     -f                 Force option
     -delete            Delete named attribute
     -i                 Fail if request cannot be processed immediately
     -env               Override environment values for this command
     resourceGroupName  Resource group name

Now you will be able to start the database without any problem,

srvctl start database -d TESTCDB

Theory about START_DEPENDENCIES Attribute and it's value

Cannot determine the cause the value of START_DEPENDENCIES got changed in first place. It gets modified only when someone attempt to change the values.

START_DEPENDENCIES
Specifies a set of relationships that Oracle Clusterware considers when starting a resource. You can specify a space-delimited list of dependencies on several resources and resource types on which a particular resource can depend.

SYNTAX: START_DEPENDENCIES=dependency(resource_set) [dependency(resource_set)] [...]

In the above syntax, the variables are defined, as follows:

•dependency: Possible values are attraction, dispersion, exclusion, hard, pullup, and weak. You can specify each dependency only once, except for pullup, which you can specify multiple times.

•resource_set: A comma-delimited list of resource entities—either individual resources or resource types—enclosed in parentheses (), in the form of res1[, res2[, ...]], upon which the resource you are configuring depends.

Below are 2 dependency explained, 

pullup[:always]([intermediate:][global:]{resource_name | type:resource_type})—When you specify the pullup start dependency for a resource, then this resource starts because of named resources starting.

Use the always modifier for pullup so that Oracle Clusterware starts this resource despite the value of its TARGET attribute, whether that value is ONLINE or OFFLINE. Otherwise, if you do not specify the always modifier, then Oracle Clusterware starts this resource only if the value of the TARGET attribute is ONLINE for this resource.

hard([intermediate:][global:][uniform:]{resource_name | type:resource_type}) - Specify a hard start dependency for a resource when you want the resource to start only when a particular resource or resource of a particular type starts.

weak([concurrent:][global:][uniform:]{resource_name | type:resource_type})—Specify a weak start dependency for a resource when you want that resource to start despite whether named resources are running, or not. An attempt to start this resource also attempts to start any resources on which this resource depends if they are not running.

For any technical queries you can email me on samiappsdba@gmail.com

Tuesday, December 25, 2018

Convert physical standby to snapshot standby database

Snapshot standby:

Snapshot standby is a feature in Oracle 11g that allows doing a read-write operation on the standby database.  i. e we can convert the physical standby database to snapshot standby. On that, we can do all types of testing or can be used as a development database (which is an exact replication of production ). Once the testing is over we can again convert the snapshot database to physical standby. Once it is converted physical standby database, whatever changes were done to the snapshot standby will be reverted.
A snapshot standby database is a fully update-able standby database that is created by converting a physical standby database into a snapshot standby database.

A snapshot Standby is open in the read-write mode and hence it is possible to process transactions independently of the primary database. At the same time, it maintains protection by continuing to receive data from the production database, archiving it for later use.
Using a single command change made while the database is in read-write mode can throw away the changes made to the standby database only and re-synchronize the standby database with the production database.
1. Snapshot standby database receives and archives, but does not apply the redo data.

2. Redo data received from the primary database is applied automatically once it is converted back into a physical standby database.

3. Snapshot standby database cannot be the target of a switchover or failover. A snapshot standby database must first be converted back into a physical standby database before performing a role transition to it.


DEMONSTRATION:
Steps to convert Physical Standby Database to the Snapshot Standby Database


I have 2 node primary cluster database and 2 node standby cluster database with the ASM. It is running on 12c version
Note: In the snapshot standby database, there is no step to be performed in the primary database. all the steps are performed only in the physical standby database

STATUS OF THE STANDBY DATABASE
SQL> select name,open_mode from gv$database;
NAME      OPEN_MODE
mydb1       MOUNTED
mydb2       MOUNTED

CHECKING RECOVERY AREA AND ALLOCATE SIZE
SQL> show parameter db_recovery_file_dest
NAME                                 TYPE        VALUE
db_recovery_file_dest                string      +EXA_RECO
db_recovery_file_dest_size           big integer 400G

CHECKING WHETHER FLASHBACK IS ENABLED OR NOT. TO OPEN A STANDBY DATABASE IN THE READ/WRITE MODE, WE NEED TO HAVE THE FLASHBACK WITH ENOUGH SIZE.

SQL> select flashback_on from gV$database;
FLASHBACK_ON
YES
YES
CHECKING THE STATUS OF RECOVERY PROCESS, IF IT IS ENABLED THEN WE HAVE TO STOP THE RECOVERY.

SQL> select PROCESS,CLIENT_PROCESS,THREAD#,SEQUENCE#,BLOCK# from v$managed_standby where process = 'MRP0' or client_process='LGWR';
PROCESS   CLIENT_P    THREAD#  SEQUENCE#     BLOCK#
RFS       LGWR              2         74       6080
MRP0      N/A               2         74       6078
RFS       LGWR              1         78       7145

SQL> ALTER DATABASE RECOVER MANAGED STANDBY DATABASE CANCEL;
Database altered.

AFTER CANCELING THE RECOVERY PROCESS, CHECK THE STATUS
SQL> select PROCESS,CLIENT_PROCESS,THREAD#,SEQUENCE#,BLOCK# from v$managed_standby where process = 'MRP0' or           client_process='LGWR';
PROCESS   CLIENT_P    THREAD#  SEQUENCE#     BLOCK#
RFS       LGWR              2         74       6150
RFS       LGWR              1         78       7216
CONVERTING THE STANDBY DATABASE AS A SNAPSHOT STANDBY DATABASE
SQL> ALTER DATABASE CONVERT TO SNAPSHOT STANDBY;
Database altered.

CHECKING THE STATUS OF THE DATABASE
SQL> select open_mode,database_role from gv$database;
OPEN_MODE            DATABASE_ROLE
MOUNTED              SNAPSHOT STANDBY

$ srvctl stop database -d mydb
$ srvctl start database -d mydb -o open

CHECKING THE STATUS OF THE DATABASE
SQL> select open_mode,database_role from gv$database;
OPEN_MODE            DATABASE_ROLE
READ WRITE           SNAPSHOT STANDBY

CHECKING THE SYSTEM CREATED THE RESTORE POINT
SQL> select NAME,SCN,TIME from v$restore_point;
NAME              SCN                 TIME
SNAPSHOT_STANDBY_REQUIRED_12/25/2018 10:30:00         20539509
25-DEC-18 10.30.00.000000000 AM

Now CREATE SOME TABLES & PERFORMING SOME DML OPERATIONS IN THE SNAPSHOT DATABASE

SQL> create table bhuvan as select * from dba_objects;
Table created.

SQL> select count(1) from test;
COUNT(1)
100786

SQL> delete test where owner='SAMI MALIK';
100786 rows deleted.
SQL> commit;
Commit complete.

SQL> select count(1) from TEST;
COUNT(1)
100111


NOW WE ARE STOPPING & CONVERTING SNAPSHOT DATABASE IN TO PHYSICAL STANDBY DATABASE
$ srvctl stop database -d MYDB

# I am using single instance to perform the conversion from the snapshot standby database to the physical standby database

$ sqlplus / as sysdba
SQL*Plus: Release 12.2.0.4.0 Production on Mon Dec 25 10:40:11 2018
Copyright (c) 1982, 2010, Oracle.  All rights reserved.
Connected to an idle instance.

SQL> startup mount
ORA-32004: obsolete or deprecated parameter(s) specified for RDBMS instance
ORACLE instance started.
Total System Global Area 1.4431E+10 bytes
Fixed Size                  2240272 bytes
Variable Size            3892314352 bytes
Database Buffers         1.0503E+10 bytes
Redo Buffers               34148352 bytes
Database mounted.

SQL> ALTER DATABASE CONVERT TO PHYSICAL STANDBY;
Database altered.

Once we convert from the snapshot standby database to the physical standby database, database will go to the no mount stage.


SQL> select open_mode,database_role from v$database;
select open_mode,database_role from v$database
                 *
ERROR at line 1:
ORA-01507: database not mounted
NOW WE ARE STOPPING & STARTING THE DATABASE TO MOUNT STAGE AND CHECKING THE RECOVERY PROCESS

$ srvctl stop database -d mydb
$ srvctl start database -d mydb

CHECKING THE RESTORE POINT, SYSTEM WILL REMOVE IT AUTOMATICALLY ONCE WE ARE CONVERTED TO PHYSICAL STANDBY DATABASE
SQL> select NAME,SCN,TIME from v$restore_point;
no rows selected

CHECKING THE RECOVEY PROCESS
SQL> select PROCESS,CLIENT_PROCESS,THREAD#,SEQUENCE#,BLOCK# from v$managed_standby where process = 'MRP0' or client_process='LGWR';

PROCESS   CLIENT_P    THREAD#  SEQUENCE#     BLOCK#
--------- -------- ---------- ---------- ----------
RFS       LGWR              2         83       3495
RFS       LGWR              1         87       4407
MRP0      N/A               2         83       3495


Monday, December 25, 2017

Protecting Oracle OHS/Apache using Oracle Clusterware 11g/12c

This month's article is about protecting Apache Application service using Oracle RAC Clusterware 12c. To do this we should create an application VIP, an Action Script and a Resource on the Clusterware.
Here we will see the step by step configuration to protect Apache application and similar configuration can be plagiarized to protect Oracle OHS or any other Application service.
The below steps will work for both 11g and 12c RAC Clusterware software,

Step1. As the root user, verify that the Apache RPMs, httpd, httpd-devel and httpd-manual are installed on the two nodes on which Oracle clusterware is installed and configured.
grid@host01# su -
root@host01# rpm -qa | grep httpd
httpd-2.4.6-40.0.1.el7.x86_64
httpd-manual-2.4.6-40.0.1.el7.noarch
httpd-tools-2.4.6-40.0.1.el7.x86_64

Repeat on second node
root@host02# rpm -qa | grep httpd
httpd-2.4.6-40.0.1.el7.x86_64
httpd-manual-2.4.6-40.0.1.el7.noarch
httpd-tools-2.4.6-40.0.1.el7.x86_64


Step2. As the root user, start the Apache application on first node,
# apachectl start
Now access the Apache home page and verify it is working,
http://host01.samiora.blogspot.com:7777

OHS is managed by OPMN, the command line interface to OPMN is opmnctl.
Start OPMN and all managed processed, if not already started,
# ./opmnctl startall
# ./opmnctl status -l
# ./opmnctl stopproc process-type=OHS
[appldev@host01 scripts]$ sh adopmnctl.sh status -l
You are running adopmnctl.sh version 120.0.12020000.2
Checking status of OPMN managed processes...
Processes in Instance: EBS_web_dev_OHS1
---------------------------------+--------------------+---------+----------+------------+----------+-----------+------
ias-component                    | process-type       |     pid | status   |        uid |  memused |    uptime | ports
---------------------------------+--------------------+---------+----------+------------+----------+-----------+------
EBS_web_dev                   | OHS                |    8356 | Alive    |  778125435 |  2125916 |   2:03:55 | https:4447,https:10004,http:7777

adopmnctl.sh: exiting with status 0
adopmnctl.sh: check the logfile /u01/dev/fs1/inst/apps/dev_host01/logs/appl/admin/log/adopmnctl.txt for more information ...

Verify OHS and Apache pages are appearing or not on host01 where the service is started,


Step3. Now create an action script to control the application. This script must be accessible by all nodes on which the application resource can be located.

A) As the root user, create a script on the first node called 'apache.scr' in /usr/local/bin that will start, stop, check status and clean up if the application does not exit cleanly. Make sure that the host specified in the WEBPAGECHECK variable is your first node.
root@host01# vi /usr/local/bin/apache.scr
#!/bin/bash
HTTPDCONFLOCATION=/etc/httpd/conf/httpd.conf
WEBPAGECHECK=http://host01.samiora.blogspot.com:80/icons/apache_pb.gif
case $1 in
'start')
/usr/sbin/apachectl -k start -f $HTTPDCONFLOCATION
RET=$?
;;
'stop')
/usr/sbin/apachectl -k stop
RET=$?
;;
'clean')
/usr/sbin/apachectl -k stop
RET=$?
;;
'check')
/usr/bin/wget -q --delete-after $WEBPAGECHECK
RET=$?
;;
*)
RET=0
;;
esac
# 0: success; 1 : error
if [ $RET -eq 0 ]; then
exit 0
else
exit 1
fi

root@host01# chmod 755 /usr/local/bin/apache.scr
root@host01# apache.scr start
Verify the web page and it should be working.
root@host01# apache.scr stop
Verify the web page and it will not be working.

B) As root, create a script on the second node called 'apache.scr' in /usr/bin/local that will start, stop, check status and clean up if the application does not exit cleanly. Make sure that the host specified in WEBPAGECHECK variable is your second node.
root@host02# vi /usr/local/bin/apache.scr
#!/bin/bash
HTTPDCONFLOCATION=/etc/httpd/conf/httpd.conf
WEBPAGECHECK=http://host02.samiora.blogspot.com:80/icons/apache_pb.gif
case $1 in
'start')
/usr/sbin/apachectl -k start -f $HTTPDCONFLOCATION
RET=$?
;;
'stop')
/usr/sbin/apachectl -k stop
RET=$?
;;
'clean')
/usr/sbin/apachectl -k stop
RET=$?
;;
'check')
/usr/bin/wget -q --delete-after $WEBPAGECHECK
RET=$?
;;
*)
RET=0
;;
esac
# 0: success; 1 : error
if [ $RET -eq 0 ]; then
exit 0
else
exit 1
fi

root@host02# chmod 755 /usr/local/bin/apache.scr
root@host02# apache.scr start
Verify the web page and it should be working.
root@host02# apache.scr stop
Verify the web page and it will not be working.

Step4. Next, you must validate the return code of a check failure using the new script. The Apache server should NOT be running on either node. Run 'apache.scr check' and immediately test the return code by issuing an 'echo $?' command. This must be run immediately after the 'apache.scr check' command because the shell variable $? holds the exit code of the previous command run from the shell. An unsuccessful check should return an exit code of 1. You should do this on both nodes.
root@host01# apache.scr check
root@host01# echo $?
1
root@host02# apache.scr check
root@host02# echo $?
1

Step5. As the grid user, create a server pool for the resource called myApache_sp. This pool contains your first two hosts of the cluster and is a child of the Generic pool.
grid@host01# id
uid=502(grid) gid=54321(oinstall) groups=504(asmadmin),505(asmdba),506(asmoper),54321(oinstall)
grid@host01# . oraenv
ORACLE_SID = [grid] ? +ASM1
The Oracle base has been set to /u01/app/grid
grid@host01# /u01/app/12.2.0/grid/bin/crsctl add serverpool myApache_sp -attr "PARENT_POOLS=Generic,SERVER_NAMES=host01 host02"

Step6. Check the status of the new pool of your cluster.
grid@host01# /u01/app/12.2.0/grid/bin/crsctl status server -f
NAME=host01
STATE=ONLINE
ACTIVE_POOLS=myApache_sp Generic
STATE_DETAILS=

NAME=host02
STATE=ONLINE
ACTIVE_POOLS=myApache_sp Generic
STATE_DETAILS=....

Step7. Add the Apache Resource, which can be called myApache, to the myApache_sp subpool that has Generic as a parent. It must be performed as root because the resource requires root authority because of listening on the default privileged port 80. set CHECK_INTERVAL to 30, RESTART_ATTEMPTS to 2 and PLACEMENT to restricted.
root@host01# su -
root@host01# id
uid=0(root) gid=0(root) groups=0(root),1(bin),2(daemon),3(sys),4(adm),6(disk),10(wheel)
root@host01# /u01/app/12.2.0/grid/bin/crsctl add resource myApache -type cluster_resource -attr "ACTION_SCRIPT=/usr/local/bin/apache.scr, PLACEMENT='restricted', SERVER_POOLS=myApache_sp, CHECK_INTERVAL='30', RESTART_ATTEMPTS='2'"

Step8. View the static attributes of the myApache resource with the crsctl status resource myApache -p -f command.
root@host01# /u01/app/12.2.0/grid/bin/crsctl status resource myApache -f
NAME=myApache
TYPE=cluster_resource
STATE=OFFLINE
TARGET=ONLINE
ACL=owner:root:rwx,pgrp:root:r-x,other::r--
ACTION_FAILURE_TEMPLATE=
ACTION_SCRIPT=/usr/local/bin/apache.scr
ACTIVE_PLACEMENT=0
AGENT_FILENAME=%CRS_HOME%/bin/scriptagent
AUTO_START=restore
CARDINALITY=1
CARDINALITY_ID=0
CHECK_INTERVAL=30
CREATION_SEED=30
DEFAULT_TEMPLATE=
DEGREE=1
DESCRIPTION=
ENABLED=1
FAILOVER_DELAY=0
FAILURE_INTERVAL=0
FAILURE_THRESHOLD=0
HOSTING_MEMBERS=
ID=myApache
INSTANCE_FAILOVER=0
LOAD=1
LOGGING_LEVEL=1
NOT_RESTARTING_TEMPLATE=
OFFLINE_CHECK_INTERVAL=0
PLACEMENT=restricted
PROFILE_CHANGE_TEMPLATE=
RESTART_ATTEMPTS=2
SCRIPT_TIMEOUT=60
SERVER_POOLS=myApache_sp
START_DEPENDENCIES=
START_TIMEOUT=0
STATE_CHANGE_TEMPLATE=
STOP_DEPENDENCIES=
STOP_TIMEOUT=0
UPTIME_THRESHOLD=1h


Step9. Use the 'crsctl start resource myApache' command to start the new resource. Use the 'crsctl status resource myApache' command to confirm that the resource is online on the first node. If you like, open a browser and verify the apache home page as shown in step 2 above.
root@host01# /u01/app/12.2.0/grid/bin/crsctl start resource myApache
root@host01# /u01/app/12.2.0/grid/bin/crsctl status resource myApache
resource myApache
NAME=myApache
TYPE=cluster_resource
TARGET=ONLINE
STATE=ONLINE on host01

Step10. Confirm that Apache is NOT running on your second node. The easiest way to do this is to check for the running '/usr/sbin/httpd -k start -f /etc/httpd/conf/httpd.confd' processes with the ps command.
root@host02# ps -ef | grep -i "httpd -k"

Step11. Next, simulate a node failure on your first node using the init command as root. Before issuing the reboot on the first node, open a VNC session on the second node and as the root user execute below script so that you can monitor the failover.
monitor.sh
while true
do
ps -ef | grep -i "httpd -k"
  sleep 1
done

root@host01# reboot ==>To initiate a reboot, simulating a node failure.
At the same time on second node run the below script as root user,
root@host02# sh monitor.sh ==> you will see that after sometime the httpd service will be started on host02.

Step12. Verify the failover from the host01 to host02 with the 'crsctl status resource myApache -t' command.
root@host02# /u01/app/12.2.0/grid/bin/crsctl status resource myApache -t
NAME      TARGET  STATE  SERVER  STATE_DETAILS 
Cluster Resources
myApache

1               ONLINE  ONLINE  host02
Now access Apache page on host02 and it should display while on host01 it will not.
http://host02.samiora.blogspot.com

Step13. Use the 'crsctl relocate resource' command to move the myApache resource back to host01.
root@host01# /u01/app/12.2.0/grid/bin/crsctl relocate resource myApache
CRS-2673: Attempting to stop 'myApache' on 'host02'
CRS-2677: Stop of 'myApache' on 'host02' succeeded
CRS-2672: Attempting to start 'myApache' on 'host01'
CRS-2676: Start of 'myApache' on 'host01' succeeded
Now access Apache page on host01 and it should display while on host02 it will not.
http://host01.samiora.blogspot.com

For any queries on Oracle RAC 11g or RAC 12c you can email me on samiappsdba@gmail.com

Tuesday, November 28, 2017

Oracle ASM Cluster File Systems (ACFS)

ACFS is NOT yet certified to be used for Oracle E-Business Suite application files. 
https://blogs.oracle.com/stevenchan/choosing-a-shared-file-system-for-oracle-e-business-suite

OCFS2 is certified for EBS 12.2 application files. 
https://blogs.oracle.com/stevenchan/ocfs2-certified-with-ebs-122-shared-file-system-configurations
This article describes three ways to create an ASM Cluster File System (ACFS) in an Oracle 11G Release 2 RAC database. It is assumed that that RAC database is already present.

Oracle ASM Cluster File System (ACFS) is a general purpose cluster file system implemented as part of ASM. It can be used to store almost anything, including the database executables. The only things that should not be stored in ACFS are the Grid Infrastructure home and any Oracle files that can be directly stored in Oracle ASM.
ASM Configuration Assistant (ASMCA)
As the "oracle" user, switch to the ASM environment on node 1 of the RAC, then we start the ASM Configuration Assistant (asmca).
[oracle@rac1 ~]$ . oraenv
ORACLE_SID = [RAC1] ? +ASM1
The Oracle base for ORACLE_HOME=/u01/app/11.2.0/grid is /u01/app/oracle
[oracle@rac1 ~]$ dbhome
/u01/app/11.2.0/grid
[oracle@rac1 ~]$ asmca
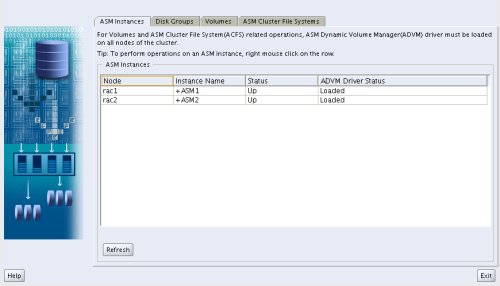
 When the ASM configuration assistant starts you are presented with the "ASM Instances" tab.

 Click on the "ASM Cluster File Systems" tab, then click the "Create" button.
Select "Create Volume" from the Volume list.
Enter the Volume Name and Size and click the "OK" button. Wait for the volume to be created, then click the "OK" button on the subsequent message dialog.
 The newly created volume will now be selected in the Volume list. Select the "General Purpose File System" option, enter a previously created mount point directory (or leave the suggested mount point), select the "Yes" option for Register MountPoint and click the "OK" button.
Click the "OK" button on the resulting message.
The newly created cluster file system is now listed under the "ASM Cluster File Systems" tab.

 Either perform another action, or click the "Exit" button.
At the command line on the first RAC node, navigate to the ACFS mount point and create a test file.
[oracle@rac1 data_acfsvol1]$ cd /u01/app/oracle/acfsmounts/data_acfsvol1
[oracle@rac1 data_acfsvol1]$ echo "This is a test" > test.txt
[oracle@rac1 data_acfsvol1]$ ls -al
total 80
drwxrwx--- 4 root   dba       4096 Nov 28 16:39 .
drwxr-xr-x 3 root   root      4096 Nov 28 16:24 ..
drwxr-xr-x 5 root   root      4096 Nov 28 16:24 .ACFS
drwx------ 2 root   root     65536 Nov 28 16:24 lost+found
-rw-r--r-- 1 oracle oinstall    15 Nov 28 16:39 test.txt
[oracle@rac1 data_acfsvol1]$
Check the file is present on the second RAC node.
[oracle@rac2 data_acfsvol1]$ cd /u01/app/oracle/acfsmounts/data_acfsvol1
[oracle@rac2 data_acfsvol1]$ ls -al
total 80
drwxrwx--- 4 root   dba       4096 Nov 28 16:39 .
drwxr-xr-x 3 root   root      4096 Nov 28 16:24 ..
drwxr-xr-x 5 root   root      4096 Nov 28 16:24 .ACFS
drwx------ 2 root   root     65536 Nov 28 16:24 lost+found
-rw-r--r-- 1 oracle oinstall    15 Nov 28 16:39 test.txt
[oracle@rac2 data_acfsvol1]$ cat test.txt
This is a test
[oracle@rac2 data_acfsvol1]$
So the ASM Cluster File System is working as expected.
Oracle Enterprise Manager (OEM)
Oracle Enterprise Manager provides a similar interface for interacting with ASM Cluster File Systems.
First we need to create mount points on the file system of each node for the new volume.
# mkdir -p /u01/app/oracle/acfsmounts/data_acfsvol2
# chown oracle:oinstall /u01/app/oracle/acfsmounts/data_acfsvol2
Log in to OEM, scroll to the bottom of the home page, then click on one of the ASM instances listed. On the resulting ASM screen, click on the "ASM Cluster File System" tab. You are then presented with the following screen. Click the "Create" button.
Click the "Create ASM Volume" button.
Enter the Volume Name and Size and click the "OK" button. Wait for the volume to be created.
The newly created volume will now be entered in the Volume Device field. Enter a Volume Label and the previously created mount point directory, then click the "OK" button.
The newly created volume is listed as "Dismounted". Select it and click the "Mount" button.
Accept the default node selection by clicking the "Continue" button.
Enter the Mount Point and click the "Generate Command" button.
Run the suggested command as the "root" user on all nodes, then click the "Return" button on this and the previous screen.
The new ASM Cluster File System is ready for use.

 Command Line 
First we need to create mount points on the file system of each node for the new volume.
# mkdir -p /u01/app/oracle/acfsmounts/data_acfsvol3
# chown oracle:oinstall /u01/app/oracle/acfsmounts/data_acfsvol3
As the "oracle" user, switch to the ASM environment on node 1 of the RAC, then connect to the ASM instance using SQL*Plus.
[oracle@rac1 ~]$ . oraenv
ORACLE_SID = [RAC1] ? +ASM1
The Oracle base for ORACLE_HOME=/u01/app/11.2.0/grid is /u01/app/oracle
[oracle@rac1 ~]$ dbhome
/u01/app/11.2.0/grid
[oracle@rac1 ~]$ sqlplus / as sysasm
Issue to the following command to create a new volume.
SQL> ALTER DISKGROUP DATA ADD VOLUME ACFSVOL3 SIZE 10G;
Diskgroup altered.
Exit the SQL*Plus session, then create a file system on the volume.
[oracle@rac1 ~]$ /sbin/mkfs -t acfs -b 4k /dev/asm/acfsvol3-301 -n "ASMVOL3"
mkfs.acfs: version                   = 11.2.0.1.0.0
mkfs.acfs: on-disk version           = 39.0
mkfs.acfs: volume                    = /dev/asm/acfsvol3-301
mkfs.acfs: volume size               = 10737418240
mkfs.acfs: Format complete.
[oracle@rac1 ~]$
Register the filesystem.
[oracle@rac1 ~]$ /sbin/acfsutil registry -f -a /dev/asm/acfsvol3-301 /u01/app/oracle/acfsmounts/data_acfsvol3
acfsutil registry: mount point /u01/app/oracle/acfsmounts/data_acfsvol3 successfully added to Oracle Registry
[oracle@rac1 ~]$
The ASM Cluster File System should now be mounted on all RAC nodes. If it not, then issue the following command on each node to mount it.
/bin/mount -t acfs /dev/asm/acfsvol3-301 /u01/app/oracle/acfsmounts/data_acfsvol3
General Points
You can unmount and mount all the ACFS locations using the following commands from the "root" user on each RAC node.
# /bin/umount -t acfs -a
# /sbin/mount.acfs -o all
Registering mount points, means these file systems will automatically be mounted and unmounted and startup and shutdown respectively.
Probably the easiest interface to use is the ASM Configuration Assistant (ASMCA), but Enterprise Manager does allow you to see all the commands being run to perform each task. The easiest way to learn how to use the command line utilities is to use Enterprise Manager and click the "Show Command" button each step of the way.
For any further Questions/Support on ACFS file system, email me on samiappsdba@gmail.com