Showing posts with label Oracle Enterprise Manager 12c Cloud Control. Show all posts

Wednesday, February 6, 2019

Migrate On-premises Database to Cloud using Data Pump

Below are step by step procedure to migrate an on-premises source database, tablespace, schema, or table to an Oracle Database Cloud Service database deployment using the conventional export and import functionality of the Data Pump feature of Oracle Database. This method can be used regardless of the endian format and database character set of the on-premises database.
To accomplish the migration, perform the following steps:
  1. On the on-premises database host, invoke Data Pump Export (expdp) and export the on-premises database.
  2. Create a new Oracle Database Cloud Service.
  3. Connect to the Oracle Database Cloud Service compute node and then use a secure copy utility to transfer the dump file to the Oracle Database Cloud Service compute node.
  4. On the Oracle Database Cloud Service compute node, invoke Data Pump Import (impdp) and import the data into the database.
  5. After verifying that the data has been imported successfully, delete the dump file.
The following sections show an example of the entire process. The example illustrates a schema export and import. However, the same procedure applies for exporting and importing a full database, a tablespace, or a table. In this example, the on-premises database is on a Linux host.

Export the On-Premises Database

Perform the following steps on the on-premises database host to export the schemas:
  1. On the on-premises database host, create an operating system directory to use for the on-premises database export files:

    [oracle@cloud ~]$ mkdir -p /u01/app/dbpump
    
  2. On the on-premises database host, invoke SQL*Plus and log in to the on-premises database as the SYS user:

    [oracle@cloud ~]$ sqlplus sys@PDB_PREM as sysdba
    SQL*Plus: Release 12.1.0.2.0 Production on Sun May 21 16:05:26 2017
    Copyright (c) 1982, 2014, Oracle. All rights reserved.
    Enter Password:
    Connected to:
    Oracle Database12c Enterprise Edition Release 12.1.0.2.0 - 64bit Production
    With the partitioning, OLAP, Advanced Analytics and Real Application Testing options
    
  3. Create a directory object in the on-premises database to reference the operating system directory:

    SQL> create directory prem_to_cloud as '/u01/app/dpdump';
    Directory created
    
  4. Exit from SQL*Plus.
  5. On the on-premises database host, invoke the Data Pump Export utility as the SYSTEM user or as another user with the DATAPUMP_EXP_FULL_DATABASE role and export the on-premises schemas. Provide the password for the user when prompted.

    [oracle@cloud ]$ expdp system@PDB_PREM full=y directory=prem_to_cloud
    Export: Release 12.1.0.2.0 - Production on Sun May 21 16:05:26 2017
    Copyright (c) 1982, 2014, Oracle and/or its affiliates. All rights reserved.
    Password:
    Connected to: Oracle Database 12c Enterprise Edition Release 12.1.0.2.0 - 64bit
    Production
    With the Partitioning, OLAP, Advanced Analytics and Real Application Testing options
    

Create a New Instance of Oracle Database Cloud Service

  1. Log in to your Oracle Cloud services account, go to the Oracle Database Cloud Service page, and create a new service:
    - For Service Name enter Cloud-Mig.
    - From the Service Level list, select Oracle Database Cloud Service.
    - From the Metering Frequency list, select whatever frequency is appropriate for your environment.
    - From the Software Release list, select Oracle Database 12c Release 1.
    - From the Software Edition list, select Enterprise Edition.
    - From the Database Type list, select Single Instance.
      Then click Next to continue.
Figure1. Creating a new service (Cloud-Mig)
2. In the Service Details screen, do the following:

- For DB Name (SID), enter MIGORCL.
- Set an administrative password of your choice and confirm the password (this will be your sys password).
- For Usable Database Storage (GB), enter 25.
- From the Compute Shape list, select OC3 -1 OCPU, 7.5 GB RAM (this is the bare minimum required).
- For SSH Public Key, enter rsa-key-20170111.pub.

Then click Next to continue.

Figure 2. Specifying the service details


3. Finally, review the configuration and click Create to create your cloud database.
Figure 3. Creating the cloud database instance


  After a few minutes, the cloud database instance has been created successfully.
Figure 4. The cloud database has been created


4. Click the service name (Cloud-Mig) to open the main page of the database.
5. Before trying to connect to the database instance on the cloud machine, you have to enable the dblistener access rule. Do the following:

a. Open the database service and select Access Rules from the menu.
b. For the ora_p2_dblistener rule, select Enable from the Actions menu.

Connect to the Cloud Database, Transfer the Dump File, and Import the Data

  1. Open an instance of the PuTTY executable and connect to the Oracle Database Cloud Service compute node using an SSH public key.
Figure shows Connecting to Database Cloud Service compute node using PuTTY
2. On the Oracle Database Cloud Service compute node, check the pluggable databases (PDBs) and the pmon process:

[oracle@Cloud-Mig ~]$ ps -ef|grep pmon
oracle    311 32724 0 10:31 pts/1    00:00:00 grep pmon
oracle   7695     1 0 07:57 ?        00:00:00 ora_pmon_MIGORCL
[oracle@Cloud-Mig ~]$ sqlplus sys as sysdba
SQL*Plus: Release 12.1.0.2.0 Production on Sun May 21 10:31:42 2017
Copyright (c) 1982, 2014, Oracle. All rights reserved.
Enter Password:
Connected to:
Oracle Database 12c Enterprise Edition Release 12.1.0.2.0 - 64bit Production
With the Partitioning, Oracle Label Security, OLAP, Advanced Analytics 
and Real Application Testing options
SQL> show pdbs
   CON_ID   CON_NAME     OPEN MODE      RESTRICTED
----------  ----------   -----------    ------------
     2      PDB$SEED     READ ONLY      NO
     3      PDB1         READ WRITE     NO
3. Use a secure copy utility to transfer the dump file to the Oracle Database Cloud Service compute node.
In this example, the dump file is copied to the /u01 directory. Choose an appropriate location based on the size of the file that will be transferred.

a. On the Oracle Database Cloud Service compute node, create a directory for the dump file:
[oracle@Cloud-Mig admin]$ mkdir -p /u01/app/dump

b. Before using the scp command to copy the exported dump file, make sure the SSH private key that provides access to the Oracle Database Cloud Service compute node is available on your on-premises host.

c. On the on-premises database host, use the scp command to transfer the dump file to the Oracle Database Cloud Service compute node:

[oracle@cloud dpdump]$ ls
expdat.dmp   export.log
[oracle@cloud dpdump]$ scp -i /home/oracle/rsa-key-20170111.ssh expdat.dmp oracle@129.157.129.107:/u01/app/dump
Enter passphrase for key '/home/oracle/rsa-key-20170111.ssh':
expdat.dmp               4%  2704KB 856.1KB/s   01:12 ETA
4. On the Oracle Database Cloud Service compute node, import the data into the database:
a. On the Oracle Database Cloud Service compute node, invoke SQL*Plus and log in to the database as the SYSTEM user.
[oracle@Cloud-Mig admin]$ sqlplus sys@pdprem2 as sysdba
SQL*Plus: Release 12.1.0.2.0 Production on Sun May 21 11:56:53 2017
Copyright (c) 1982, 2014, Oracle. All rights reserved.
Enter Password:
Connected to:
Oracle Database 12c Enterprise Edition Release 12.1.0.2.0 - 64bit Production
With the Partitioning, Oracle Label Security, OLAP, Advanced Analytics and Real Application Testing options


b. Create a directory object in the Oracle Database Cloud Service database.
SQL> create directory cloud_mig as '/u01/app/dpump';
Directory created.
c. If they do not exist, create the tablespace(s) for the objects that will be imported.
d. Exit from SQL*Plus.
e. On the Oracle Database Cloud Service compute node, invoke the Data Pump Import utility and connect to the database. Import the data into the database.

[oracle@Cloud-Mig admin] $ impdb system@pdbprem2 full=y directory=cloud_mig
Import: Release 12.1.0.1.0 - Production on Sun May 21 12:24:39 2017
Copyright (c) 1982, 2014, Oracle and/or its affiliates.  All rights reserved.
Password:
Connected to: Oracle Database 12c Enterprise Edition Release 12.1.0.2.0 - 64bit Production
With the Partitioning, OLAP, Advanced Analytics and Real Application Testing options
...
5. After verifying that the data has been imported successfully, you can delete the expdat.dmp file. With this step, the entire process has be completed.


References: Oracle Technology Network.


For any queries you can email me on samiappsdba@gmail.com


Monday, January 15, 2018

Performance Tune Oracle SOA 12c EM Console

This article applies to Enterprise Manager for Fusion Middleware Version 11.1.1.2.0 and later, i.e., it applies to 11g and 12c. Logging into Enterprise Manager Fusion Middleware Control (FMWC) takes a long time.  Sometimes as long as 45-60 seconds.  This is often viewed as slow response time, performance or hanging issues. This time is expected because EM discovery 'mbeans' need to be invoked for every target.
Solution is to cache the discovery results in the servlet context and use it for subsequent logins. This discovery result will be shared by all the FMWC users. This will still require the entire discovery to be done at least once. 

Enable the “Data Display Option”: Login into EM console and make the data display option to 30 minutes default, so when user will login into EM console, it will load data of last 30 minutes process and it will load EM console faster as with default configuration.
  • Enable the checkbox for below options-
  • Disabled fetching of instance and fault matrices count.
Restrict display of instance and fault to the last 30 minute


Decrease the frequency of DMS application: EM has one inbuilt application called Dynamic Monitoring System (DMS) which does the status collection for all the targets wherever DMS got deployed, if the frequency of DMS stats collection will be too fast then it makes EM console to slow down. To increase the frequency here are the steps-
Increased below parameters in dms_config.xml file given at this location –
$MiddlewareHome/fmw/soa11.1.1.6/oracle_common/modules/oracle.dms_11.1.1/server_config
prefetch intervalSeconds from 15 second to 120,
Discover intervalSeconds from 180 second to 300 seconds
<collectorConfiguration>
   <prefetch intervalSeconds="120" removeCycle="2" isDefault="true"/>
   <prefetch intervalSeconds="300" removeCycle="3"/>
   <discover intervalSeconds="300"/>
</collectorConfiguration>

Disabled “BPEL recovery console” option from Dashboard: Once you logged in into EM console, during dashboard page loading, EM will try to fetch the data from “DLV_MESSAGE” tables for “invoke” and “callback” activities which take longer time since DLV_ MESSAGE table normally is quite huge.
In order to disable the same please perform this –
EM console>>Farm>>soa-infra>>Administration>>System Mbeam Browser>> Filter>> Type bean name "oracle.as.soainfra.config:name=soa-infra,*", >> In result click on "AduitConfig" attribute and change the "bpelRecoveryStatus=Off", default value for bpelRecoveryStatus is "all"

Added JVM parameter at domain level “-Dweblogic.management.disableManagedServerNotifications=true”
Above JVM parameter has been suggested by Oracle, this parameter will help to reduce JMX notification which occur between Admin and Managed servers whenever any new component get added, any state get changes etc.
This configuration got added only for Admin Server Instance, not at Manage server level, and we have notice huge benefit in EM after this change, now EM was not at all hanging during login time, internal link were slow but at least multiple users were able to login into EM.

Increased cache timeout for discovery: During login process in EM console, EM does three things:
  • Authentication
  • Discovery of targets
  • Loading the page.
 Discovery of target step was taking too long around 10 minute since Domain was big and having a list of targets.

From Oracle note 1423893.1 we can implement to cache the discovery result, so the sub sequent login attempt will be fast - Following given Mbeans attributes has been added into to improve performance.

All timing for mbeans in milliseconds. After implementing above change, very first user login will take time after restart of Admin and the discovery result will be stored in cache and sub sequent login attempt will be fast.
  • If the caching is enabled, fmwc will use the cached discovery results.
  • The default setting is "not use the cached results"


  • This step applies to FMW 11g & 12c.

    -If FMW version is lower than 11.1.1.6,  upgrade to FMw 11.1.1.6 or apply available patch 13251077 for your version.
    -If applying patch 13251077, pay attention to patch README for setting of ORACLE_HOME.

    Navigate to fmwc System mBean browser. (Screenshots are shown for fmw 11g, it is similar for 12c)

    Access following AdminServer mBean for setting the cache property.
    • emoms.props:Location=AdminServer,name=emoms.properties,type=Properties,Application=em
    Setting following three properties.  Unless using non-default values, the last two properties are optional.

    # Enable caching of FMw Discovery data and use it for other subsequent users.
    # Values=true/false   Default=false
    oracle.sysman.emas.discovery.wls.FMW_DISCOVERY_USE_CACHED_RESULTS=true
    # If caching of discovery data is true, this parameter indicates how long the discovery data
    # from cache should be used before requiring a fresh discovery.
    # Time value is in milliseconds.  Default is 7200000 milliseconds.
    oracle.sysman.emas.discovery.wls.FMW_DISCOVERY_MAX_CACHE_AGE=7200000
    # If caching of discovery data is true, a user logs in and a discovery session is in progress,
    # this parameter indicates how long the user can wait for current discovery to complete.
    # After this wait time is elapsed and discovery is still not finished:  If there is already data
    # in cache it will be used, else the user will launch a new discovery session.
    # Time value is in milliseconds.  Default is 10000 milliseconds.
    oracle.sysman.emas.discovery.wls.FMW_DISCOVERY_MAX_WAIT_TIME=10000

    If new targets are added after enabling discovery cache and new targets are not displayed in fmwc, perform a manual refresh of the Farm to update the discovery cache.

    Please subscribe to the blog and For any further queries you can email me on samiappsdba@gmail.com

    I wish you all a Very Happy and Prosperous New Year 2018.


    Tuesday, November 17, 2015

    1-System Upgrade EM 12c Cloud Control 12.1.0.3 to 12.1.0.4

    Before starting an upgrade to Enterprise Manager Cloud Control 12c from an earlier version of Grid Control or Cloud Control consider your starting point because this will determine which upgrade path you select.

    The below picture illustrates the upgrade path from a Grid control to 12c Cloud control or from an earlier version of 12c CC to latest 12c CC.


    12c to 12c Upgrade Utilities are
    • Oracle Universal Installer (OUI)
    – Upgrades the OMS and OMR to the latest 12c version
    – Graphical or silent mode

    • Could Control 12c built-in Agent Upgrade Console page
    – Upgrade the agents
    – Delete the old agents
    – Perform other agent post-upgrade tasks

    A Choice of Two Upgrade Processes are
    • 1-System upgrade
    – An upgrade of the current 10g or 11g Grid Control OMR and agents to Cloud Control 12c
    – An upgrade of the current Cloud Control 12c OMR and agents to the latest version of 12c
    • 2-System upgrade
    – A migration of OMR and agents from the current 10g or 11g Grid Control to Cloud Control 12c
    • Agent/OMS Oracle Management Service compatibility across versions:
    – 10g and 11g agents cannot communicate with 12c OMS.
    – 12c agents cannot communicate with 10g and 11g OMS.
    – Both upgrade processes handle this in different ways.
    – 12c agents can communicate with all 12c OMS versions.

    In this article we will be focusing on the "1-system updgrade enterprise manager 12c cloud control from 12.1.0.3 to 12.1.0.4".

    Steps for Cloud Control 12c 1-System Upgrade Process are
    1. Ensure that the current 12c system is up to date.
    • Minimum version 12.1.0.2
    • Database patches
    • Latest Cloud Control PSU
    • DST Patches for database, OMS and Agents
    2. Back up the OMR.
    3. Copy emkey to the OMR.
    4. Shut down the current OMS.
    5. Run OUI in 1-System upgrade mode.
    6. Upgrade agents using the Agent Upgrade Console.
    • Central Agent first
    • Other agents in your system
    7. Clean up the old agents.

    Below are steps to upgrade EM 12c from Release3 to Release4:

    • Check that the EM Release3 OMR Oracle Management Repository Database and it's Listener should be up and running.
    • Check that the EM Release3 OMS Oracle Management Server should be up and running.
    # emctl start oms
    # emctl status agent 
    Oracle Enterprise Manager Cloud Control 12c Release 3
    Copyright (c) 1996, 2013 Oracle Corporation. All rights
    reserved.
    WebTier is Up
    Oracle Management Server is Up

    • Check that the Central Agent installed with the OMS should be up and running.
    # /u01/app/oracle/product/agent12c/agent_inst/bin/emctl start agent
    # /u01/app/oracle/product/agent12c/agent_inst/bin/emctl status agent
    Oracle Enterprise Manager Cloud Control 12c Release 3
    Copyright (c) 1996, 2013 Oracle Corporation. All rights
    reserved.
    ---------------------------------------------------------------
    Agent Version : 12.1.0.3.0
    OMS Version : 12.1.0.3.0
    Protocol Version : 12.1.0.1.0
    Agent Home : /u01/app/oracle/product/agent12c/agent_inst
    Agent Binaries :
    /u01/app/oracle/product/agent12c/core/12.1.0.3.0
    Agent Process ID : 3020
    Parent Process ID : 2970
    Agent URL : https://em12c.example.com:3872/emd/main/
    Repository URL : https://em12c.example.com:4904/empbs/upload
    Started at : 2014-04-04 10:49:35
    Started by user : oracle
    Last Reload : (none)
    Last successful upload : 2014-04-04
    11:34:39
    Last attempted upload : 2014-04-04
    11:34:39
    Total Megabytes of XML files uploaded so far : 0.06
    Number of XML files pending upload : 0
    Size of XML files pending upload(MB) : 0
    Available disk space on upload filesystem : 30.54%
    Collection Status : Collections
    enabled
    Heartbeat Status : Ok
    Last attempted heartbeat to OMS : 2014-04-04
    11:37:31
    Last successful heartbeat to OMS : 2014-04-04
    11:37:31
    Next scheduled heartbeat to OMS : 2014-04-04
    11:38:31
    ---------------------------------------------------------------
    Agent is Running and Ready

    • At this point, in a production system, you must back up your existing system, using your predefined backup strategy.
    • Next, apply all required patches for the database home in your environment, if your DB Software is 11.2.0.3 version of the database/OMR. Then, install the latest version of Patch
      6880880: OPatch 11.2.0.3.6 for the OMR home.
    •  Apply the generic database patch 11061801. This is a required database patch for
      database 11.2.0.3, the OMR version. While applying the database patch, Confirm the version of Perl installed and configured for the ORACLE_HOME. The version of Perl must be 5.00503 or higher, you can check the perl version using command 'perl -v'. While applying this database patch shutdown the database and OMS services and then apply using 'opatch apply' command.
    • After the database patch is applied, then start the database.
    • As a prerequisite for this upgrade, the Management Repository tables must not have
      any snapshots created. To check, log in as the sysman user and run the following
      query. It should return no rows.
    # sqlplus sysman/Oracle123
    SQL> select master , log_table from all_mview_logs where log_owner='SYSMAN'; 
    no rows selected.

    • Now Apply the Oracle Enterprise Manager 12c Release 3 Patch Set Update 1 (12.1.0.3.2) for
      Oracle Management Service on EMRelese3
      • Save the old OPatch and apply the latest required OPatch for your OMS home
        environment (p6880880_111000_Linux-x86-64.zip). 
      • The WebLogic Administration server and the database must be up in order to apply
        this patch. Check all components’ status. Your OMS should already be down.
    # emctl status oms 
    Oracle Enterprise Manager Cloud Control 12c Release 3
    Copyright (c) 1996, 2013 Oracle Corporation. All rights
    reserved.
    WebTier is Down
    Oracle Management Server is Down


    If the OMS shows up then stop it using 'emctl stop oms' command.
      •  Check that the WebLogic Administration server is running at this stage before applying the patch.
    # ps –ef | grep ADMINSERVER
    oracle 2092 2045 0 Oct26 2015 10:11:15
    /u01/app/oracle/product/middleware/jdk16/jdk/bin/java -server -Xms256m -Xmx512m -XX:MaxPermSize=512m -Dweblogic.Name=EMGC_ADMINSERVER

      •  Ensure that you have the correct OMS version for this patch, it should be 12.1.0.3.0
    # emctl getversion oms 


    Oracle Enterprise Manager Cloud Control 12c Release 3
    Copyright (c) 1996, 2013 Oracle Corporation. All rights reserved.
    Enterprise Manager 12c OMS Version 12.1.0.3.0


      • Analyze your system configuration and make sure that you meet all the prerequisites for applying this Patch Set update PSU.
    [p17513525]# opatchauto apply -analyze
    OPatch Automation Tool
    Copyright (c) 2013, Oracle Corporation. All rights reserved.
    OPatchauto version : 11.1.0.10.3
    OUI version : 11.1.0.11.0
    Running from : /u01/app/oracle/product/middleware/oms
    Log file location :
    /u01/app/oracle/product/middleware/oms/cfgtoollogs/opatch/opatch2015-10-26_15-20-56PM_1.log
    opatchauto log file:
    /u01/app/oracle/product/middleware/oms/cfgtoollogs/opatchauto/17513525/opatch_oms_2014-05-12_15-21-01PM_analyze.log
    Please enter OMS weblogic admin server
    URL(t3s://em12c.example.com:7103):> <Enter>
    Please enter OMS weblogic admin server username:> weblogic
    Please enter OMS weblogic admin server password:> Oracle123
    Configuration Validation: Success
    […]
    opatchauto succeeded.

      • Apply the patch 17513525,
    [p17513525]# opatchauto apply OPatch Automation Tool
    Copyright (c) 2013, Oracle Corporation. All rights reserved.
    OPatchauto version : 11.1.0.10.3
    OUI version : 11.1.0.11.0
    Running from : /u01/app/oracle/product/middleware/oms
    Log file location :/u01/app/oracle/product/middleware/oms/cfgtoollogs/opatch/opatch2015-10-26_15-30-13PM_1.log
    opatchauto log file:
    /u01/app/oracle/product/middleware/oms/cfgtoollogs/opatchauto/17
    513525/opatch_oms_2015-10-26_15-30-13PM_1_deploy.log
    Please enter OMS weblogic admin server
    URL(t3s://em12c.example.com:7103):> <Enter>
    Please enter OMS weblogic admin server username:> weblogic
    Please enter OMS weblogic admin server password:> Oracle123
    Configuration Validation: Success
    Running apply prerequisite checks for patch(es) "17513525" and Oracle Home
    "/u01/app/oracle/product/middleware/oms"...
    Please monitor OPatch log file:
    /u01/app/oracle/product/middleware/oms/cfgtoollogs/opatch/17513525_Oct_26_2015
    _11_01_13/ApplyPrereq2015-10-26_15-30-13PM_9.log
    Patches "17513525" are successfully analyzed for Oracle Home
    "/u01/app/oracle/product/middleware/oms"
    To continue, OPatch will do the following:
    [Patch and deploy patch(es) binaries] : Apply patch(es) [ 17513525 ] to
    Oracle Home "/u01/app/oracle/product/middleware/oms";
    Apply RCU artifact with patch
    "/u01/app/oracle/product/middleware/oms/.patch_storage/17513525_Jan_13_2014_07
    _45_01/original_patch";
    Register MRS artifact "swlib";
    Register MRS artifact "procedures"
    Do you want to proceed? [y|n] y
    User Responded with: Y
    y
    Applying patch "17513525" to Oracle Home
    "/u01/app/oracle/product/middleware/oms"...
    Please monitor OPatch log file:
    /u01/app/oracle/product/middleware/oms/cfgtoollogs/opatch/17513525_Oct_26_2015
    _11_01_13/apply2015-10-26_15-30-13PM_11.log


    • Start the OMS to ensure that the patch was applied successfully. You may log in and confirm that your system is working as expected.
    # emctl start oms
    • Copy the emkey from the existing OMS to the existing Management Repository
     # emctl config emkey -copy_to_repos -sysman_pwd Oracle123
    Oracle Enterprise Manager Cloud Control 12c Release 3
    Copyright (c) 1996, 2013 Oracle Corporation. All rights reserved.
    The EMKey has been copied to the Management Repository. This operation will cause the EMKey to become unsecure.
    After the required operation has been completed, secure the EMKey by running "emctl config emkey -remove_from_repos".


    • Check the emkey's status 
     #emctl status emkey -sysman_pwd Oracle123
    Oracle Enterprise Manager Cloud Control 12c Release 3
    Copyright (c) 1996, 2013 Oracle Corporation. All rights reserved.
    Enter Enterprise Manager Root (SYSMAN) Password :
    The EMKey is configured properly, but is not secure. Secure the EMKey by running "emctl config emkey -remove_from_repos".

    • Now stop the OMS that you are about to upgrade to Enterprise Manager Cloud Control 12c R4,
      your primary and only OMS
    # emctl stop oms –all
    Note that if you are running a JVMD or ADP engine you must stop them explicitly. For example:
    # emctl extended oms jvmd stop -all
    # emctl extended oms adp stop –all

    • Shut down the central Management Agent. Even though this agent is not yet being upgraded, it must be stopped because it monitors the management repository that is being upgraded.
    # /u01/app/oracle/product/agent12c/agent_inst/bin/emctl stop agent

    • In a production environment, prior to upgrading you should back up the OMS (the middleware home and the inventory), the Management Repository, and the Software Library so that you can always restore your system to a known state. You can upgrade the OMS and the Management Repository in graphical or silent mode. You can also choose to install the software binaries at one point and upgrade them later in graphical or silent mode. Here we will perform an upgrade in graphical mode.
      • If you have additional non-default plug-ins that you want to upgrade during this
        upgrade process, download them from http://www.oracle.com/technetwork/oem/grid-control/downloads/oemupgrade-console-502238.html and place them in a known location. Then run the installer as: runInstaller -pluginLocation <absolute_path_to_plugin_software_location>
      • Launch the Oracle Universal Installer
    # /stage/emcc12104/runInstaller & 


      •  The Enterprise manager console URL remains the same after an upgrade.
        − Connect to https://em12c.example.com:7803/em
      • − Accept the security certificate exception.
        − Log in as sysman/Oracle123.
        − Review the default Accessibility Preferences.
        − Click Save and Continue.
        Note the status of all targets. Remember that the central agent or other agents have yet to be upgraded; therefore, most targets will be in status “unknown.” 
    • Upgrade the management agents
      • First, you must upgrade the central agent installed with the old OMS. The agents to be
        upgraded must be up and running and secure. You stopped the central agent for the
        repository upgrade, and you must now restart it
    # /u01/app/oracle/product/agent12c/agent_inst/bin/emctl start agent 
    # /u01/app/oracle/product/agent12c/agent_inst/bin/emctl status agent
     Oracle Enterprise Manager Cloud Control 12c Release 3
    Copyright (c) 1996, 2013 Oracle Corporation. All rights
    reserved.
    ---------------------------------------------------------------
    Agent Version : 12.1.0.3.0
    OMS Version : 12.1.0.4.0
    Protocol Version : 12.1.0.1.0
    Agent Home : /u01/app/oracle/product/agent12c/agent_inst

    Agent Binaries :
    /u01/app/oracle/product/agent12c/core/12.1.0.3.0
    Agent Process ID : 20594
    Parent Process ID : 20546
    Agent URL : https://em12c.example.com:3872/emd/main/
    Repository URL : https://em12c.example.com:4904/empbs/upload
    Started at : 2014-04-08 20:21:18
    Started by user : oracle
    Last Reload : (none)
    Last successful upload : (none)
    Last attempted upload : 2014-04-08
    20:21:48
    Total Megabytes of XML files uploaded so far : 0
    Number of XML files pending upload : 18
    Size of XML files pending upload(MB) : 0.02
    Available disk space on upload filesystem : 23.04%
    Collection Status : Collections
    enabled
    Heartbeat Status : Ok
    Last attempted heartbeat to OMS : 2014-04-08
    20:21:38
    Last successful heartbeat to OMS : 2014-04-08
    20:21:38
    Next scheduled heartbeat to OMS : 2014-04-08
    20:22:48
    ---------------------------------------------------------------
    Agent is Running and Ready

    Note the Agent URL points to https, indicating that the agent is secure
      •  In the EM Console, navigate to Setup > Manage Cloud Control > Upgrade Agents. This leads you to the Agent Upgrade Console (AUG).
      • Under Job Name, maintain the default name. Click Add to select the agents
      • Use the top left cell in the Agents table, or use Ctrl-Click (multi-select) to select the
        em12c.example.com:3872 and host01.example.com:3872 agents, and click
        OK
      • Select to Override Privileged Credentials and use the green plus to create new
        credentials. Enter the following values: username/password= root/password, RunPrivilege=none, SaveAs=NC_HOST_ROOT 
      • Click OK to return to the Upgrade Agents screen, and select your new credentials.
      • Skip the Additional Inputs field and click Submit. Click OK if a warning dialog box is presented, and then monitor the upgrade and make sure that all steps are successful. From the top left menu navigate to the Agent Upgrade Results and confirm that the
        agent upgrade was a success.
      • To save disk space you may delete the old agents.
      • Other recommended post-upgrade tasks are Delete old OMS home (in graphical or silent modes, using OUI), Set up the command-line interface, EM CLI, Set up automatic startup of the OMS and agent on the host, if not already set up, Apply custom third-party security certificates, Apply patches released after the release that you are upgrading to and Periodic Self-Update review and downloads.
    Hence following all the above steps you will be able to do EM 12c CC Upgrade from Release3 to Release4, the process so termed by Oracle as "1-system upgrade EM 12c Cloud Control 12.1.0.3 to 12.1.0.4".

    For any further queries, technical assistance and support on such upgrades, please don't hesitate to contact me on samiappsdba@gmail.com

    Monday, November 16, 2015

    Installing Oracle Enterprise Manager 12c Cloud Control

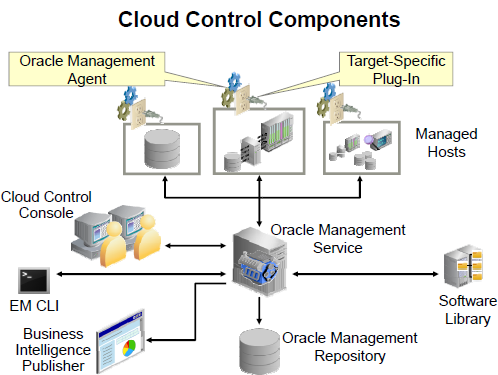
    Oracle Enterprise Manager Cloud Control 12c helps to manage your IT enterprise at all levels.

    Oracle Enterprise Manager Cloud Control 12c has been built around 10 major themes. Some of the key aspects of each theme are:

    Enterprise-Ready Framework: Plug-in-based management of targets, user interface redesign, named credentials
    Cloud Management: OVM server and server pool management, cloud topology viewer
    Chargeback and Capacity Planning: Charge back based on selected target types, reporting on usage and trends
    Exadata and Exalogic Management: InfiniBand monitoring, real-time and historical system views
    Configuration Management: Configuration tracking, comparisons, compliance checking
    Provisioning and Patching: Separation of provisioning design and execution, selfupdate, mass database patching
    Application Quality Management: Application replay, real application testing, data masking
    Database Management: Database creation and upgrade via Cloud Control
    Middleware Management: Improved discovery, monitoring, provisioning, diagnostics
    Applications Management: Fusion Applications management improvements


    Step by Step Installing EM 12c Cloud Control in a Single-Server Topology

    Before starting the EM 12c installation, create a database as a repository.
    Preconfigured management repositories are offered by Oracle in the form of database templates and are available for download from the Oracle Technology Network (OTN).

    # unzip 11.2.0.3_Database_Template_for_EM12_1_0_4_Linux_x64.zip –d $ORACLE_HOME/assistants/dbca/templates

    Start DBCA.

    # dbca

    Select “Create a Database” and click Next.

    Select the “11.2.0.3 Database Template for EM12.1.0.4 Small Deployment” template and click Next.

    Enter the following values,
    Global Database Name = em12rep.example.com
    SID = em12rep

    Uncheck the option to “Configure Enterprise Manager”. Deselecting this option will prevent the Database Control (part of the 11g database distribution) from being configured.

    When complete, you will see the Database creation complete page. Click Exit.

    Database and Listener should be up and running to start with the below 12c EM Cloud Control installation.

    Typically, hardware and software requirements are checked ahead of time based on the installation documentation. Before starting the installation, it is recommended that you run the installer prerequisite check to verify the host’s suitability for this installation. Run the runInstaller utility with the following parameters to give yourself an opportunity to fix any parameters that may need to be adjusted. In your environment, all parameters have been set to the required values, and the output will reflect that fact.

    # cd /emstage/emcc12104/
    # ./runInstaller -executeSysPrereqs

    Starting Oracle Universal Installer...
    Checking Temp space: must be greater than 400 MB. Actual 4593 MB Passed
    Checking swap space: must be greater than 150 MB. Actual 8306 MB Passed
    Checking monitor: must be configured to display at least 256 colors. Actual 16777216 Passed
    Exiting Oracle Universal Installer, log for this session can be
    found at /u01/app/oraInventory/logs/installActions25_Oct_2015.log


    Note: DO NOT run the EM Prerequisite Kit (emprereqkit) on an installation with a preconfigured database.

    At this point you may download any additional plug-ins required for your system but not included in the default distribution. If additional plug-ins were needed, then check the following location for more plug-ins:

    http://www.oracle.com/technetwork/oem/extensions/index.html

    Then you would run the installer:

    # runInstaller -pluginLocation <absolute_path_to_plugin_software_location>


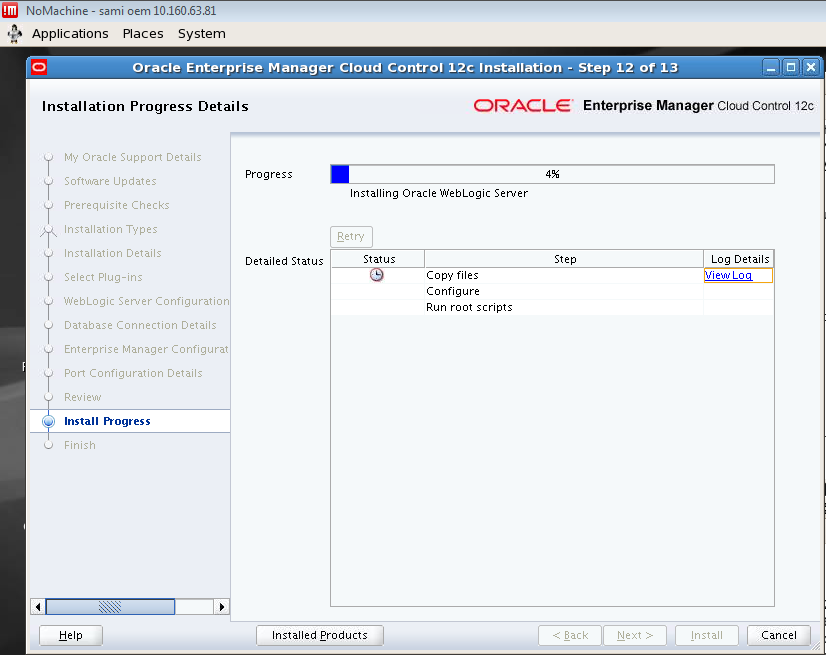
    # ./runInstaller


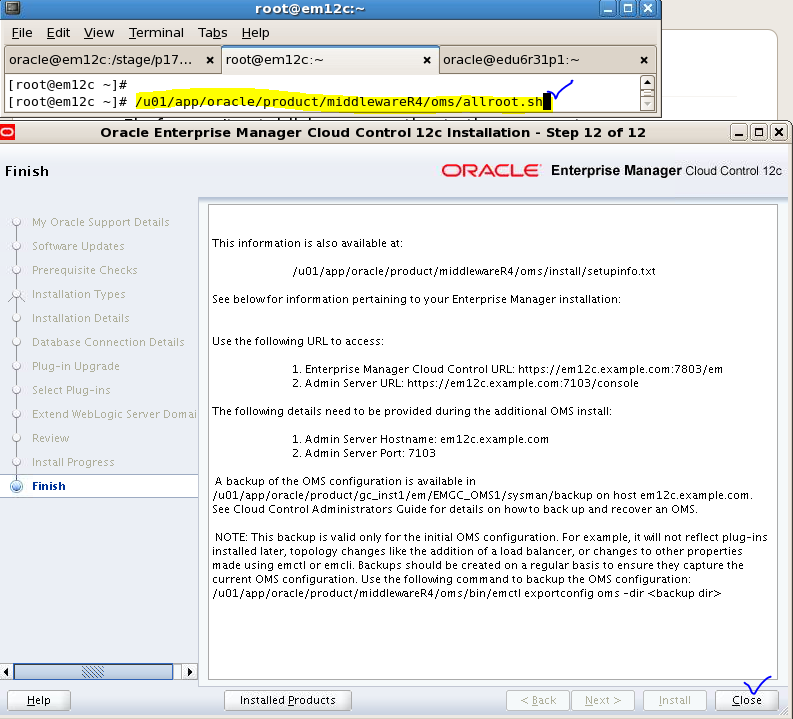
    As root user from another terminal execute allroot.sh script.
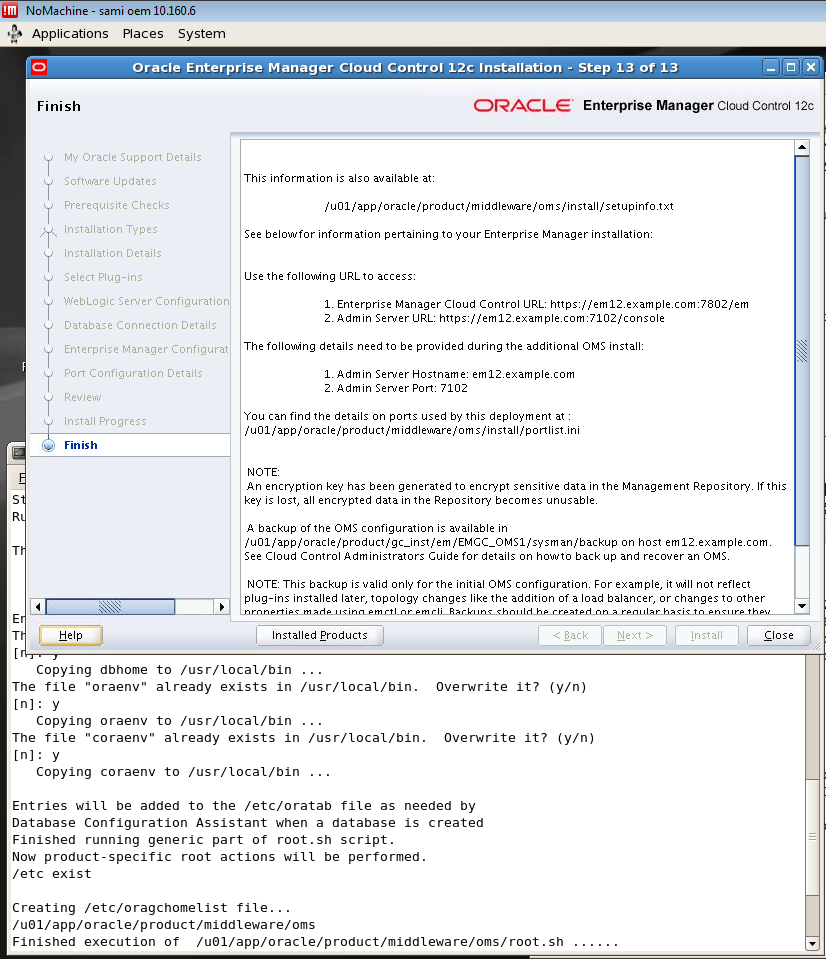
    # ./u01/app/oracle/product/middleware/oms/allroot.sh


    On the Finish page, take note of the Cloud Control URL:
    Enterprise Manager Cloud Control URL: https://em12.example.com:7802/em
    Admin Server URL: https://em12.example.com:7102/console
    Click Close to close the installer

    Now log in to Cloud Control Console as the SYSMAN user.

    To View all the targets managed by Enterprise Manager Cloud Control 12c installation.
    Navigate to Targets > All Targets

    Navigate to Setup > Extensibility > Self Update
    To check updates on Cloud Control components such as plug-ins and new agents. By default, the
    connection mode is Online and you would be able to Check Updates on a regular basis. If you select the Offline connection mode, you must perform separate metadata downloads to a known location, transfer these files to the OMS host, and then upload them to your system.

    Enterprise Manager startup sequence:
    1. OMR Oracle Management Repository listener and database instance
    2. OMS Oracle Management Service
    3. Agent on OMS server

    Enterprise Manager shutdown sequence, is in the reverse order.
    1. Agent on OMS Server
    2. OMS
    3. OMR Listener and database instance

    Start, stop, and check the status of the OMS with emctl
    $ORACLE_HOME/bin/emctl start oms
    $ORACLE_HOME/bin/emctl stop oms [-all][-force]
    $ORACLE_HOME/bin/emctl status oms [-details]
    Start, stop, and check the status of an agent with emctl
    $AGENT_INST_HOME/bin/emctl start|stop|status agent

    OMS Oracle Management Service Log Files
    Log files for the OMS are primarily in the following locations:
    gc_inst/em/EMGC_OMS1/sysman/log
    gc_inst/user_projects/domains/GCDomain/servers/EMGC_OMS1/sysman/log
    gc_inst/user_projects/domains/GCDomain/servers/EMGC_OMS1/logs

    Agent Log Files
    Log files for the central agent (the agent installed on the OMS server) are in this location:
    <agent_base_directory>/agent_inst/sysman/log

    I hope this article helps you to understand the steps involved in installing Oracle EM 12c Cloud Control. 
    Please subscribe to this blog and for any further queries please don't hesitate to contact me on samiappsdba@gmail.com