Following are the simple steps for migrating the SQL Server database from one server to the other along with all the user logins with their same login passwords,
1. On Source database server identify the location of the MDF and LDF files for the database.
2. Right click the database and go to all task, detach database.
3. After the database is successfully detached, copy the database files MDF and LDF to the destination server and attach the MDF file and automatically the database will be attached to the target.
To transfer logins and passwords between these SQL Server databases, follow the below steps:
1. Run the below script on the source SQL Server, this will create two procedures, sp_help_revlogin & sp_hexadecimal.
2. Execute the sp_help_revlogin procedure from Query Analyzer on the source server. The output of the sp_help_revlogin stored procedure is login scripts that create logins with the original SID and password.
3. Save the above step's output, and then paste and run it in Query Analyzer on the destination SQL Server like ‘EXEC master..sp_help_revlogin’. This will create/migrate all the logins along with their original SID and password to the target SQL Server database.
Script to create the sp_help_revlogin stored procedure. (This is written by Microsoft consultants so just create these procedures as is without chaning the code)
----- Begin Script, Create sp_help_revlogin procedure -----
USE master
GO
IF OBJECT_ID ('sp_hexadecimal') IS NOT NULL
DROP PROCEDURE sp_hexadecimal
GO
CREATE PROCEDURE sp_hexadecimal
@binvalue varbinary(256),
@hexvalue varchar(256) OUTPUT
AS
DECLARE @charvalue varchar(256)
DECLARE @i int
DECLARE @length int
DECLARE @hexstring char(16)
SELECT @charvalue = '0x'
SELECT @i = 1
SELECT @length = DATALENGTH (@binvalue)
SELECT @hexstring = '0123456789ABCDEF'
WHILE (@i <= @length)
BEGIN
DECLARE @tempint int
DECLARE @firstint int
DECLARE @secondint int
SELECT @tempint = CONVERT(int, SUBSTRING(@binvalue,@i,1))
SELECT @firstint = FLOOR(@tempint/16)
SELECT @secondint = @tempint - (@firstint*16)
SELECT @charvalue = @charvalue +
SUBSTRING(@hexstring, @firstint+1, 1) +
SUBSTRING(@hexstring, @secondint+1, 1)
SELECT @i = @i + 1
END
SELECT @hexvalue = @charvalue
GO
IF OBJECT_ID ('sp_help_revlogin') IS NOT NULL
DROP PROCEDURE sp_help_revlogin
GO
CREATE PROCEDURE sp_help_revlogin @login_name sysname = NULL AS
DECLARE @name sysname
DECLARE @xstatus int
DECLARE @binpwd varbinary (256)
ECLARE @txtpwd sysname
DECLARE @tmpstr varchar (256)
DECLARE @SID_varbinary varbinary(85)
DECLARE @SID_string varchar(256)
IF (@login_name IS NULL)
DECLARE login_curs CURSOR FOR
SELECT sid, name, xstatus, password FROM master..sysxlogins
WHERE srvid IS NULL AND name <> 'sa'
ELSE
DECLARE login_curs CURSOR FOR
SELECT sid, name, xstatus, password FROM master..sysxlogins
WHERE srvid IS NULL AND name = @login_name
OPEN login_curs
FETCH NEXT FROM login_curs INTO @SID_varbinary, @name, @xstatus, @binpwd
IF (@@fetch_status = -1)
BEGIN
PRINT 'No login(s) found.'
CLOSE login_curs
DEALLOCATE login_curs
RETURN -1
END
SET @tmpstr = '/* sp_help_revlogin script '
PRINT @tmpstr
SET @tmpstr = '** Generated '
+ CONVERT (varchar, GETDATE()) + ' on ' + @@SERVERNAME + ' */'
PRINT @tmpstr
PRINT ''
PRINT 'DECLARE @pwd sysname'
WHILE (@@fetch_status <> -1)
BEGIN
IF (@@fetch_status <> -2)
BEGIN
PRINT ''
SET @tmpstr = '-- Login: ' + @name
PRINT @tmpstr
IF (@xstatus & 4) = 4
BEGIN -- NT authenticated account/group
IF (@xstatus & 1) = 1
BEGIN -- NT login is denied access
SET @tmpstr = 'EXEC master..sp_denylogin ''' + @name + ''''
PRINT @tmpstr
END
ELSE BEGIN -- NT login has access
SET @tmpstr = 'EXEC master..sp_grantlogin ''' + @name + ''''
PRINT @tmpstr
END
END
ELSE BEGIN -- SQL Server authentication
IF (@binpwd IS NOT NULL)
BEGIN -- Non-null password
EXEC sp_hexadecimal @binpwd, @txtpwd OUT
IF (@xstatus & 2048) = 2048
SET @tmpstr = 'SET @pwd = CONVERT (varchar(256), ' + @txtpwd + ')'
ELSE
SET @tmpstr = 'SET @pwd = CONVERT (varbinary(256), ' + @txtpwd + ')'
PRINT @tmpstr
EXEC sp_hexadecimal @SID_varbinary,@SID_string OUT
SET @tmpstr = 'EXEC master..sp_addlogin ''' + @name
+ ''', @pwd, @sid = ' + @SID_string + ', @encryptopt = '
END
ELSE BEGIN
-- Null password
EXEC sp_hexadecimal @SID_varbinary,@SID_string OUT
SET @tmpstr = 'EXEC master..sp_addlogin ''' + @name
+ ''', NULL, @sid = ' + @SID_string + ', @encryptopt = '
END
IF (@xstatus & 2048) = 2048
-- login upgraded from 6.5
SET @tmpstr = @tmpstr + '''skip_encryption_old'''
ELSE
SET @tmpstr = @tmpstr + '''skip_encryption'''
PRINT @tmpstr
END
END
FETCH NEXT FROM login_curs INTO @SID_varbinary, @name, @xstatus, @binpwd
END
CLOSE login_curs
DEALLOCATE login_curs
RETURN 0
GO
----- End Script -----
references:
http://support.microsoft.com/kb/246133
http://support.microsoft.com/kb/918992
Thursday, December 27, 2012
Saturday, November 3, 2012
Non-Dataguard Standby for RAC primary using RMAN
The following are the steps to create a single instance manual standby database for RAC Primary using RMAN without dataguard setup.
on Primary RAC Servers (ed-olraclin1 & ed-olraclin2)
On one of the RAC node take a full RMAN backup of the database on /u01/BACKUP folder, also create the same folder on target dred-olraclin server in same drive and copy the backup set to the DR database server. We will later use this backup set to restore the database to initial build the standby database.
[oracle@ed-olraclin2 ~]$ RMAN TARGET /
RMAN> CONFIGURE CONTROLFILE AUTOBACKUP ON;
RMAN> RUN
{
ALLOCATE CHANNEL CH1 TYPE DISK FORMAT '/u01/BACKUP/%d_%T_%s.bak';
BACKUP DATABASE;
BACKUP ARCHIVELOG ALL;
}
RMAN> DELETE NOPROMPT OBSOLETE;
Since the autobackup of controlfile is on ASM disk +TESTDB_FRA, used the new feature of 11.2.0.2 that can copy the files from ASM to local disk using the ASMCMD utility CP copy command as given below,
[oracle@ed-olraclin2 ~]$ export ORACLE_HOME=/u01/oracle/11.2.0/grid
[oracle@ed-olraclin2 ~]$ export ORACLE_SID=+asm2
[oracle@racdb2 ~]$ asmcmd
ASMCMD> pwd
+TESTDB_FRA/testdb/AUTOBACKUP/2012_10_26
ASMCMD> ls
s_790046163.3443.790046167
ASMCMD> CP s_790046163.3443.790046167 /u01/BACKUP/s_790046163.3443.790046167
Copy all the files to dred-olraclin standby database server,
The below copies the directory BACKUP to /u01 on dred-olraclin server,
[oracle@ed-olraclin2 ~] scp -r /u01/BACKUP oracle@dred-olraclin:/u01
or use the below to copy all files from BACKUP directory to /u01/BACKUP directory on dr-olraclin server,
[oracle@ed-olraclin2 ~] scp /u01/BACKUP/* oracle@dred-olraclin:/u01/BACKUP
On Target Single Instance server (dred-olraclin)
Install database software on DR server with same version that of Primary. Or you can use the below article to clone the database home,
http://samiora.blogspot.com/2012/10/cloning-oracle-database-home.html
Create the Listener using 'netca' and database service using 'oradim' utility.
Create the initTEST.ora file and update the parameters accordingly.
SQL> STARTUP NOMOUNT;
[oracle@dred-olraclin ~] RMAN TARGET /
RMAN> RESTORE CONTROLFILE FROM '/u01/BACKUP/s_790046163.3443.790046167';
SQL> ALTER DATABASE MOUNT;
RMAN> RESTORE DATABASE;
Automate archive log apply from primary to standby site
Create .sh scripts and through crontab, automate the process of archive log backup, robocopy the archive backupset to DR server, catalog the archive backups to DR control files and then apply the archives to the DR database using RMAN.
archives_backup.sh
/u01/oracle/11.2.0/bin/rman target / log archive_backup.log @archive_level_0.sql
archive_level_0.sql
run
{
backup format '/u01/archive_backup/%d_%I_%u_%T_%e.rman_arch' archivelog all;
}
copyarchives.sh
scp /u01/archive_backup/* oracle@dred-olraclin:/u01/archive_backup
rman_recovery.sh
rman target / log recovery.log @rman_dr_recovery.sql
rman_dr_recovery.sql
CATALOG START WITH '/u01/archive_backup/' NOPROMPT;
recover database;
Note that 'CATALOG START WITH' statement catalogs all the archives from /u01/archive_backup folder and will skip those files that were already cataloged earlier.
Through crontab, schedule the above scripts archive_backup.sh and copyarchives.sh on any one node of primary RAC server while schedule rman_recovery.sh on DR standby single instance database server.
Verify archive apply and data
You can verify the standby database data by opening the database in read only mode as follows,
SQL> ALTER DATABASE OPEN READ ONLY;
Here verify the data and then restart the database in mount state so that the recovery process continues.
SQL> STARTUP FORCE MOUNT;
To check the last archives been applied run the below query on primary and standby databases,
SQL> SELECT thread#,max(SEQUENCE#) FROM V$ARCHIVED_LOG group by thread#;
THREAD# MAX(SEQUENCE#)
------------------------------------
1 10701
2 13430
For any further questions please don't hesitate to email me samiora@gmail.com
Create 11g Clone or Standby Database using RMAN
Following are the steps of Creating a Standby or a Clone Database using Rman Duplicate From Active Database for 11.2.0.2 database.
The following are the steps to create a standby or a clone of oracle database using RMAN,
1) Create a parameter file for the clone or standby
2) Add the following three parameters to the standby or clone database parameter file, even if the paths are identical on both the source and standby or clone servers:
*._compression_compatibility='11.2.0'
*.db_file_name_convert=('target path','auxilary path'....)
*.log_file_name_convert=('target path','auxilary path'....)
3) Copy the passwordfile from the source database to the clone or standby Oracle_Home/database for windows folder or $Oracle_Home/dbs for Linux.
4) Configure the network on the clone or standby server so that you can connect to the database
5) Startup nomount the clone or standby database
6) Add a tnsnames.ora entry to the clone or standby on your source database server
7) Check that you can connect to the clone or standby database as sysdba
8) On the Primary server connect to the source database and clone or standby database (auxiliary) using RMAN
D:\> RMAN TARGET / AUXILIARY sys/password@prodclon
Recovery Manager: Release 11.2.0.2.0 - Production on Fri Nov 2 9:02:41 2012
Copyright (c) 1982, 2009, Oracle and/or its affiliates. All rights reserved.
connected to target database: PROD (DBID=7119395273)
Connected to auxiliary database: PRODCLON (not mounted)
9) Use the following syntax to duplicate to a clone (use as many channels as CPU’s you may dedicate):
run
{
allocate channel c1 type disk;
allocate auxiliary channel cr1 type disk;
duplicate target database to 'prodclon' from active database nofilenamecheck;
}
10) Use the following syntax to duplicate for standby (use as many channels as CPU’s you may dedicate):
run
{
allocate channel c1 type disk;
allocate auxiliary channel cr1 type disk;
duplicate target database for standby from active database nofilenamecheck;
}
If you have any questions regarding the above steps then please don't hesitate to email me samiora@gmail.com
Tuesday, October 23, 2012
Cloning Oracle Database Home
Following are the step by step method of cloning an Oracle 11g 11.2.0.2 Database Home from source server(ProdA) to a target server(TestA).
1. Check the patches applied on source ProdA server and the size of the oracle home directory,
[oracle@proda dbhome_1]$ opatch lsinv
[oracle@proda dbhome_1]$ du -h . tail
2. On TestA target server create directory for oracle home, change ownership to oracle user and then on source ProdA server tar oracle home and copy to destination TestA server,
[root@testa ~]# mkdir -p /oracle/app/product/11.2.0/dbhome_1
[root@testa ~]# chown -R oracle:dba /oracle
[oracle@proda ~]$ cd /oracle/app/product/11.2.0/dbhome_1
[oracle@proda dbhome_1]$ tar cvf - .
[oracle@proda dbhome_1]$ scp *.tar testa:/oracle/app/product/11.2.0/dbhome_1
[oracle@testa ~]$ cd /oracle/app/product/11.2.0/dbhome_1
[oracle@proda dbhome_1]$ tar xvf *.tar
3. On TestA target server detach the oracle home (This step is required only if the server itself is a clone/image of the source server or if oracle home was already registered in the inventory)
[oracle@testa ~]$ cd /oracle/app/product/11.2.0/dbhome_1/oui/bin
[oracle@testa bin]$ ./runInstaller -detachHome ORACLE_HOME="/oracle/app/product/11.2.0/dbhome_1"
4. Now do the cloning of oracle home,
[oracle@testa bin]$ ./runInstaller -clone -silent -ignorePreReq ORACLE_HOME="/oracle/app/product/11.2.0/dbhome_1" ORACLE_HOME_NAME="dbhome_11gR2" ORACLE_BASE="/oracle/app" OSDBA_GROUP=dba OSOPER_GROUP=dba
Once the above step is successful then execute root.sh script as root,
[root@testa ~]# /oracle/app/product/11.2.0/dbhome_1/root.sh
Finally you can check the cloned home and crosscheck the patchset level from the result seen in step 1, both will be same.
[oracle@testa ~]$ opatch lsinv
5. Post cloning steps is to accordingly update the files in $ORACLE_HOME/dbs and $ORACLE_HOME/network/admin folders.
On Windows:
After doing step 1 and 2 as above then from step 3 do the following,
SET PATH=I:\r11i\ebstestdb\10.2.0\bin;I:\r11i\ebstestdb\10.2.0\jdk\jre\bin;%PATH%
cd I:\r11i\ebstestdb\10.2.0\oui\bin
# setup.exe -clone -silent -ignorePreReq ORACLE_HOME="I:\r11i\ebstestdb\10.2.0" ORACLE_HOME_NAME="dbhome_11107" ORACLE_BASE="I:\r11i"
Starting Oracle Universal Installer...
No pre-requisite checks found in oraparam.ini, no system pre-requisite checks will be executed.
Preparing to launch Oracle Universal Installer from C:\DOCUME~1\sami\LOCALS~1\Temp\1\OraInstall2013-02-10_12-15-02PM. Please wait ... Oracle Universal Installer, Version 10.2.0.4.0 Production
Copyright (C) 1999, 2008, Oracle. All rights reserved.
You can find a log of this install session at:
C:\Program Files\Oracle\Inventory\logs\cloneActions2013-02-10_12-15-02PM.log
....................................................................................................Dll to load is C:\DOCUME~1\sami\LOCALS~1\Temp\1\OraInstal
l2013-02-10_12-15-02PM\Win64RunProcesses.dll
Loading psapi.dll from C:\DOCUME~1\sami\LOCALS~1\Temp\1\OraInstall2013-02-10_12-15-02PM\psapi.dll
100% Done.
Installation in progress (Sunday, February 10, 2013 12:15:52 PM GST)
.........................................................................
73% Done.
Install successful
Setup in progress (Sunday, February 10, 2013 12:16:07 PM GST)
Problem in getting file info: No such file or directory toLoad is C:\DOCUME~1\sami\LOCALS~1\Temp\1\OraInstall2013-02-10_12-15-02PM\win64ocxReg.dll
ERROR: Cannot add user to application access ACL.
No mapping between account names and security IDs was done.
(534)
ERROR: Cannot add user to application launch ACL.
No mapping between account names and security IDs was done.
(534)
Setup successful
End of install phases.(Sunday, February 10, 2013 12:16:27 PM GST)
The cloning of dbhome_11107 was successful.
Please check 'C:\Program Files\Oracle\Inventory\logs\cloneActions2013-02-10_12-15-02PM.log' for more details.
Please press Enter to exit...
For more details you can refer to following MOS documents and don't hesitate to contact me as well samiora@gmail.com:
Master Note For Cloning Oracle Database Server ORACLE_HOME's Using the Oracle Universal Installer (OUI) (Doc ID 1154613.1)
Cloning An Existing Oracle11g Release 2 (11.2.0.x) RDBMS Installation Using OUI (Doc ID 1221705.1)
FAQs on RDBMS Oracle Home Cloning Using OUI (Doc ID 565009.1)
Thursday, September 6, 2012
Oralce Linux 6 OS & Oracle 11g DB Installation
Linux 6 installation followed by oracle 11g Release 2 database installation on a machine with 8GB RAM.
1. Boot from the Oracle Linux 6 DVD. At the boot screen select "Install or upgrade an existing system" and press "Enter".

2. The next screen test the media DVD before the installation starts. This will take long time so use the TAB key and when the focus is on SKIP button press ENTER.
 3. On the "Welcome" screen, click the "Next" button.
 4.Select the appropriate language, then click the "Next" button.
 5.Select the relevant keyboard setting, then click the "Next" button.
 6.Select the storage option necessary for the installation, then click the "Next" button.
 7.Click the "Re-initialize all" button on the disk initialization warning dialog.8.Enter a fully qualified host name, then click the "Configure Network" button.


 10.Check the "Connect automatically" checkbox. If you are not using DHCP, click on the "IPv4 Settings" tab, set the method to "Manual", click the "Add" button and enter the appropriate network details. When you are happy with the details, click the "Apply" and "Close" buttons to return to the host name screen, then click the "Forward" button.

 12.Enter a root password for the server, then click the "Next" button to proceed.
 13.Check the partitioning type you require. If you want to amend the default partitioning layout, check the "Review and modify partitioning layout" option. Click the "Next" button.
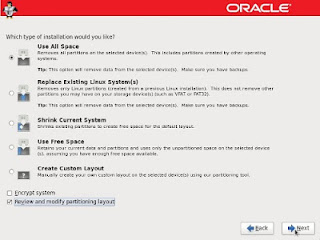 14.The installer will list the default partitioning scheme for your size disk. Amend them as required and click the "Next" button, then the "Format" and "Write changes to disk" buttons on the following dialogs.
 15.Accept the boot loader settings by clicking the "Next" button.
 16.Accept the "Basic Server" installation and check the "Customize now" option, then click the "Next" button.
 17.The "Package Group Selection" screen allows you to select the required package groups, and individual packages within the details section. When you've made your selection, click the "Next" button. If you want the server to have a regular gnome desktop you need to include the following package groups from the "Desktops" section:
◦Desktops
◦Desktop
◦Desktop Platform
◦Fonts
◦General Purpose Desktop
◦Graphical Administration Tools
◦X Windows System
 18. Now you can wait and relax for the installation to complete.

 20.On the "Welcome" screen, click the "Forward" button.

 22.Pick the desired ULN Registration option, then click the "Forward" button. In this case we will pick the register later option.
 23.Click the "No thanks, I'll connect later." button.
 24.Finish the software updates setup by clicking the "Forward" button.
 25.Enter the details for system user, then click the "Forward" button.
 26.Adjust the Date and Time settings if necessary, and click the "Forward" Button.

 28.Next, you are presented with the login screen. Log in by clicking on the user on the login screen.
 29.Once logged in, you are ready to use the desktop.
 30. Now turn off the Firewall,
>Open the "Firewall Configuration" dialog (System > Administration > Firewall).
>Click the "Close" button on the startup dialog and type in the "root" password if requested.
>On the resulting dialog, click the "Disable" button, followed by the "Apply" button on the toolbar.
>Click the "Yes" button on the confirmation dialog.
>Quit the "Firewall Configuration" dialog.
 31. Finally, Disable SELinux by editing the "/etc/selinux/config" file, making sure the SELINUX flag is set as follows.
Now the following is about Installing Oracle database 11g on the above installed Oracle Linux 6.
Oracle Database 11g Release 2 (11.2) Installation On Oracle Linux 6
The previous post is about Oracle Linux 6 installation and the following article describes the installation of Oracle Database 11g Release 2 (11.2) (64-bit) on Oracle Linux 6 (64-bit). The article is based on a server installation with a minimum of 2G swap, with both SELinux and the firewall disabled. The following package groups were included for this installation.
Note. Oracle currently only support 11gR2 on Oracle Linux 6 using the Unbreakable Linux Kernel (UEK).
For example.
Create the new groups and users.
Create the directories in which the Oracle software will be installed.
1.Configure Security Updates

2.Select Install Option

3.System Class

4.Node Selection

5.Select Install Type

6.Typical Install Configuration

7.Create Inventory

8.Perform Prerequisite Checks

9.Summary

10.Install Product

11.Database Configuration Assistant

12.Database Configuration Assistant 2

13.Execute Configuration Scripts

14.Finish

1. Boot from the Oracle Linux 6 DVD. At the boot screen select "Install or upgrade an existing system" and press "Enter".

2. The next screen test the media DVD before the installation starts. This will take long time so use the TAB key and when the focus is on SKIP button press ENTER.


9.Highlight the relevant connection and click the "Edit" button.


11.Select the relevant time zone by clicking on your nearest city on the map. Click on the "Next" button to proceed.


◦Desktops
◦Desktop
◦Desktop Platform
◦Fonts
◦General Purpose Desktop
◦Graphical Administration Tools
◦X Windows System


19.Click the "Reboot" button to complete the installation.


21.Accept the license agreement and click the "Forward" button.


27.Accept the default setting on the Kdump screen by clicking the "Finish" button.


>Open the "Firewall Configuration" dialog (System > Administration > Firewall).
>Click the "Close" button on the startup dialog and type in the "root" password if requested.
>On the resulting dialog, click the "Disable" button, followed by the "Apply" button on the toolbar.
>Click the "Yes" button on the confirmation dialog.
>Quit the "Firewall Configuration" dialog.

Once the change is complete, restart the server.SELINUX=disabled
Now the following is about Installing Oracle database 11g on the above installed Oracle Linux 6.
Oracle Database 11g Release 2 (11.2) Installation On Oracle Linux 6
The previous post is about Oracle Linux 6 installation and the following article describes the installation of Oracle Database 11g Release 2 (11.2) (64-bit) on Oracle Linux 6 (64-bit). The article is based on a server installation with a minimum of 2G swap, with both SELinux and the firewall disabled. The following package groups were included for this installation.
- Base System > Base
- Base System > Client management tools
- Base System > Compatibility libraries
- Base System > Hardware monitoring utilities
- Base System > Large Systems Performance
- Base System > Network file system client
- Base System > Performance Tools
- Base System > Perl Support
- Servers > Server Platform
- Servers > System administration tools
- Desktops > Desktop
- Desktops > Desktop Platform
- Desktops > Fonts
- Desktops > General Purpose Desktop
- Desktops > Graphical Administration Tools
- Desktops > Input Methods
- Desktops > X Window System
- Development > Additional Development
- Development > Development Tools
- Applications > Internet Browser
Note. Oracle currently only support 11gR2 on Oracle Linux 6 using the Unbreakable Linux Kernel (UEK).
- Download Software
- Unpack Files
- Hosts File
- Automatic Setup
- Manual Setup
- Additional Setup
- Installation
- Post Installation
Download Software
Download the Oracle software from OTN or MOS-Metalink Oracle Support depending on your support status.- OTN: Oracle Database 11g Release 2 (11.2.0.1) Software (64-bit) - For unsupported installation.
- MOS: Oracle Database 11g Release 2 (11.2.0.3) Software (64-bit) - For supported installation.
Unpack Files
Unzip the files.You should now have a single directory called "database" containing installation files.# 11.2.0.1 unzip linux.x64_11gR2_database_1of2.zip unzip linux.x64_11gR2_database_2of2.zip #11.2.0.2 unzip p10098816_112020_Linux-x86-64_1of7.zip unzip p10098816_112020_Linux-x86-64_2of7.zip #11.2.0.3 unzip p10404530_112030_Linux-x86-64_1of7.zip unzip p10404530_112030_Linux-x86-64_2of7.zip
Hosts File
The "/etc/hosts" file must contain a fully qualified name for the server.For example.
127.0.0.1       localhost.localdomain  localhost
192.168.0.181   ol6-112.localdomain    ol6-112
Automatic Setup
If you plan to use the "oracle-rdbms-server-11gR2-preinstall" package to perform all your prerequisite setup, follow the instructions at http://public-yum.oracle.com to setup the yum repository for OL, then perform the following command.All necessary prerequisites will be performed automatically.# yum install oracle-rdbms-server-11gR2-preinstall
Manual Setup
Oracle recommend the following minimum parameter settings.The current values can be tested using the following command.fs.suid_dumpable = 1 fs.aio-max-nr = 1048576 fs.file-max = 6815744 kernel.shmall = 2097152 kernel.shmmax = 536870912 kernel.shmmni = 4096 kernel.sem = 250 32000 100 128 net.ipv4.ip_local_port_range = 9000 65500 net.core.rmem_default = 262144 net.core.rmem_max = 4194304 net.core.wmem_default = 262144 net.core.wmem_max = 1048586
Add or amend the following lines in the "/etc/sysctl.conf" file./sbin/sysctl -a | grep
Run the following command to change the current kernel parameters.fs.suid_dumpable = 1 fs.aio-max-nr = 1048576 fs.file-max = 6815744 kernel.shmall = 2097152 kernel.shmmax = 536870912 kernel.shmmni = 4096 # semaphores: semmsl, semmns, semopm, semmni kernel.sem = 250 32000 100 128 net.ipv4.ip_local_port_range = 9000 65500 net.core.rmem_default=4194304 net.core.rmem_max=4194304 net.core.wmem_default=262144 net.core.wmem_max=1048586
Add the following lines to the "/etc/security/limits.conf" file./sbin/sysctl -p
Install the following packages if they are not already present.oracle soft nproc 2047 oracle hard nproc 16384 oracle soft nofile 4096 oracle hard nofile 65536 oracle soft stack 10240
Note. This will install all the necessary 32-bit packages for 11.2.0.1. From 11.2.0.2 onwards many of these are unnecessary, but having them present does not cause a problem.# From Oracle Linux 6 DVD cd /media/cdrom/Server/Packages rpm -Uvh binutils-2*x86_64* rpm -Uvh glibc-2*x86_64* nss-softokn-freebl-3*x86_64* rpm -Uvh glibc-2*i686* nss-softokn-freebl-3*i686* rpm -Uvh compat-libstdc++-33*x86_64* rpm -Uvh glibc-common-2*x86_64* rpm -Uvh glibc-devel-2*x86_64* rpm -Uvh glibc-devel-2*i686* rpm -Uvh glibc-headers-2*x86_64* rpm -Uvh elfutils-libelf-0*x86_64* rpm -Uvh elfutils-libelf-devel-0*x86_64* rpm -Uvh gcc-4*x86_64* rpm -Uvh gcc-c++-4*x86_64* rpm -Uvh ksh-*x86_64* rpm -Uvh libaio-0*x86_64* rpm -Uvh libaio-devel-0*x86_64* rpm -Uvh libaio-0*i686* rpm -Uvh libaio-devel-0*i686* rpm -Uvh libgcc-4*x86_64* rpm -Uvh libgcc-4*i686* rpm -Uvh libstdc++-4*x86_64* rpm -Uvh libstdc++-4*i686* rpm -Uvh libstdc++-devel-4*x86_64* rpm -Uvh make-3.81*x86_64* rpm -Uvh numactl-devel-2*x86_64* rpm -Uvh sysstat-9*x86_64* rpm -Uvh compat-libstdc++-33*i686* rpm -Uvh compat-libcap* cd / eject
Create the new groups and users.
Note. We are not going to use the "asm" groups, since this installation will not use ASM.groupadd -g 501 oinstall groupadd -g 502 dba groupadd -g 503 oper groupadd -g 504 asmadmin groupadd -g 506 asmdba groupadd -g 505 asmoper useradd -u 502 -g oinstall -G dba,asmdba,oper oracle passwd oracle
Additional Setup
Disable secure linux by editing the "/etc/selinux/config" file, making sure the SELINUX flag is set as follows.Once the change is complete, restart the server.SELINUX=disabled
Create the directories in which the Oracle software will be installed.
Login as root and issue the following command.mkdir -p /u01/app/oracle/product/11.2.0/db_1 chown -R oracle:oinstall /u01 chmod -R 775 /u01
Login as the oracle user and add the following lines at the end of the ".bash_profile" file.xhost +
# Oracle Settings
TMP=/tmp; export TMP
TMPDIR=$TMP; export TMPDIR

ORACLE_HOSTNAME=ol6-112.localdomain; export ORACLE_HOSTNAME
ORACLE_UNQNAME=DB11G; export ORACLE_UNQNAME
ORACLE_BASE=/u01/app/oracle; export ORACLE_BASE
ORACLE_HOME=$ORACLE_BASE/product/11.2.0/db_1; export ORACLE_HOME
ORACLE_SID=DB11G; export ORACLE_SID

PATH=/usr/sbin:$PATH; export PATH
PATH=$ORACLE_HOME/bin:$PATH; export PATH

LD_LIBRARY_PATH=$ORACLE_HOME/lib:/lib:/usr/lib; export LD_LIBRARY_PATH
CLASSPATH=$ORACLE_HOME/jlib:$ORACLE_HOME/rdbms/jlib; export CLASSPATH
Installation
Log into the oracle user. If you are using X emulation then set the DISPLAY environmental variable.Start the Oracle Universal Installer (OUI) by issuing the following command in the database directory.DISPLAY=:0.0; export DISPLAY
Proceed with the installation of your choice. The prerequisites checks will fail for the following version-dependent reasons:./runInstaller
- 11.2.0.1: The installer shows multiple "missing package" failures because it does not recognize several of the newer version packages that were installed. These "missing package" failures can be ignored as the packages are present. The failure for the "pdksh" package can be ignored because we installed the "ksh" package in its place.
- 11.2.0.2: The installer should only show a single "missing package" failure for the "pdksh" package. It can be ignored because we installed the "ksh" package in its place.
- 11.2.0.3: The installer shows no failures and continues normally.
1.Configure Security Updates

2.Select Install Option

3.System Class

4.Node Selection

5.Select Install Type

6.Typical Install Configuration

7.Create Inventory

8.Perform Prerequisite Checks

9.Summary

10.Install Product

11.Database Configuration Assistant

12.Database Configuration Assistant 2

13.Execute Configuration Scripts

14.Finish

Post Installation
Edit the "/etc/oratab" file setting the restart flag for each instance to 'Y'.
If you have any questions then don't hesitate to email me. samiappsdba@gmail.comDB11G:/u01/app/oracle/product/11.2.0/db_1:Y
Wednesday, August 1, 2012
Migrating autoconfig to database tier
If you don't have appsutil on the database tier then follow the below steps to configure appsutil to migrate autoconfig to database tier.
1. Copy AutoConfig to the RDBMS ORACLE_HOME as the APPLMGR user:
- source the environment file on application tier:
. /APPS_MI/visappl/APPSORA.env
- On the application tier, Create appsutil.zip file
[applmgr@apps ~]$ perl $AD_TOP/bin/admkappsutil.pl
- Now Copy the appsutil.zip to the Database Tier (as the ORACLE user) and unzip it:
[applmgr@dbhome ~] cd /APPS_DB_R12/db/tech_st/10.2.0
[applmgr@dbhome ~] cd unzip -o appsutil.zip
2. Now generate Database Context File
cd $ORACLE_HOME/appsutil/bin
perl adbldxml.pl tier=db appsuser=APPS
If the listener.ora is not created in /APPS_DB_R12/db/tech_st/10.2.0/network/admin/VIS_db this will generates an error which can be ignored.
The above adbldxml.pl script will generate the following context file:
/APPS_DB_R12/db/tech_st/10.2.0/appsutil/VIS_db.xml
3. This is an optional step but you can review and Resolve Manual Configuration Changes by following script,
cd $ORACLE_HOME/appsutil/bin
./adchkcfg.sh contextfile=/APPS_DB_R12/db/tech_st/10.2.0/appsutil/VIS_db.xml
The following report will be generated: /APPS_DB_R12/db/tech_st/10.2.0/appsutil/out/VIS_db/05072108/cfgcheck.html
This report provide information about all file changes, profile option changes and other important database updates that will be done during the next normal execution of AutoConfig
4. Generate and Apply AutoConfig Configuration files
cd $ORACLE_HOME/appsutil/bin
./adconfig.sh contextfile=/APPS_DB_R12/db/tech_st/10.2.0/appsutil/VIS_db.xml
This command creates /APPS_DB_R12/db/tech_st/10.2.0/appsutil/scripts/VIS_db/adautocfg.sh and run it.
/APPS_DB_R12/db/tech_st/10.2.0/network/admin/VIS_db/listener.ora will be created as well.
For any further queries please don't hesitate to contact me samiora@gmail.com
Sunday, July 1, 2012
Applying Rolling Patch on RAC 11g R2
Last week I have got this task to apply Rolling patch 6 on Oracle RAC 11g R2 11.2.0.3 on Windows 2008 64 bit
Environment: 11gRAC/DB (11.2.0.3) , Windows Server 2008 R2 x64 Edition
Patch:13965211 - 11.2.0.3 Patch 6 for Windows 64 bit, download patch from metalink.
This patch is RAC rolling upgradable for GRID, and RDBMS homes.
You should administer one Oracle product, one Oracle home at a time, for its particular Bundle Patch Update.
DB 11.2.0.3 Patch 6 includes all bugs fixed in 11.2.0.3 Patch 1 to Patch 5. It must be applied on top of the 11.2.0.3 base release or on top of any earlier bundle patch from 11.2.0.3 Patch 1 to Patch 5.
The order of patching in RAC install is GRID_HOME, then RDBMS_HOME
OPatch Info:
Oracle recommends that you use OPatch utility release 11.2.0.1.9 or later. You can download it from My Oracle Support with patch 6880880.
Patch Installation Instructions
Patching GRID Home
1. Before Patching GRID_HOME, stop OCR related resources, Oracle HASD Services (OHASD) Services and all Oracle Services:
Copyright (c) 2012, Oracle Corporation. All rights reserved.
Oracle Home : D:\app\11.2.0.3\grid
Central Inventory : C:\Program Files\Oracle\Inventory
from : n/a
OPatch version : 11.2.0.3.0
OUI version : 11.2.0.3.0
Log file location : D:\app\11.2.0.3\grid\cfgtoollogs\opatch\opatch2012-06-30_11-55-13AM_1.log
Lsinventory Output file location : D:\app\11.2.0.3\grid\cfgtoollogs\opatch\lsinv\lsinventory2012-06-30_11-55-13AM.txt
--------------------------------------------------------------------------------
Installed Top-level Products (1):
Oracle Grid Infrastructure 11.2.0.3.0
There are 1 products installed in this Oracle Home.
There are no Interim patches installed in this Oracle Home.
Rac system comprising of multiple nodes
Local node = NODE1
Remote node = NODE2
--------------------------------------------------------------------------------
OPatch succeeded.
7. D:\Sources\11.2.0.3\Patches\p13965211_112030_MSWIN-x86-64>cd 13965211
8. D:\Sources\11.2.0.3\Patches\p13965211_112030_MSWIN-x86-64\13965211>D:\Sources\11.2.0.3\Patches\p6880880_112000_MSWIN-x86-64_optach\OPatch\opatch apply -local
Copyright (c) 2012, Oracle Corporation. All rights reserved.
Oracle Home : D:\app\11.2.0.3\grid
Central Inventory : C:\Program Files\Oracle\Inventory
from : n/a
OPatch version : 11.2.0.3.0
OUI version : 11.2.0.3.0
Log file location : D:\app\11.2.0.3\grid\cfgtoollogs\opatch\13965211_May_26_2012_13_32_19\apply2012-06-30_13-32-18PM_1.l
og
Applying interim patch '13965211' to OH 'D:\app\11.2.0.3\grid'
Verifying environment and performing prerequisite checks...
Patch 13965211: Optional component(s) missing : [ oracle.precomp.common, 11.2.0.3.0 ] , [ oracle.precomp.lang, 11.2.0.3.
0 ] , [ oracle.ntoledb.odp_net_2, 11.2.0.3.0 ] , [ oracle.rdbms.tg4msql, 11.2.0.3.0 ] , [ oracle.rdbms.oci, 11.2.0.3.0 ]
, [ oracle.ntoramts, 11.2.0.3.0 ] , [ oracle.rdbms.ic, 11.2.0.3.0 ] , [ oracle.ntoledb, 11.2.0.3.0 ] , [ oracle.ctx, 11
.2.0.3.0 ] , [ oracle.odbc.ic, 11.2.0.3.0 ] , [ oracle.sysman.console.db, 11.2.0.3.0 ] , [ oracle.sysman.agent, 10.2.0.4
.3 ]
All checks passed.
Provide your email address to be informed of security issues, install and
initiate Oracle Configuration Manager. Easier for you if you use your My
Oracle Support Email address/User Name.
Visit http://www.oracle.com/support/policies.html for details.
Email address/User Name:
You have not provided an email address for notification of security issues.
Do you wish to remain uninformed of security issues ([Y]es, [N]o) [N]: Y
This node is part of an Oracle Real Application Cluster.
Remote nodes: 'NODE2'
Local node: 'NODE1'
Please shutdown Oracle instances running out of this ORACLE_HOME on the local system.
(Oracle Home = 'D:\app\11.2.0.3\grid')
Is the local system ready for patching? [y|n]
y
User Responded with: Y
Backing up files...
Patching component oracle.rdbms, 11.2.0.3.0...
Patching component oracle.rdbms.rsf, 11.2.0.3.0...
Patching component oracle.rdbms.plsql, 11.2.0.3.0...
Patching component oracle.network.rsf, 11.2.0.3.0...
Patching component oracle.rdbms.rman, 11.2.0.3.0...
Patching component oracle.rdbms.util, 11.2.0.3.0...
Patching component oracle.rdbms.dbscripts, 11.2.0.3.0...
Patching component oracle.xdk.rsf, 11.2.0.3.0...
Patching component oracle.rdbms.rsf.ic, 11.2.0.3.0...
Patching component oracle.has.common.cvu, 11.2.0.3.0...
Patching component oracle.has.deconfig, 11.2.0.3.0...
Patching component oracle.has.rsf, 11.2.0.3.0...
Patching component oracle.swd.oui, 11.2.0.3.0...
Patching component oracle.has.common, 11.2.0.3.0...
Patching component oracle.has.cvu, 11.2.0.3.0...
Patching component oracle.has.db, 11.2.0.3.0...
Patching component oracle.has.crs, 11.2.0.3.0...
Patching component oracle.usm, 11.2.0.3.0...
Patching component oracle.usm.deconfig, 11.2.0.3.0...
Patching component oracle.network.listener, 11.2.0.3.0...
Patching component oracle.ldap.rsf.ic, 11.2.0.3.0...
Verifying the update...
The local system has been patched. You can restart Oracle instances on it.
9. opatch will attempt to apply the patch on all the nodes in the cluster sequentially. However will prompt for user input to start patching other nodes. At this time ensure that the Oracle services on target node are stopped before proceeding to patch. Once the opatch session completes patching this node, start the services and proceed applying patch to the next node.
10. Once the opatch session completes patching GRID_HOME on a node, run the following before proceeding to patch GRID_HOME on the next node. %ORACLE_HOME%\bin\acfsroot installD:\Sources\11.2.0.3\Patches\p13965211_112030_MSWIN-x86-64\13965211>%ORACLE_HOME%\bin\acfsroot install
ACFS-9300: ADVM/ACFS distribution files found.
ACFS-9307: Installing requested ADVM/ACFS software.
ACFS-9308: Loading installed ADVM/ACFS drivers.
ACFS-9327: Verifying ADVM/ACFS devices.
ACFS-9157: Detecting driver 'oracle oks'.
ACFS-9157: Detecting driver 'oracle advm'.
ACFS-9157: Detecting driver 'oracle acfs'.
ACFS-9309: ADVM/ACFS installation correctness verified.
11. After this you can start the CRS or go for the RDBMS home patch without starting it, I started.
D:\app\11.2.0.3\grid\BIN>crsctl start crs
CRS-4123: Oracle High Availability Services has been started.
D:\app\11.2.0.3\grid\BIN>crsctl check crs
CRS-4638: Oracle High Availability Services is online
CRS-4537: Cluster Ready Services is online
CRS-4529: Cluster Synchronization Services is online
CRS-4533: Event Manager is online
12. Verify the patch installation
# opatch lsinventory
D:\Sources\11.2.0.3\Patches\p13965211_112030_MSWIN-x86-64\13965211>set ORACLE_HOME=D:\app\11.2.0.3\grid
D:\Sources\11.2.0.3\Patches\p13965211_112030_MSWIN-x86-64\13965211>D:\Sources\11.2.0.3\Patches\p6880880_112000_MSWIN-x86
-64_optach\OPatch\opatch lsinventory
Oracle Interim Patch Installer version 11.2.0.3.0
Copyright (c) 2012, Oracle Corporation. All rights reserved.
Oracle Home : D:\app\11.2.0.3\grid
Central Inventory : C:\Program Files\Oracle\Inventory
from : n/a
OPatch version : 11.2.0.3.0
OUI version : 11.2.0.3.0
Log file location : D:\app\11.2.0.3\grid\cfgtoollogs\opatch\opatch2012-06-30_13-52-31PM_1.log
Lsinventory Output file location : D:\app\11.2.0.3\grid\cfgtoollogs\opatch\lsinv\lsinventory2012-06-30_13-52-31PM.txt
--------------------------------------------------------------------------------
Installed Top-level Products (1):
Oracle Grid Infrastructure 11.2.0.3.0
There are 1 products installed in this Oracle Home.
Interim patches (1) :
Patch 13965211 : applied on Sat Jun 30 13:39:18 AST 2012
Unique Patch ID: 14860516
Patch description: "ORACLE 11G 11.2.0.3 PATCH 6 BUG FOR WINDOWS (64-BIT AMD64 AND INTEL EM64)"
Created on 21 May 2012, 00:06:51 hrs PST8PDT
Bugs fixed:
13965211, 12424121, 13478060, 13786778, 13579992, 13705338, 13603613
13476583, 12745662, 9190186, 13530646, 13520452, 9019231, 13610777
12905053, 10263668, 13550185, 13385346, 13448206, 12772404, 13911711
11072246, 13104881, 13863326, 12889054, 13775960, 13777823, 13464002
11824898, 13535622, 13916709, 12880299, 12918338, 12529945, 13811209
14058362, 13724808, 13885389, 13649031, 13350245, 13553883, 13388104
13635347, 13404129, 13031118, 12530140, 13023541, 13767921, 13787482
13641076, 13807411, 13724992, 12965899, 13791443, 12879027, 13584130
13495307, 12594032, 13709220, 13247965, 13243072, 13683125, 13652493
12957127, 10215977, 13014128, 13040331, 12857222, 12977501, 12664456
12405931, 13525554, 13492863, 13573521, 13873471, 13366268, 13352423
13460353, 12709476, 13652088, 13886023, 13942723, 12919564, 12894807
12829021, 12612118, 11063191, 13503598, 13482688, 13354082, 13484963
13395403, 13542159, 12983611, 13718476, 12846562, 9659614, 13326736
11846902, 11665727, 13257247, 13588248, 13544396, 13566938, 13615517
13425727, 13037709, 12730342, 12349553, 13502441, 13258062, 13251796
13247273, 12659561, 12639013, 12594616, 11772838, 13570057, 12403721
12585543, 12784549, 12834800, 12975771, 13040171, 13058950, 13063120
13077335, 13365700, 13382280, 13384397, 13440516, 13454210, 13457537
13477790, 13496250, 13501787, 13505390, 13506110, 13524899, 13572659
13594712, 13617627, 13326289, 13555974, 13035360, 13420224, 13419660
13036331, 13332439, 13420174, 12583826, 13358781, 11883969, 13524237
12867713, 13328193, 13516727, 11865420, 13502183, 13259364, 13371153
12998795, 13413168, 12897902, 13044108, 12971242, 12834027, 12620823
13420516, 12849377, 12975811, 12646784, 12829429, 12538907, 12950823
12848480, 12823838, 13366202, 13002015, 12834777, 13001901, 13017428
13082238, 12965049, 11840910, 12656535, 12617123, 13073340, 12925041
12938841, 13023632, 13066371, 12942119, 11877623, 12810890, 12995950
12765467, 12934171, 13070939, 12535346, 12985184, 13103913, 12765868
12622441, 12876314, 12820045, 13038806, 13090686, 12923168, 13362079
12591252, 12718090, 12873909, 10350832, 12795861, 13039908, 12976590
13017584, 12627504, 13263435, 12847466, 12797765, 12758736, 12878750
12861463, 13024624, 12764337, 12662040, 13068077, 12914824, 13074261
12668341, 12597906, 12932852, 13045518, 12897651, 12960925, 12728585
13019958, 12902661, 12886827, 12913474, 3522216, 12678920, 12885323
13334158, 12947871, 12896850, 13001955, 12784559, 12827166, 9703627
12772345, 12905058, 13345868, 10357727, 12827493, 13004894, 12780983
12842804, 13146719, 12655301, 12960302, 13085732, 12979199, 12638117
13357509, 12401111, 12857064, 8631856, 13035804, 13355963, 12845115
12695029, 12990582, 12971775, 12867511, 12917230, 12582664, 12849688
12950644, 12588744, 13011520, 12899169, 12823042
Rac system comprising of multiple nodes
Local node = NODE1
Remote node = NODE2
--------------------------------------------------------------------------------
OPatch succeeded.
D:\Sources\11.2.0.3\Patches\p13965211_112030_MSWIN-x86-64\13965211>
D:\Sources\11.2.0.3\Patches\p13965211_112030_MSWIN-x86-64\13965211>D:\Sources\11.2.0.3\Patches\p6880880_112000_MSWIN-x86-64_optach\OPatch\opatch apply
Oracle Interim Patch Installer version 11.2.0.3.0
Copyright (c) 2012, Oracle Corporation. All rights reserved.
Oracle Home : D:\app\Sami\product\11.2.0.3\dbhome_1
Central Inventory : C:\Program Files\Oracle\Inventory
from : n/a
OPatch version : 11.2.0.3.0
OUI version : 11.2.0.3.0
Log file location : D:\app\Sami\product\11.2.0.3\dbhome_1\cfgtoollogs\opatch\13965211_Jun_30_2012_15_21_30\apply2012-06-
30_15-21-29PM_1.log
Applying interim patch '13965211' to OH 'D:\app\Sami\product\11.2.0.3\dbhome_1'
Verifying environment and performing prerequisite checks...
Patch 13965211: Optional component(s) missing : [ oracle.precomp.lang, 11.2.0.3.0 ] , [ oracle.rdbms.tg4msql, 11.2.0.3.0
] , [ oracle.rdbms.ic, 11.2.0.3.0 ] , [ oracle.has.cvu, 11.2.0.3.0 ] , [ oracle.has.crs, 11.2.0.3.0 ] , [ oracle.usm, 1
1.2.0.3.0 ]
All checks passed.
Provide your email address to be informed of security issues, install and
initiate Oracle Configuration Manager. Easier for you if you use your My
Oracle Support Email address/User Name.
Visit http://www.oracle.com/support/policies.html for details.
Email address/User Name:
You have not provided an email address for notification of security issues.
Do you wish to remain uninformed of security issues ([Y]es, [N]o) [N]: Y
This node is part of an Oracle Real Application Cluster.
Remote nodes: 'node2'
Local node: 'node1'
Please shutdown Oracle instances running out of this ORACLE_HOME on the local system.
(Oracle Home = 'D:\app\Sami\product\11.2.0.3\dbhome_1')
Is the local system ready for patching? [y|n]
y
User Responded with: Y
Backing up files...
Patching component oracle.rdbms, 11.2.0.3.0...
Patching component oracle.rdbms.rsf, 11.2.0.3.0...
Patching component oracle.rdbms.plsql, 11.2.0.3.0...
Patching component oracle.network.rsf, 11.2.0.3.0...
Patching component oracle.precomp.common, 11.2.0.3.0...
Patching component oracle.rdbms.rman, 11.2.0.3.0...
Patching component oracle.rdbms.util, 11.2.0.3.0...
Patching component oracle.ntoledb.odp_net_2, 11.2.0.3.0...
Patching component oracle.rdbms.dbscripts, 11.2.0.3.0...
Patching component oracle.xdk.rsf, 11.2.0.3.0...
Patching component oracle.rdbms.rsf.ic, 11.2.0.3.0...
Patching component oracle.rdbms.oci, 11.2.0.3.0...
Patching component oracle.ntoramts, 11.2.0.3.0...
Patching component oracle.ntoledb, 11.2.0.3.0...
Patching component oracle.ctx, 11.2.0.3.0...
Patching component oracle.odbc.ic, 11.2.0.3.0...
Patching component oracle.has.common.cvu, 11.2.0.3.0...
Patching component oracle.has.deconfig, 11.2.0.3.0...
Patching component oracle.has.rsf, 11.2.0.3.0...
Patching component oracle.swd.oui, 11.2.0.3.0...
Patching component oracle.has.common, 11.2.0.3.0...
Patching component oracle.has.db, 11.2.0.3.0...
Patching component oracle.usm.deconfig, 11.2.0.3.0...
Patching component oracle.sysman.console.db, 11.2.0.3.0...
Patching component oracle.network.listener, 11.2.0.3.0...
Patching component oracle.sysman.agent, 10.2.0.4.3...
Patching component oracle.ldap.rsf.ic, 11.2.0.3.0...
Verifying the update...
The local system has been patched. You can restart Oracle instances on it.4. Now start the Database instance,
D:\app\11.2.0.3\grid\BIN>srvctl start instance -d rac -i rac1
Post installation steps
After installing the patch, perform the following actions:
For each database instance running out of the ORACLE_HOME being patched, connect to the database using SQL*Plus as SYSDBA and run catwinbundle.sql as follows:
> cd %ORACLE_HOME%\Bundle\Patch6
> sqlplus /nolog
SQL> CONNECT / AS SYSDBA
SQL> STARTUP
SQL> @catwinbundle.sql
SQL> QUIT
C:\Users\sami>cd D:\app\Sami\product\11.2.0.3\dbhome_1\bundle\patch6
D:\app\Sami\product\11.2.0.3\dbhome_1\bundle\patch6>sqlplus / as sysdba
SQL*Plus: Release 11.2.0.3.0 Production on Sat Jun 30 15:30:19 2012
Copyright (c) 1982, 2011, Oracle. All rights reserved.
Connected to:
Oracle Database 11g Enterprise Edition Release 11.2.0.3.0 - 64bit Production
With the Partitioning, Real Application Clusters, Automatic Storage Management, Oracle Label Security,
OLAP, Data Mining and Real Application Testing options
SQL>
SQL> @catwinbundle.sql
...
..
...
SQL> ALTER SESSION SET current_schema = SYS;
Session altered.
SQL> PROMPT Updating registry...
Updating registry...
SQL> INSERT INTO registry$history
2 (action_time, action,
3 namespace, version, id,
4 bundle_series, comments)
5 VALUES
6 (SYSTIMESTAMP, 'APPLY',
7 SYS_CONTEXT('REGISTRY$CTX','NAMESPACE'),
8 '11.2.0.3',
9 6,
10 'WINBUNDLE',
11 '11.2.0.3 BP 6');
1 row created.
SQL> COMMIT;
Commit complete.
SQL> SPOOL off
SQL> SET echo off
Check the following log file for errors:
D:\app\Sami\cfgtoollogs\catbundle\catbundle_WINBUNDLE_RAC_APPLY_2012Jun30_15_31_37.log
SQL>
Check all dependent objects are valid and if not then compile them by using utlrp.sql script.
----------
20083
Finally check the status of all the services
>crsctl status resource -t
Once all is well, you can start the same steps mentioned above for the next node.
For any further queries on RAC and Grid Infrastructure, please don't hesitate to email me on samiora@gmail.com
Environment: 11gRAC/DB (11.2.0.3) , Windows Server 2008 R2 x64 Edition
Patch:13965211 - 11.2.0.3 Patch 6 for Windows 64 bit, download patch from metalink.
This patch is RAC rolling upgradable for GRID, and RDBMS homes.
You should administer one Oracle product, one Oracle home at a time, for its particular Bundle Patch Update.
DB 11.2.0.3 Patch 6 includes all bugs fixed in 11.2.0.3 Patch 1 to Patch 5. It must be applied on top of the 11.2.0.3 base release or on top of any earlier bundle patch from 11.2.0.3 Patch 1 to Patch 5.
The order of patching in RAC install is GRID_HOME, then RDBMS_HOME
OPatch Info:
Oracle recommends that you use OPatch utility release 11.2.0.1.9 or later. You can download it from My Oracle Support with patch 6880880.
Patch Installation Instructions
Patching GRID Home
1. Before Patching GRID_HOME, stop OCR related resources, Oracle HASD Services (OHASD) Services and all Oracle Services:
> srvctl stop service -d -s -i
> srvctl stop instance -d DBNAME -i INSTANCE -o abort
> crsctl stop crs
make the backup of the Oracle Home being patached (eg; d:\app...)
- To verify all resources have been oved to the other nodes, run the following command from another node with GRID running:
3. > crsctl status resource -t
- Then use the Computer Management Services GUI or the net stop command to stop ALL Oracle services running on that node:
net stop OracleService
net stop OracleTNSListenerLISTENER_
net stop OracleTNSListenerLISTENER_SCANn
net stop OracleDBConsole
net stop OracleASMService
net stop "Oracle VSS Writer Service"
net stop OracleREMExecService
net stop OracleOHService
net stop "Oracle Object Service"
net stop OracleClusterVolumeService
net stop ocfs (required only for OCFS installation)
net stop orafenceservice
Note: An explicit 'srvctl start listener -n ' should be issued after patching - Set the ORACLE_HOME environment variable properly
D:\Sources\11.2.0.3\Patches\p6880880_112000_MSWIN-x86-64_optach\OPatch>set ORACLE_HOME=D:\app\11.2.0.3\grid - Go to the directory where you downloaded the patch:
D:\Sources\11.2.0.3\Patches\p6880880_112000_MSWIN-x86-64_optach\OPatch>cd D:\Sources\11.2.0.3\Patches\p13965211_112030_MSWIN-x86-64First check the inventory for the existing patches
D:\Sources\11.2.0.3\Patches\p13965211_112030_MSWIN-x86-64>D:\Sources\11.2.0.3\Patches\p6880880_112000_MSWIN-x86-64_optach\OPatch\opatch lsinventory
Copyright (c) 2012, Oracle Corporation. All rights reserved.
Oracle Home : D:\app\11.2.0.3\grid
Central Inventory : C:\Program Files\Oracle\Inventory
from : n/a
OPatch version : 11.2.0.3.0
OUI version : 11.2.0.3.0
Log file location : D:\app\11.2.0.3\grid\cfgtoollogs\opatch\opatch2012-06-30_11-55-13AM_1.log
Lsinventory Output file location : D:\app\11.2.0.3\grid\cfgtoollogs\opatch\lsinv\lsinventory2012-06-30_11-55-13AM.txt
--------------------------------------------------------------------------------
Installed Top-level Products (1):
Oracle Grid Infrastructure 11.2.0.3.0
There are 1 products installed in this Oracle Home.
There are no Interim patches installed in this Oracle Home.
Rac system comprising of multiple nodes
Local node = NODE1
Remote node = NODE2
--------------------------------------------------------------------------------
OPatch succeeded.
7. D:\Sources\11.2.0.3\Patches\p13965211_112030_MSWIN-x86-64>cd 13965211
8. D:\Sources\11.2.0.3\Patches\p13965211_112030_MSWIN-x86-64\13965211>D:\Sources\11.2.0.3\Patches\p6880880_112000_MSWIN-x86-64_optach\OPatch\opatch apply -local
Copyright (c) 2012, Oracle Corporation. All rights reserved.
Oracle Home : D:\app\11.2.0.3\grid
Central Inventory : C:\Program Files\Oracle\Inventory
from : n/a
OPatch version : 11.2.0.3.0
OUI version : 11.2.0.3.0
Log file location : D:\app\11.2.0.3\grid\cfgtoollogs\opatch\13965211_May_26_2012_13_32_19\apply2012-06-30_13-32-18PM_1.l
og
Applying interim patch '13965211' to OH 'D:\app\11.2.0.3\grid'
Verifying environment and performing prerequisite checks...
Patch 13965211: Optional component(s) missing : [ oracle.precomp.common, 11.2.0.3.0 ] , [ oracle.precomp.lang, 11.2.0.3.
0 ] , [ oracle.ntoledb.odp_net_2, 11.2.0.3.0 ] , [ oracle.rdbms.tg4msql, 11.2.0.3.0 ] , [ oracle.rdbms.oci, 11.2.0.3.0 ]
, [ oracle.ntoramts, 11.2.0.3.0 ] , [ oracle.rdbms.ic, 11.2.0.3.0 ] , [ oracle.ntoledb, 11.2.0.3.0 ] , [ oracle.ctx, 11
.2.0.3.0 ] , [ oracle.odbc.ic, 11.2.0.3.0 ] , [ oracle.sysman.console.db, 11.2.0.3.0 ] , [ oracle.sysman.agent, 10.2.0.4
.3 ]
All checks passed.
Provide your email address to be informed of security issues, install and
initiate Oracle Configuration Manager. Easier for you if you use your My
Oracle Support Email address/User Name.
Visit http://www.oracle.com/support/policies.html for details.
Email address/User Name:
You have not provided an email address for notification of security issues.
Do you wish to remain uninformed of security issues ([Y]es, [N]o) [N]: Y
This node is part of an Oracle Real Application Cluster.
Remote nodes: 'NODE2'
Local node: 'NODE1'
Please shutdown Oracle instances running out of this ORACLE_HOME on the local system.
(Oracle Home = 'D:\app\11.2.0.3\grid')
Is the local system ready for patching? [y|n]
y
User Responded with: Y
Backing up files...
Patching component oracle.rdbms, 11.2.0.3.0...
Patching component oracle.rdbms.rsf, 11.2.0.3.0...
Patching component oracle.rdbms.plsql, 11.2.0.3.0...
Patching component oracle.network.rsf, 11.2.0.3.0...
Patching component oracle.rdbms.rman, 11.2.0.3.0...
Patching component oracle.rdbms.util, 11.2.0.3.0...
Patching component oracle.rdbms.dbscripts, 11.2.0.3.0...
Patching component oracle.xdk.rsf, 11.2.0.3.0...
Patching component oracle.rdbms.rsf.ic, 11.2.0.3.0...
Patching component oracle.has.common.cvu, 11.2.0.3.0...
Patching component oracle.has.deconfig, 11.2.0.3.0...
Patching component oracle.has.rsf, 11.2.0.3.0...
Patching component oracle.swd.oui, 11.2.0.3.0...
Patching component oracle.has.common, 11.2.0.3.0...
Patching component oracle.has.cvu, 11.2.0.3.0...
Patching component oracle.has.db, 11.2.0.3.0...
Patching component oracle.has.crs, 11.2.0.3.0...
Patching component oracle.usm, 11.2.0.3.0...
Patching component oracle.usm.deconfig, 11.2.0.3.0...
Patching component oracle.network.listener, 11.2.0.3.0...
Patching component oracle.ldap.rsf.ic, 11.2.0.3.0...
Verifying the update...
The local system has been patched. You can restart Oracle instances on it.
9. opatch will attempt to apply the patch on all the nodes in the cluster sequentially. However will prompt for user input to start patching other nodes. At this time ensure that the Oracle services on target node are stopped before proceeding to patch. Once the opatch session completes patching this node, start the services and proceed applying patch to the next node.
10. Once the opatch session completes patching GRID_HOME on a node, run the following before proceeding to patch GRID_HOME on the next node. %ORACLE_HOME%\bin\acfsroot installD:\Sources\11.2.0.3\Patches\p13965211_112030_MSWIN-x86-64\13965211>%ORACLE_HOME%\bin\acfsroot install
ACFS-9300: ADVM/ACFS distribution files found.
ACFS-9307: Installing requested ADVM/ACFS software.
ACFS-9308: Loading installed ADVM/ACFS drivers.
ACFS-9327: Verifying ADVM/ACFS devices.
ACFS-9157: Detecting driver 'oracle oks'.
ACFS-9157: Detecting driver 'oracle advm'.
ACFS-9157: Detecting driver 'oracle acfs'.
ACFS-9309: ADVM/ACFS installation correctness verified.
11. After this you can start the CRS or go for the RDBMS home patch without starting it, I started.
D:\app\11.2.0.3\grid\BIN>crsctl start crs
CRS-4123: Oracle High Availability Services has been started.
D:\app\11.2.0.3\grid\BIN>crsctl check crs
CRS-4638: Oracle High Availability Services is online
CRS-4537: Cluster Ready Services is online
CRS-4529: Cluster Synchronization Services is online
CRS-4533: Event Manager is online
12. Verify the patch installation
# opatch lsinventory
D:\Sources\11.2.0.3\Patches\p13965211_112030_MSWIN-x86-64\13965211>set ORACLE_HOME=D:\app\11.2.0.3\grid
D:\Sources\11.2.0.3\Patches\p13965211_112030_MSWIN-x86-64\13965211>D:\Sources\11.2.0.3\Patches\p6880880_112000_MSWIN-x86
-64_optach\OPatch\opatch lsinventory
Oracle Interim Patch Installer version 11.2.0.3.0
Copyright (c) 2012, Oracle Corporation. All rights reserved.
Oracle Home : D:\app\11.2.0.3\grid
Central Inventory : C:\Program Files\Oracle\Inventory
from : n/a
OPatch version : 11.2.0.3.0
OUI version : 11.2.0.3.0
Log file location : D:\app\11.2.0.3\grid\cfgtoollogs\opatch\opatch2012-06-30_13-52-31PM_1.log
Lsinventory Output file location : D:\app\11.2.0.3\grid\cfgtoollogs\opatch\lsinv\lsinventory2012-06-30_13-52-31PM.txt
--------------------------------------------------------------------------------
Installed Top-level Products (1):
Oracle Grid Infrastructure 11.2.0.3.0
There are 1 products installed in this Oracle Home.
Interim patches (1) :
Patch 13965211 : applied on Sat Jun 30 13:39:18 AST 2012
Unique Patch ID: 14860516
Patch description: "ORACLE 11G 11.2.0.3 PATCH 6 BUG FOR WINDOWS (64-BIT AMD64 AND INTEL EM64)"
Created on 21 May 2012, 00:06:51 hrs PST8PDT
Bugs fixed:
13965211, 12424121, 13478060, 13786778, 13579992, 13705338, 13603613
13476583, 12745662, 9190186, 13530646, 13520452, 9019231, 13610777
12905053, 10263668, 13550185, 13385346, 13448206, 12772404, 13911711
11072246, 13104881, 13863326, 12889054, 13775960, 13777823, 13464002
11824898, 13535622, 13916709, 12880299, 12918338, 12529945, 13811209
14058362, 13724808, 13885389, 13649031, 13350245, 13553883, 13388104
13635347, 13404129, 13031118, 12530140, 13023541, 13767921, 13787482
13641076, 13807411, 13724992, 12965899, 13791443, 12879027, 13584130
13495307, 12594032, 13709220, 13247965, 13243072, 13683125, 13652493
12957127, 10215977, 13014128, 13040331, 12857222, 12977501, 12664456
12405931, 13525554, 13492863, 13573521, 13873471, 13366268, 13352423
13460353, 12709476, 13652088, 13886023, 13942723, 12919564, 12894807
12829021, 12612118, 11063191, 13503598, 13482688, 13354082, 13484963
13395403, 13542159, 12983611, 13718476, 12846562, 9659614, 13326736
11846902, 11665727, 13257247, 13588248, 13544396, 13566938, 13615517
13425727, 13037709, 12730342, 12349553, 13502441, 13258062, 13251796
13247273, 12659561, 12639013, 12594616, 11772838, 13570057, 12403721
12585543, 12784549, 12834800, 12975771, 13040171, 13058950, 13063120
13077335, 13365700, 13382280, 13384397, 13440516, 13454210, 13457537
13477790, 13496250, 13501787, 13505390, 13506110, 13524899, 13572659
13594712, 13617627, 13326289, 13555974, 13035360, 13420224, 13419660
13036331, 13332439, 13420174, 12583826, 13358781, 11883969, 13524237
12867713, 13328193, 13516727, 11865420, 13502183, 13259364, 13371153
12998795, 13413168, 12897902, 13044108, 12971242, 12834027, 12620823
13420516, 12849377, 12975811, 12646784, 12829429, 12538907, 12950823
12848480, 12823838, 13366202, 13002015, 12834777, 13001901, 13017428
13082238, 12965049, 11840910, 12656535, 12617123, 13073340, 12925041
12938841, 13023632, 13066371, 12942119, 11877623, 12810890, 12995950
12765467, 12934171, 13070939, 12535346, 12985184, 13103913, 12765868
12622441, 12876314, 12820045, 13038806, 13090686, 12923168, 13362079
12591252, 12718090, 12873909, 10350832, 12795861, 13039908, 12976590
13017584, 12627504, 13263435, 12847466, 12797765, 12758736, 12878750
12861463, 13024624, 12764337, 12662040, 13068077, 12914824, 13074261
12668341, 12597906, 12932852, 13045518, 12897651, 12960925, 12728585
13019958, 12902661, 12886827, 12913474, 3522216, 12678920, 12885323
13334158, 12947871, 12896850, 13001955, 12784559, 12827166, 9703627
12772345, 12905058, 13345868, 10357727, 12827493, 13004894, 12780983
12842804, 13146719, 12655301, 12960302, 13085732, 12979199, 12638117
13357509, 12401111, 12857064, 8631856, 13035804, 13355963, 12845115
12695029, 12990582, 12971775, 12867511, 12917230, 12582664, 12849688
12950644, 12588744, 13011520, 12899169, 12823042
Rac system comprising of multiple nodes
Local node = NODE1
Remote node = NODE2
--------------------------------------------------------------------------------
OPatch succeeded.
D:\Sources\11.2.0.3\Patches\p13965211_112030_MSWIN-x86-64\13965211>
Patching RDBMS Home
- Before Patching RDBMS_HOME, the GRID and ASM services can be running.
Stop OCR related resources and Oracle Services on the current node as listed below:
> srvctl stop service -d -s -i > srvctl stop instance -d -i -o abort
D:\app\11.2.0.3\grid\BIN>srvctl stop instance -d rac -i rac1 - Set ORACLE_HOME
D:\Sources\11.2.0.3\Patches\p13965211_112030_MSWIN-x86-64\13965211>set ORACLE_HOME=D:\app\Sami\product\11.2.0.3\dbhome_1
D:\Sources\11.2.0.3\Patches\p13965211_112030_MSWIN-x86-64\13965211>D:\Sources\11.2.0.3\Patches\p6880880_112000_MSWIN-x86-64_optach\OPatch\opatch apply
Oracle Interim Patch Installer version 11.2.0.3.0
Copyright (c) 2012, Oracle Corporation. All rights reserved.
Oracle Home : D:\app\Sami\product\11.2.0.3\dbhome_1
Central Inventory : C:\Program Files\Oracle\Inventory
from : n/a
OPatch version : 11.2.0.3.0
OUI version : 11.2.0.3.0
Log file location : D:\app\Sami\product\11.2.0.3\dbhome_1\cfgtoollogs\opatch\13965211_Jun_30_2012_15_21_30\apply2012-06-
30_15-21-29PM_1.log
Applying interim patch '13965211' to OH 'D:\app\Sami\product\11.2.0.3\dbhome_1'
Verifying environment and performing prerequisite checks...
Patch 13965211: Optional component(s) missing : [ oracle.precomp.lang, 11.2.0.3.0 ] , [ oracle.rdbms.tg4msql, 11.2.0.3.0
] , [ oracle.rdbms.ic, 11.2.0.3.0 ] , [ oracle.has.cvu, 11.2.0.3.0 ] , [ oracle.has.crs, 11.2.0.3.0 ] , [ oracle.usm, 1
1.2.0.3.0 ]
All checks passed.
Provide your email address to be informed of security issues, install and
initiate Oracle Configuration Manager. Easier for you if you use your My
Oracle Support Email address/User Name.
Visit http://www.oracle.com/support/policies.html for details.
Email address/User Name:
You have not provided an email address for notification of security issues.
Do you wish to remain uninformed of security issues ([Y]es, [N]o) [N]: Y
This node is part of an Oracle Real Application Cluster.
Remote nodes: 'node2'
Local node: 'node1'
Please shutdown Oracle instances running out of this ORACLE_HOME on the local system.
(Oracle Home = 'D:\app\Sami\product\11.2.0.3\dbhome_1')
Is the local system ready for patching? [y|n]
y
User Responded with: Y
Backing up files...
Patching component oracle.rdbms, 11.2.0.3.0...
Patching component oracle.rdbms.rsf, 11.2.0.3.0...
Patching component oracle.rdbms.plsql, 11.2.0.3.0...
Patching component oracle.network.rsf, 11.2.0.3.0...
Patching component oracle.precomp.common, 11.2.0.3.0...
Patching component oracle.rdbms.rman, 11.2.0.3.0...
Patching component oracle.rdbms.util, 11.2.0.3.0...
Patching component oracle.ntoledb.odp_net_2, 11.2.0.3.0...
Patching component oracle.rdbms.dbscripts, 11.2.0.3.0...
Patching component oracle.xdk.rsf, 11.2.0.3.0...
Patching component oracle.rdbms.rsf.ic, 11.2.0.3.0...
Patching component oracle.rdbms.oci, 11.2.0.3.0...
Patching component oracle.ntoramts, 11.2.0.3.0...
Patching component oracle.ntoledb, 11.2.0.3.0...
Patching component oracle.ctx, 11.2.0.3.0...
Patching component oracle.odbc.ic, 11.2.0.3.0...
Patching component oracle.has.common.cvu, 11.2.0.3.0...
Patching component oracle.has.deconfig, 11.2.0.3.0...
Patching component oracle.has.rsf, 11.2.0.3.0...
Patching component oracle.swd.oui, 11.2.0.3.0...
Patching component oracle.has.common, 11.2.0.3.0...
Patching component oracle.has.db, 11.2.0.3.0...
Patching component oracle.usm.deconfig, 11.2.0.3.0...
Patching component oracle.sysman.console.db, 11.2.0.3.0...
Patching component oracle.network.listener, 11.2.0.3.0...
Patching component oracle.sysman.agent, 10.2.0.4.3...
Patching component oracle.ldap.rsf.ic, 11.2.0.3.0...
Verifying the update...
The local system has been patched. You can restart Oracle instances on it.4. Now start the Database instance,
D:\app\11.2.0.3\grid\BIN>srvctl start instance -d rac -i rac1
Post installation steps
After installing the patch, perform the following actions:
For each database instance running out of the ORACLE_HOME being patched, connect to the database using SQL*Plus as SYSDBA and run catwinbundle.sql as follows:
> cd %ORACLE_HOME%\Bundle\Patch6
> sqlplus /nolog
SQL> CONNECT / AS SYSDBA
SQL> STARTUP
SQL> @catwinbundle.sql
SQL> QUIT
C:\Users\sami>cd D:\app\Sami\product\11.2.0.3\dbhome_1\bundle\patch6
D:\app\Sami\product\11.2.0.3\dbhome_1\bundle\patch6>sqlplus / as sysdba
SQL*Plus: Release 11.2.0.3.0 Production on Sat Jun 30 15:30:19 2012
Copyright (c) 1982, 2011, Oracle. All rights reserved.
Connected to:
Oracle Database 11g Enterprise Edition Release 11.2.0.3.0 - 64bit Production
With the Partitioning, Real Application Clusters, Automatic Storage Management, Oracle Label Security,
OLAP, Data Mining and Real Application Testing options
SQL>
SQL> @catwinbundle.sql
...
..
...
SQL> ALTER SESSION SET current_schema = SYS;
Session altered.
SQL> PROMPT Updating registry...
Updating registry...
SQL> INSERT INTO registry$history
2 (action_time, action,
3 namespace, version, id,
4 bundle_series, comments)
5 VALUES
6 (SYSTIMESTAMP, 'APPLY',
7 SYS_CONTEXT('REGISTRY$CTX','NAMESPACE'),
8 '11.2.0.3',
9 6,
10 'WINBUNDLE',
11 '11.2.0.3 BP 6');
1 row created.
SQL> COMMIT;
Commit complete.
SQL> SPOOL off
SQL> SET echo off
Check the following log file for errors:
D:\app\Sami\cfgtoollogs\catbundle\catbundle_WINBUNDLE_RAC_APPLY_2012Jun30_15_31_37.log
SQL>
Check all dependent objects are valid and if not then compile them by using utlrp.sql script.
SQL> select count(*) from dba_objects where status ='INVALID';
COUNT(*)----------
20083
Note:
You must execute the steps in "Post Installation Steps” for any new database that was created by any of the following methods:
You must execute the steps in "Post Installation Steps” for any new database that was created by any of the following methods:
- Using DBCA (Database Configuration Assistant) to select a sample database (General, Data Warehouse, Transaction Processing)
- Using a script that was created by DBCA that creates a database from a sample database
- Cloning a database that was created by either of the two preceding methods, and if "Post Installation Steps” was not executed after Bundle Patch6 was applied
Finally check the status of all the services
>crsctl status resource -t
Once all is well, you can start the same steps mentioned above for the next node.
>>>Wish you all a happy patching.<<<
For any further queries on RAC and Grid Infrastructure, please don't hesitate to email me on samiora@gmail.com
Subscribe to:
Posts (Atom)